Dashboard
This is the main screen, from here you can see Frequently Viewed pages, a Call Overview and a Portal Overview. You can also search for anything in the SolSwitch by using the search field in the bottom left. In the top right, you can view your account details or make the page fullscreen. If you have a Multi-Tenant Licence, select the customer from the search bar at the top left. You can also edit that customer's details by clicking on the edit button to the right of the customer search bar.
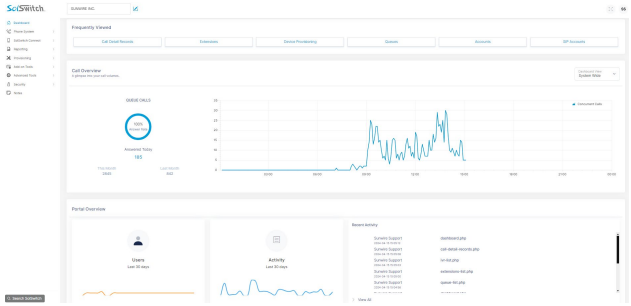
Frequently Viewed: This will show all the pages on the SolSwitch that have been viewed the most with the most popular pages starting from the left.
Call Overview: This will show the total amount of concurrent calls on the entire system or a specific customer. It also shows the answer rate of queue calls and the total number of queue calls answered.
Portal Overview: This will show how many user accounts have logged into the SolSwitch and for each action taken by a user it is recorded as an activity.
To navigate the SolSwitch you'll use the categories that are on the left side of the page. Selecting a category will expand the list of options available.
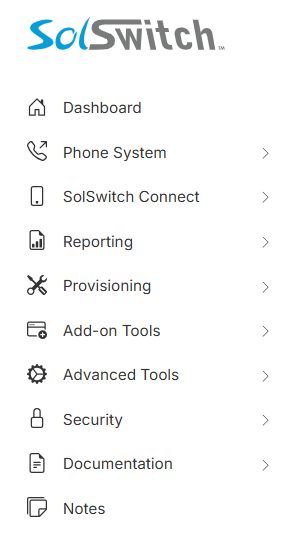
Phone System
The Phone System section is where the majority of the PBX and phone features are configured.
911 Information
This section should only be used when 911 Provider Configuration has been setup under Advanced Tools. Every DID configured will be displayed here with the ability to create, edit and delete that DIDs 911 record. The records are instantly synched with the 911 provider via their API. This information is used when an extension dials 911. The 911 call taker will see the information attached to their CID number or E911 CID number if one is specified.
API Digit Validation
API Digit Validation (DV) is similar to an IVR except that the location that the call is routed to is determined by an external API
For example, a user calls into the DV and is asked to enter their telephone number. The digits entered by the caller are sent to an external API for validation. The call is then routed to the desired location based on the response from the API.
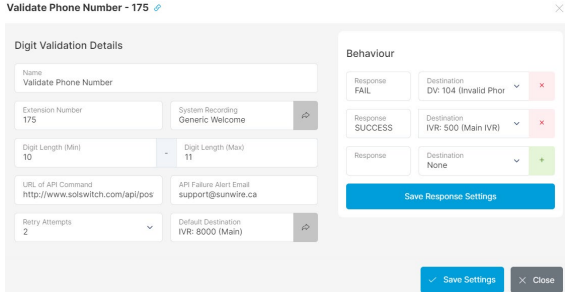
The fields to configure a DV are as follows:
- Name: Enter a name to describe the function of this DV.
- Extension Number: Enter an available extension number for your DV.
- System Recording: Select the pre-recorded System Recording you would like to use when a user enters the DV. See the System Recording section for more details on how to setup a System Recording.
- Digit Length (Min - Max): You may pre-validate the digits entered based on the length. For example, a valid phone number would be 10 to 11 digits. Therefore, for a phone number, in this section, you would enter "10 - 11". Any other digit length entered will be rejected and the user will be asked to try again until "Retry Attempts" is reached.
- URL of API Command:This is the URL that the SolSwitch will call in order to validate the digits. This URL must be prefixed by http:// or https://. The method used to call the API is POST. The following variables will be sent:
- Extension Number - Extension number of the DV.
- CDRCallID - CDR Call ID can be used to obtain additional information about the call.
- CIDNum - Caller ID number of the caller.
- CIDName - Caller ID name of the caller.
- DID - DID that the caller used to dial into the system.
- Digits - Digits that were entered which require validation.
- API Failure Alert Email:: If the API does not respond, or does not provide a valid response, send an alert to this email address. You may enter multiple email addresses by separating them with commas. See the "API Responses" section below to understand how the API should respond.
- Retry Attempts: If the user does not enter the correct digit length, this option specifies how many times to retry. This option is also used to specify how many times to retry the API if it does not respond.
- Default Destination: Enter the location where the call should be sent if the API did not respond correctly, or when the response does not match specified responses. See "API responses" below for more information.
API Responses: Once a DV is saved, a Behaviour section will appear on the right side. Use this to configure how to handle API responses.
The external API should be programmed to respond with a single word in clear text. In the Response section, you would enter all the possible words and specify the location to route each word.
For example, if we wanted to validate a phone number, we may have two responses. The first response may be "SUCCESS" which would route to the Main IVR. The second response may be "FAIL" which would route to another DV indicating that the user entered an invalid number.
All calls sent to a DV are logged in a special DV Log table. The log may be queried by using the DV log API function. See Advanced Tools > API Management for more information about how to use the SolSwitch API.
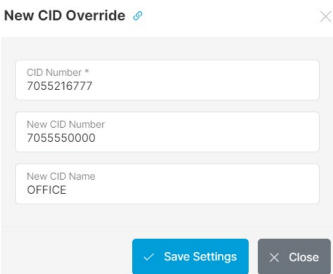
Caller ID Override
The CID Override feature allows you to override incoming caller ID information on the system. The feature works by identifying the CID Number you would like to be modified on incoming calls and assigning a new name and number to that CID information. Anytime an incoming call of the CID Number is made on the system, the SolSwitch will automatically replace the Caller ID information when it gets to the phone.
In the following example, anytime the number 7055216777 calls into the SolSwitch, whichever phone is set to ring would display: 7055550000: OFFICE.
Caller ID Routing
Caller ID Routing allows you to route incoming calls based on the CID number or the rate centre when rate centres have been configured in the Advanced Tools section under Trunks and Routing.
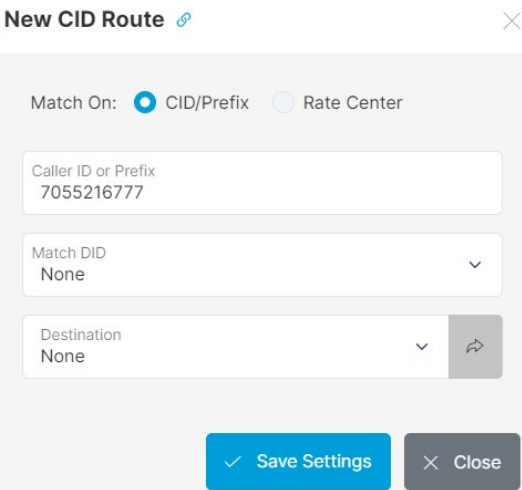
Adding a CID Route: To add a CID route, click the 'Add CID Route' button.
- CID Route Type
- CID: Creates the routing based on the incoming CID number.
- Rate Centre: Routes the call based on the Rate Centre the call is coming from.
- CID Number/Rate Centre: If the type chosen is CID, then enter the 10-digit CID number you would like to match. If the type chosen is Rate Centre, select the rate centre you would like to match from the dropdown menu.
- Match DID: This dropdown menu will display all of the existing DIDs. If you want to route a call no matter what company DID was dialled, then set this option to 'None'. Selecting a specific DID will only route the call when that particular DID is called from the CID number/Rate Centre (whichever type is chosen).
- Destination: Select the location you would like the calls to be routed to.
Blocking Calls: To block incoming calls from a specific Caller ID or Prefix, enter the name or number and set the route to None.
Caller Priority
Caller Priority allows you to modify how specific callers are handled by Queues, treating them as either higher or lower priority than other callers.
Adding a Priority: To add a Priority, click the 'Add New Priority' button.
- Caller DID: The 10 digit phone number that you would like to set the priority for.
- Priority
- High: High priority callers will always be moved to the front of the queue, in front of any waiting low or normal priority callers.
- Low: Low priority callers will always be at the back of the queue, and won't ring agents unless there are no normal or high priority callers in the queue. Note: This can potentially lead to very long wait times in busy queues.
Configuration Profiles
Configuration profiles allows creating several different accounts by pre-setting details. When creating an account, simply choose the profile and it will automatically enter the details. Types of accounts supported are below:
- Extensions
- Find-Me-Follow-Me
- Queues
- SIP Accounts
- Virtual Extensions
- Voicemail
DID Routing
This section allows you to route incoming calls for each of your DIDs. If you do not see the DID you would like to route, ensure it has been added under Advanced Tools -> Trunks and Routing -> DID Management.
To route a single DID, click on the 'Edit' button next to that particular DID or simply click on the DID. From there, choose where you would like that DID to be routed from the dropdown menu. Multiple DIDs can also have their routing modified by using the checkboxes to the left of the DID. Simply select any combination of DIDs and hit the 'Selected items' button followed by 'Edit Selected' to change the routing on all the selected DIDs.
Extensions
Extensions are numbers that can be dialled system wide to reach certain phones or other features of the phone system. The Extensions category of Phone System shows all of the extensions with SIP accounts that can be attached to devices. Extensions can be individually added using the 'Add Extension' button or they can be imported from a CSV file using the 'Import file. Once all the extensions have been created, an extension list can also be exported to CSV using the 'Export' button.
Importing Extensions from CSV: To mass import extensions, along with voicemail and SIP accounts. Simply download the CSV template from the Extension CSV Import page. Fill it out accordingly and upload it back to the system. Below is a list of each column of the CSV file and what information is held in the field.
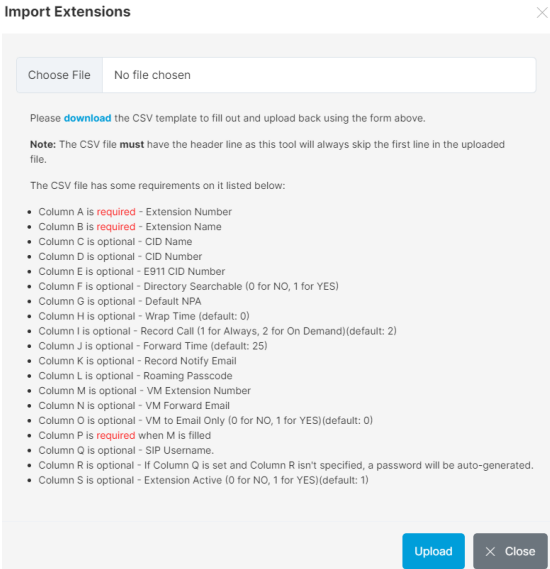
Extension Import CSV fields:
- Extension Number: The number to dial in order to access the extension.
- Extension Name: Enter the name of the extension. This name will be used to search the extensions through the directory.
- CID Name: Enter the caller ID name that will be displayed on external calls.
- CID Num: Enter the caller ID number that will be displayed on external calls.
- E911 CID Num: Enter the caller ID number that will be displayed on 911 calls. This should be the number your desired 911 record to use for this extension is configured on.
- Directory Searchable: Set to 0 for NO, 1 for YES. Enabling this will allow callers to find this extension when performing a search using the directory feature.
- Default NPA: Default area code that will be prepended to calls this extension makes when no area code is provided.
- Wrap Time: Default is 0. After a call is hung up from this extension, no calls will ring this extension until the Wrap time has elapsed. Wrap time is specified in seconds.
- Record Call: Set to 1 for Always, 2 for On Demand. Default is 2. Always will record all calls on that extension whereas On Demand will require the user to press the 'Record' button or #1 during a call.
- Forward Time: Default is 25. Time before forwarding unanswered calls to this extension.
- Record Notify Email: If a call is recorded, a recording link will be sent to the email address specified here.
- Roaming Passcode: Entering a passcode in this field allows this extension to be a roaming extension with the ability to log in and out of that extension from any SIP device. If no pass code is entered, the extension must be logged in manually by specifying its SIP device.
- VM Extension Number: Enter a voicemail extension number here to create a voicemail box for your extension with this number.
- VM Forward Email: If voicemail to email is desired for this voicemail box, enter the email you'd like to use here and voicemails will be sent to this email address.
- VM to Email Only: If enabled, voicemails will only be emailed to the VM forward email and not saved in the extensions voicemail box.
- VM Passcode: Enter a 3-7 digit number to use as the voicemail passcode for the voicemail box.
- SIP Username: Enter a SIP Username to generate a SIP Device that this extension will use.
- SIP Password: Enter the password for the SIP device to use. The password must be at least 8 characters long, include at least one number, lowercase letter, and capital letter.
- Extension Active: 0 for NO, 1 for Yes. Default is 1. Choose whether the extension will be active or inactive.
- NAT: 0 for NO, 1 for YES. Whether or not the SIP device will be behind NAT. If enabled, the SolSwitch will always respond to the source IP address and port of the received SIP packets.
- Device Template: Use this option to automatically generate a device in Device Provisioning for the extension.
- You must first create a device in Device Provisioning that will be used as a template.
- You can choose a feature profile and directory profile as well as other option that will be used to create the new device.
- Put the name you'd like to use for the template in the device's MAC address field (e.g. "Agent-Template").
- Then use the name of the template you'd like to use for your extension in this column. (This can be done multiple times for devices with different configurations.)
Exporting Extensions to CSV: There is an option to export all existing extensions located on the list extensions page, which allows a user to import the CSV to another system or customer.
Additional information on what each of these fields does can be found below.
Note: The CSV file must have the header line. The tool will always skip the first line of the CSV file.
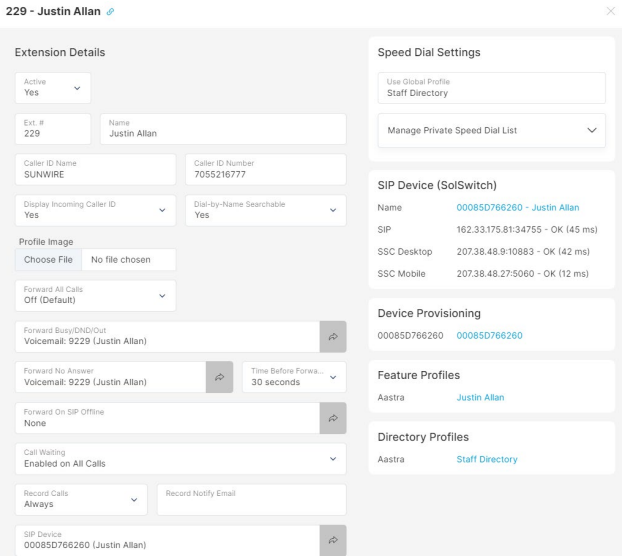
Adding Individual Extensions: Individual extensions can be added using the 'Add Extension' button. Below is a description of each field asked for on the Edit Extension page as well as a screenshot of what a completed extension may look like.
Extension Details:
- Extension Active: Choose whether or not the extension is active. If an extension is not active, it cannot be dialled or dial out.
- Extension Profiles: If configuration profiles exist for extensions, choose a profile from here to automatically fill in details.
- Extension Number: The number to dial in order to access the extension.
- Name: Enter the name of the extension. This name will be used to search the extensions through the directory.
- Caller ID Name: Enter the caller ID name that will be displayed on external calls.
- Caller ID Number: Enter the caller ID number that will be displayed on external calls.
- Display Incoming Caller ID: Specifies whether or not caller ID is displayed on incoming calls.
- Dial-by-Name Searchable: Enabling this will allow callers to find this extension when performing a search using the directory feature.
- Profile Image: Import an image for other Mitel phones to see when you call them internally.
- Forward All Calls: You can choose to forward all incoming calls to a specific internal location or any external number. This can also be done from the phone itself using the appropriate * code.
- Forward No Answer, Offline, Busy: Where to forward calls if the extension is busy, on Do Not Disturb, logged out, when the call isn't answered, or when the SIP account is offline.
- Advanced Forwarding Options: When enabled, you can set different forwarding destinations for internal and external calls under each condition (No Answer, Busy/DND/Out, On SIP Offline).
- Time before forwarding: Specify the number of seconds before forwarding to the Forward No Answer location. One ring typically takes 5 seconds.
- Call Waiting: If enabled, this extension will be able to receive new calls while on an existing call.
- Record Calls: Can either be set to On Demand or Always. Always will record all calls on that extension whereas On Demand will require the user to press the 'Record' button or #1 during a call.
- Record Notify Email: If a call is recorded, a copy of the recording will be sent to the email address specified here.
- Transcribe Calls: A toggle that shows more options for transcriptions. The Recording option sends the recording in the email. Transcribe adds the full transcription to the email. Summary adds a brief summary of the transcription.
- SIP Device: The device to attach this extension to. This will not always be required if an extension is set to be a roaming extension.
- Parking Lot Group: Select which Parking Lot Group this extension should use for Parking calls.
- Use Skill Based Routing: This option will only appear when skills have been configured, and allows skills to be added to the extension. For more information, refer to Skill Based Routing.
Advanced Options:
- Language: Default language to use when playing system messages for calls from this extension. An extension will show (en) or (fr) if the extension has selected English or French.
- Wrap time: After a call is hung up from this extension, no calls will ring this extension until the Wrap time has elapsed. Wrap time is specified in seconds.
- Privacy Enabled: If enabled, this extension cannot be monitored by extensions that have Call Monitoring turned on. Also, all recorded calls will not be made public in the Call Detail Records report; they will only be emailed to the address specified in the Record Notify Email field.
- Distinctive Ring Direct Calls: This allows the extension to ring differently if a direct call is received.
- E911 Caller ID Number: If 911 Information has been configured, all calls made to 911 will show the 911 provider the number specified in this field.
- CID Internal Override: Use this field to override caller ID numbers on internal calls. If this field is left blank, the extension number will be used for the caller ID number on internal calls.
- Make CID Private: Enabling this will cause calls placed from the extension to be private/anonymous.
- Always use Caller ID: By default, a route group can override caller ID. Enabling this option will ensure that the caller ID specified in this extension will always be displayed.
- Route Group: Specify the route group to use on this extension. Route Groups are setup under Trunks and Routing in the Advanced Tools menu
- Default NPA: The default 3-digit area code. This area code will be prefixed on all 7-digit calls.
- LD Pass code: This pass code will be required to place any long-distance call. Password requirements are configured in Route Group settings. If no pass code is entered, this extension will have the ability to place long-distance calls.
- Join Message: You can select a System Recording from this list and callers will hear the sound upon reaching the extension.
- Time Rule: Select a specific time rule if this extension is only available during certain times. Time Rules are configured under the Phone System category.
- Closed Destination: If a time rule is set and its status is closed, calls will be sent to the location specified here.
- Route No Ans. Transfers: When this extension initiates a call transfer, the call will be routed to this location if the destination of the transfer is busy or does not answer. This option overrides the Forward Busy and Forward No Answer settings.
- Block Internal Calling will prevent the extension from calling any other internal extensions on the same customer.
- Paused Presence will show the extension as busy on other phones when paused.
- Roaming Pass Code: Entering a passcode in this field allows this extension to be a roaming extension with the ability to log in and out of that extension from any SIP device. If no pass code is entered, the extension must be logged in manually by specifying its SIP device
- Can Monitor Calls: This option should only be enabled for managers and will allow this extension to monitor the calls of others. Single Call will monitor a call if one is active, then disconnect when the call has ended. Continuous Monitoring will continue to monitor incoming calls until the user decides to stop monitoring.
Multi-Channel Queuing: Multi-Channel Queueing is the ability for chats and phone calls from multiple platforms to be handled all together in a streamlined central location. Phone calls will flow as they always have while the addition of chats from multiple platforms will also now ring extensions on phones and allow chats to be managed in the Webchat section of Phone Settings.
SMS: Short Message Service (SMS) is a text messaging service component of most telephone, Internet and mobile device systems. It uses standardized communication protocols that let mobile phones exchange short text messages, typically transmitted over cellular networks. They have a 160-character limit and communications longer than 160 characters are split into multiple SMS segments.
- Enabled: Once enabled you'll be able to configure Multi-Channel Queuing for SMS.
- Fill Load: When enabled, queued items with lower load will skip ahead of higher load items in the queue to fill the available load for agents. When disabled, queued items will only be assigned in the order they are received in the queue.
- Response Timeout: The length of time in minutes to wait for an assigned agent to respond to the initial message before marking a chat as inactive. Set to 0 for unlimited.
- Chat Timeout: The length of time in minutes to wait between messages before marking a chat as inactive. Set to 0 for unlimited.
- Load: Load determines how many of these types of tasks an agent can handle at once. Low: up to 5 at once. Medium: Up to 3 at once. High: Only 1 at a time.
- Queue Closed Message: A message to be displayed if the chat is started when the time rule on the extension is closed. All chats will be deferred until the extension opens again.
- Call Queue: Decides whether or not to call the extension. Agents will be expected to pull new chats from the webchat page if this is set to No.
- Script: Execute a script a message comes into the MCQ.
- Notification Recording: This is the recording that will play when an agent answers a call notifying them that they have been assigned the chat.
- Caller ID: to be used when calling an agent to notify of a newly assigned call.
- SMS DID: Select the SMS DID to receive and send messages from.
Extension Speed-Dial Settings
Extensions -Dial Keys can be added and managed from your telephone set or through the portal. Speed dials can be from 1 - 999. All speed dials are preceded by '0'. Therefore, to call speed dial 1, you would simply dial: 01. Below are instructions on setting your speed dial through the phone as well as through the web-portal.
Speed Dial Settings (through phone)
- Configuring your speed dial settings is simple:
- If you select a speed dial which already has an entry, you will be given three dial options.
1. Dial: 00.
2. Enter the speed dial number to edit followed by the pound key.
3. Enter the phone number to be assigned to this speed dial followed by the pound key.
4. You will hear a recording stating: "Speed Dial Saved."
5. You will then be brought back to the main menu to add more speed dials.
1. Edit the existing entry.
2. Delete the existing entry.
3. Playback the number assigned to the existing entry.
Speed Dial Settings (through web-portal)
- Use Global Profile: This dropdown menu is a list of existing directory profiles that can be used for speed dial settings. For more on directory profiles, see the Provisioning -> Directory Profiles section.
- Private List: Here is where you can manage your private speed dial list. You can use a global profile in conjunction with the private list. If there are any duplicate entries between the two, the private list will take priority. Ensure to always add a '0' before your speed dial. Adding a 'w' will wait for a pickup before entering the next digits.

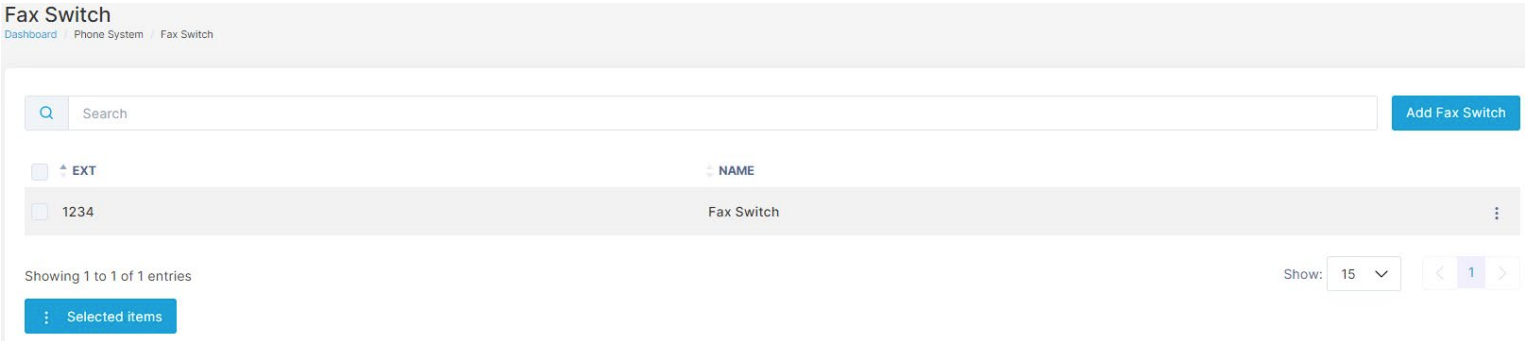
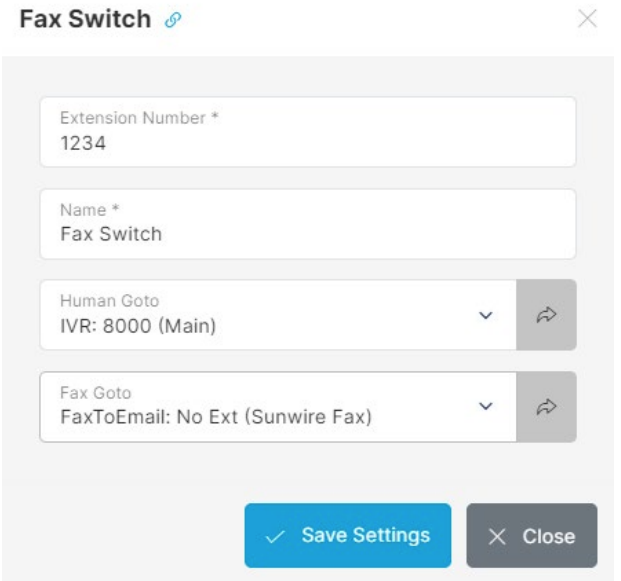
Fax Switch
The Fax Switch feature is for a DID that shares a Fax and a Phone; the fax feature will check and route according to whether the incoming caller is a phone or a fax. Assign a Fax extension, a phone extension, and an extension for the Fax switch, then apply it to the DID in question.
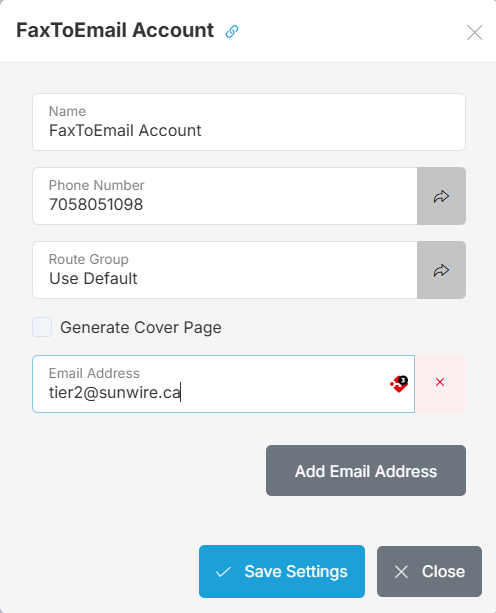
Fax to Email
Fax to Email is a feature where incoming faxes to a specified number will be converted to PDF and emailed to a particular address or multiple addresses. In order to add a Fax-to-Email, there must be an unassigned DID available. If Generate Cover Page is enabled, any Outbound Faxes sent from this Fax-To-Email account will automatically generate a cover page including details of the From DID, To DID, Number of Pages, and the Date.
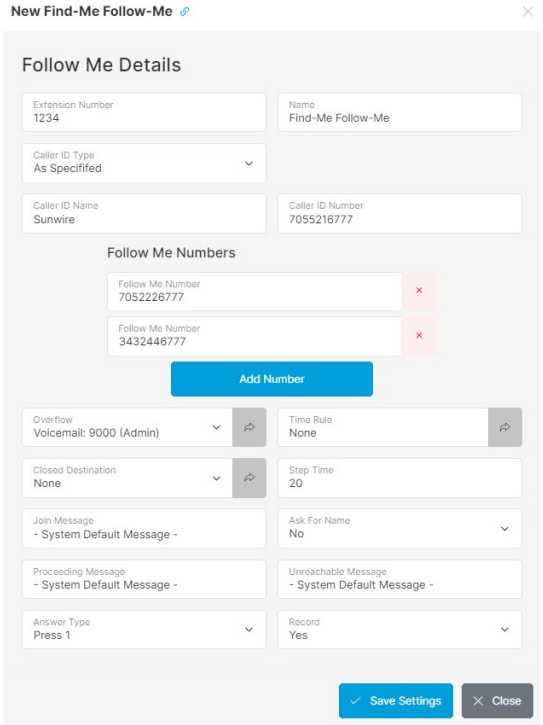
Find-Me Follow-Me
The SolSwitch can look for a user by calling a succession of extensions or numbers while keeping the incoming call on hold. You can have as many find-me numbers as you like. To add a Find-Me Follow-Me route, click the 'Add New' button. When a Find-Me number is called, the user is given the option to accept or reject the call. Rejecting immediately goes to the next number in the list or the overflow (whichever is set to be next).
- FMFM Profiles: If configuration profiles exist for FMFM, choose a profile from here to automatically fill in details.
- Extension Number: Specify the Find-Me Follow-Me's extension number.
- Name: Enter the name you would like to use for the Find-Me Follow-Me. This is for reference purposes only.
- Caller ID Type: Check whether you would like the Type to be Passthrough as is or Specified below.
- Caller ID Name: Enter a name to display when dialling external numbers.
- Caller ID Number: Enter a number to display when dialling external numbers.
- Follow Me Numbers: The numbers that should be called. Multiple numbers can be added to this field and they will all sequentially be called in the order that they appear.
- Overflow: If none of the attempted numbers were answered, the Find-Me Follow-Me will overflow to the location specified here.
- Time Rule: Set hours of operation for the Find-Me Follow-Me.
- Closed Destination: If the time rule is closed this option will send calls to the specified destination.
- Step Time: The amount of time, in seconds, before attempting the next Find-Me number in the list.
- Join Message: Whether or not to playback the incoming status message before the system starts the Follow-Me steps. This message reads the following:
- "The person you are calling is unavailable. I will try to locate them for you. Please hold while I try to locate the person you are calling."
- Ask for Name: If set to Yes, the caller will be asked to record their name so that it can be announced to the recipient of each of the Follow-Me numbers when answered.
- Proceeding Message: This option allows for a message to play while a calling is being placed.
- Unreachable Message: If all of the Follow-Me steps have been exhausted or the call recipient has selected not to be reachable, an unreachable status message will be played back to the caller.
- Answer Type: If set to Press 1, when a call is answered by the Follow Me Number they will have to press 1 to accept the call or 2 to reject it. If set to Auto, the call is immediately connected when answered.
- Record: If checked, the system will automatically record the call if it is answered.
- Routing Alerts: If emails or a phone number is provided, alerts will be sent when this FM-FM becomes active in scheduled routing. Multiple emails can be provided seperated by commas.
Hospitality
The SolSwitch Hospitality system provides tools for managing many phones distributed in guest rooms or similar environments.
Access to Hospitality features requires additional licensing. Please contact your system administrator for information about licensing options.
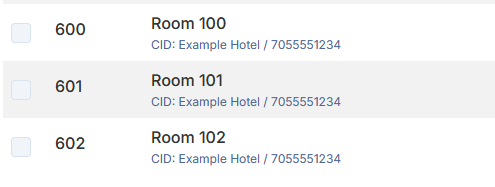
To add a phone's extension to the hospitality system, the extension must be named "Room" or "RM" followed by the room number for the extension. Ex:
Hospitality Settings
The Hospitality Settings page provides configuration options for the functionality of the system. The following options are available:
- Local Route: This is the route group that hospitality extensions will use by default when placing calls, generally one that has been configured to only allow local calling.
- Long Distance Route: This route group will be used by hospitality extensions that have had "Allow Long Distance" toggled on through the Hospitality Dashboard.
- Note: Both routing options can only be configured by system administrators with access to managing route groups.
- Wake Up Call: The message selected here will be used when placing wake up calls to extensions. Wake Up Calls can be scheduled through the Hospitality Dashboard.
- Receive Toll Receipts: When enabled, receipts will be generated for any calls which incur a toll based on the Toll Destinations configured on this page.
- Receipt Method: When Toll Receipts are enabled, this option configures how receipts should be sent. Receipts can either be sent to an email address or printed directly to a receipt printer using the IP address of the printer.
- Toll Destinations: A CSV file can be uploaded here to set the toll prices for calls to various areas based on the prefix of the destination number. Tolls are billed in 6 second increments with a minimum time of 30 seconds.
- Export CSV: Exports the current prefix list, or a blank template file if no prefixes have been added.
- Replace Existing Prefixes: When toggled on the current list of prefixes will be cleared out before uploading new prefixes, otherwise the newly uploaded prefixes will just add to the existing list.
Hospitality Dashboard
The Hospitality Dashboard provides an overview of all configured room extensions and their current settings.
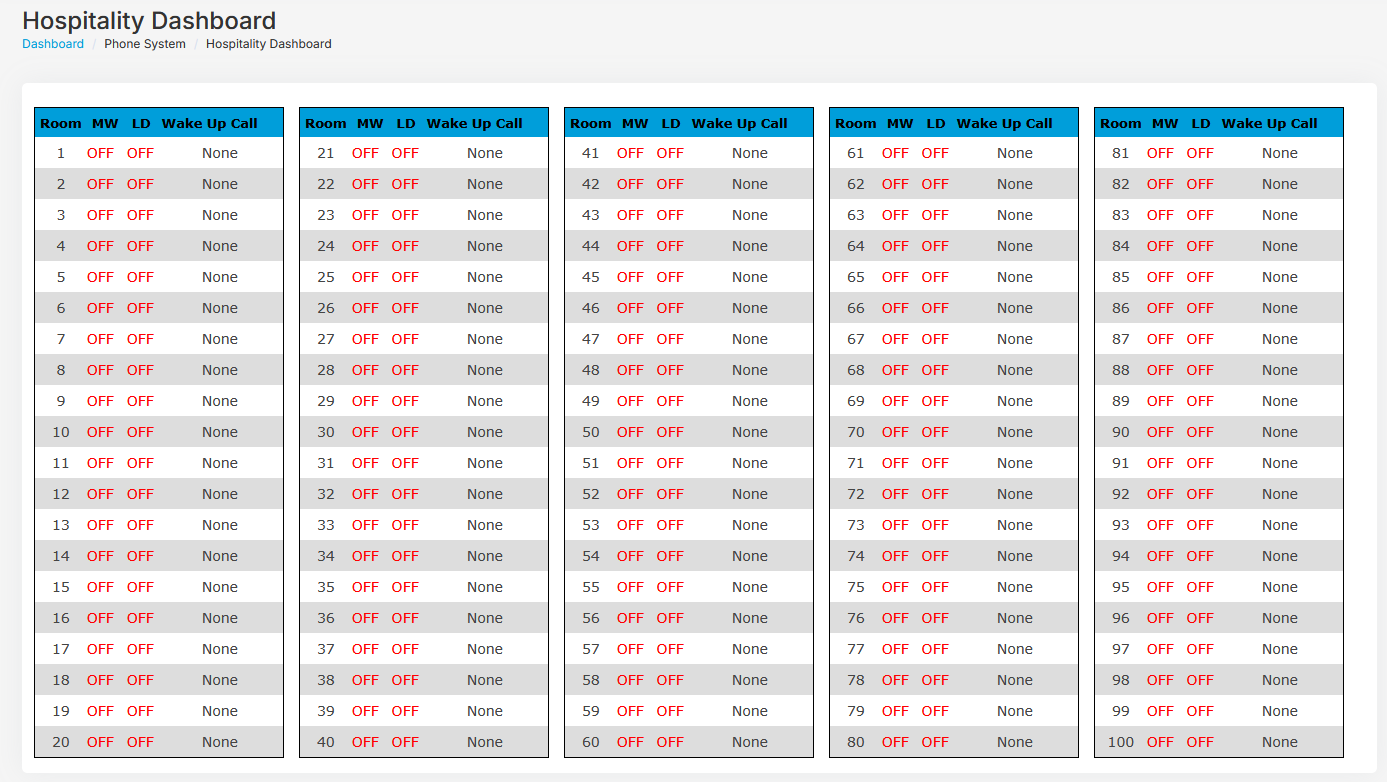
Clicking on one of the rooms will provide the option to modify the following settings:
- Wake Up Call: When set, an automated call will be placed to this room at the specified time. When the call is answered it will play the pre-recorded message configured in the system settings.
- Message Waiting: When toggled on, this will turn on the "Message Waiting Indicator" on this phone to indicate that the room has a pending message.
- Allow Long Distance: When toggled on, this phone will be able to place long distance calls. The specific routing allowed by the local or long distance calling is controlled by the route groups configured in the system settings.
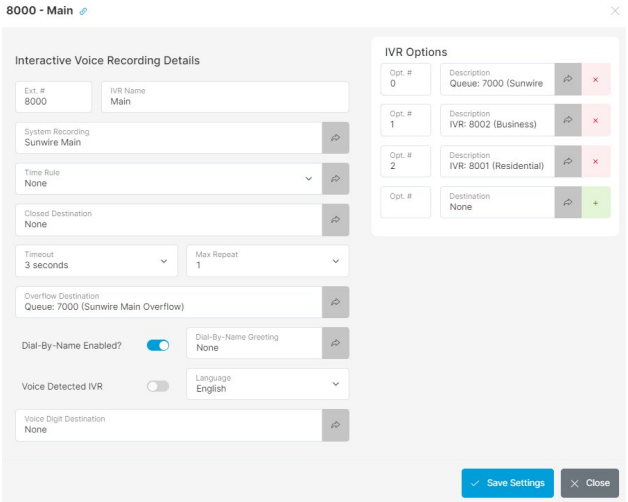
Interactive Voice Response (IVR)
IVR, also known as auto attendant, is a computerized phone system that enables a person, typically a telephone caller, to make a selection from a voice menu. The selection is made using keypad entries. Dialling an existing extension at any point while in the IVR will send the caller to that particular extension.
The phone system plays pre-recorded voice messages and the person on the call typically presses a series of digits on the telephone keypad to select the correct option associated with the voice prompt. IVRs will often point to each other to drill down into a menu. When creating a new IVR, follow the instructions below.
- Extension Number: Enter an available extension number for your IVR.
- Name: Enter a name you wish to associate with your IVR for reference purposes (i.e. Daytime IVR, Closed IVR, French IVR, etc).
- System Recording: Select the pre-recorded System Recording you would like to use when people enter the IVR. See the System Recording section for more details on how to setup a System Recording.
- Time Rule: Each IVR can be set to have its own time rule to route calls based on whether or not a Time Rule is open or closed.
- Closed Destination: The call will be sent to this location if a time rule is specified and that rule is closed. If there is no time rule, this field should be set to 'None'.
- Timeout: The length of time before your message is replayed or the time before the caller is sent to the Overflow Destination.
- Max Repeat: If no available option is selected by the caller, the System Recording will be replayed this many times on the same interval that is specified in the Timeout field. Once the message has been repeated the specified number of times, it then goes to the Overflow Destination.
- Overflow Destination: If a caller does not select any of the available options, the call will be sent to the overflow destination following the timeout time.
- Dial-By-Name: This will allow users to press the pound (#) key at any time during the IVR to access the company directory and allow people to search for a person by dialling any combination within their name.
- Dial-By-Name Greeting: controls the greeting/message that users will hear when accessing the dial-by-name directory.
- Language: This language controls the voice recognition language, if 'Voice Detected IVR' is enabled, as well as any system messages including the Dial-by-Name Directory. IVRs will show (en) or (fr) if English or French is the selected language.
On the right, you'll see the IVR Options menu. This is used to enter dial options and route calls based on the option selected by the caller. Valid options are 0 to 99 only; excluding the parking lots. Once all these options have been filled out, hit the 'Save Settings' button.
Voice Detected IVR
If set to yes, the IVR will listen for voice options instead of DTMF tones once the system recording has played. This can only be changed if there are no menu options already added. Type the word you want the system to listen for inside the IVR Option.
Note: This system does not guarantee 100% accuracy. As such similar sounding works may result in people matching on the wrong option.
- Voice Digit Destination: When Voice Detected IVR is enabled if DTMF is detected before the end of the IVR recording the system will redirect the call to this destination.
Note: If Dial-By-Name is enabled the # DTMF will direct to the Dial-By-Name directory instead.
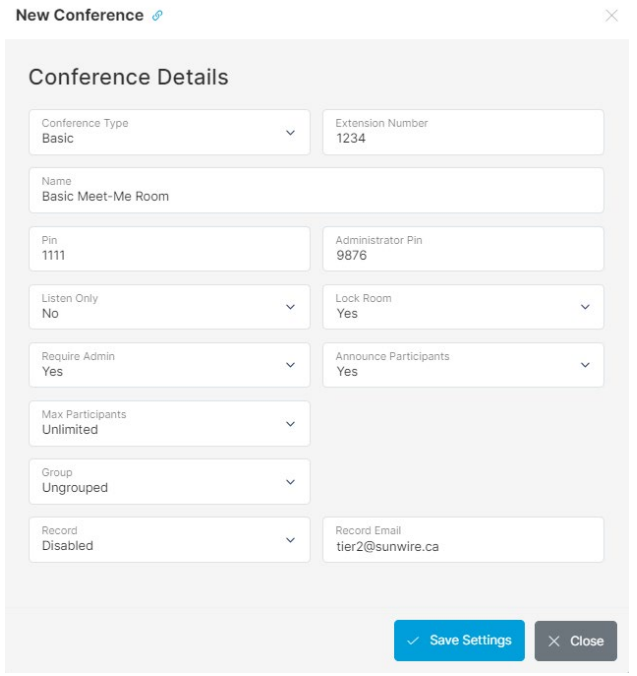
Meet-Me Conference (Basic)
This feature allows you to create a conference room which allows multiple people to call in and join a phone meeting. People can join a conference room by dialling the extension associated with the room. A DID can also be routed directly to a Meet-Me room to avoid having callers enter an extension number. Meet-Me Rooms have the option of being grouped together. Pointing a DID to a Meet-Me Room that is part of a group will allow you to join the desired room by simply entering the user or administrator PIN for that room. A basic Meet-Me room allows anyone to enter with the same pass code (with the exception of the administrator). Meet-Me rooms that are part of a group will require PINs to be unique throughout all rooms in that group. Anytime a new PIN is saved in any room in any group, a check is performed to prevent conflicts. To create a Basic Meet-Me Room, click the 'Add Conference' button and select 'Basic' as the Conference Type.
- Extension Number: Enter an available extension number for your room.
- Name: Enter a name you wish to associate with your meet-me room for reference purposes.
- Pin: Enter a pin that users must enter to join the conference.
- Administrator Pin: Anyone who logs into the conference using the Administrator Pin will have additional permissions such as muting users, removing users and locking the room.
- Listen Only: Listen only mutes all regular users so that only the administrators may talk. This can also be done by the administrator using *96 in a meet-me room to mute all participants and *97 to un-mute all the participants.
- Lock Room: If checked, this will lock the meet-me room so that no other participants may enter or join.
- Require Admin: This option will not allow any meet-me room to begin until an administrator has joined. Users waiting for the administrator will hear music on hold.
- Announce Participants: If selected, all users who enter a Meet-Me Room will be prompted to record their name followed by the # key. When this person enters the meet-me room, all others in the meet-me room will hear a recording stating: "[Name] has joined."
- Max Participants: Specify a limit of participants to have in the Meet-Me Room.
- Group: When a DID is pointing to a Meet-Me Room that is part of a group, users can join the proper Meet-Me Room simply by entering the unique user or administrator PIN for that group. Grouping allows for multiple Meet-Me Rooms to have the same PIN as long as they are in different groups. Grouping options are as follows:
- Ungrouped: Default; the meet-me room does not belong to any group.
- New Group: If you wish to create a new group for that meet-me room to belong to, select this option and a text-box will appear allowing you to create a Group name.
- Select from Existing Groups: Any previously created group will show up. If the meet-me room is to belong to an existing group, simply select it from the list.
- Record: Meet-Me Rooms can be recorded in their entirety. There are three options for this feature:
- Disabled: No recording will occur on this call.
- Once: Will only record 1 occurrence of the meet-me room. If the meet-me room is currently in progress, only that call will be recorded. For any calls thereafter, the record option will be changed to 'Disabled'. If no call is currently in progress, then only the next call to take place will be recorded.
- Always: All calls in this meet-me room will be recorded.
- Record Email: If the record option above is enabled the email addresses entered here will receive a notification message with an encrypted download link to the call recording of the entire MeetMe room. Multiple emails can be added by separating them with a comma. Transcriptions will also be sent to this email.
- Transcribe Conference: When enabled, the conference call will be transcribed and emailed to the email set in Record Email for the conference. There are three options:
- Recording: Sends the audio recording file in the email instead of just a link to download it.
- Transcribe: Generates and includes the full transcript of the call in the email. It also provides a confidence percentage in the transcription.
- Summary: Generates an AI summary of the transcript and appends it to the email. This only works with Priority Processing.
- Processing Type: Determines how the transcription is processed. There are two options:
- Priority: Processes the transcription immediately. This is billed at the priority rate which is more expensive.
- Dynamic: Sends the transcription as a batch job which takes longer to be processed and the transcription is emailed when it is finished. This is a cheaper but slower option.
*Groups will be removed from the existing group's list when they no longer hold any Meet-Me Rooms.
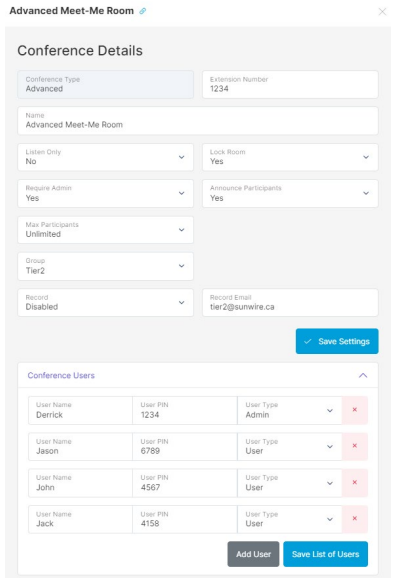
Meet-Me Conference (Advanced)
This feature allows you to create a conference room which allows multiple people to call in and join a phone meeting. Advanced allows users and administrators to have their own pins if they choose to. To create an Advanced Meet-Me Room, click the 'Add Conference' button and select 'Advanced' as the Conference Type. Advanced rooms are setup similarly to Basic rooms although Pins are not specified until after the room is created. Therefore, to configure Pins in an Advanced Meet-Me Room, users must enter all the necessary information and select the 'Save Settings' button. Once this is done, a new table will be visible where conference users can be specified as well as their Pin and permission level.
Meet-Me Conference (Feature Codes)
There are feature codes available for Meet-Me conferences. These options include mute/un-mute options, lock/unlock options, participant count options and record options. Please consult the Telephone Feature Codes section of this manual under 'Call Features' for a complete list.
Miscellaneous Settings
Operator Destination: When a device from inside the phone system dials '0', this is where the call will be routed. This is useful for hospitality industries where users dial 0 to reach an internal operator.
911 Notify Extension: This setting allows you to configure the system so that if anyone dials 911, a notification is sent out to a destination extension that's set here which announces a custom recording from the System Recordings section.
911 Notify Message ID: Select a system recording to be used when notifying the extension. The recording would typically be something like: "911 was dialled from extension number:" The custom recording is followed by the extension number that dialled 911.
Multichannel Messaging
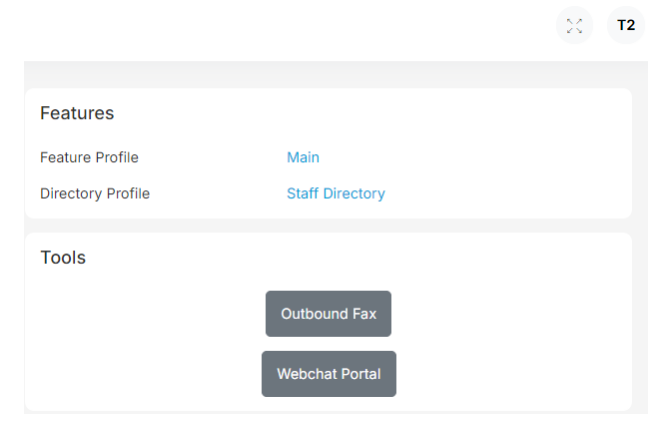
When Multi-Channel Queuing is enabled on a queue, all of the chats received by the queue will show up in this section. Sys Admins or users with permission to access Multichannel Messaging can do so from Multichannel Messaging under Phone Settings. Extension only users would access Webchat on their extension by clicking on 'Multichannel Messaging Portal'.
Once in the Multichannel Messaging portal extension users will see all of the chats assigned to them and any chats that are in MCQ queues that they are a member of. When an MCQ chat is received it will show up as a new chat on the left hand side. If the chat is in bold, the chat is still new and has not been read yet. Sys Admin users or others with access will be able to see all of the chats and all of the queues that have MCQ enabled.
On the left side, you'll see all of the chats and you can filter chats based on what queue they are in or if they are assigned to you. You can also search all of the chats for text that matches the label or the name/number of the person. Label names can be set in the top right to better identify who the contact is.
The list of chats will be sorted to show open and unanswered chats at the top of the list, and then will sort by the time of the last message in the chat.
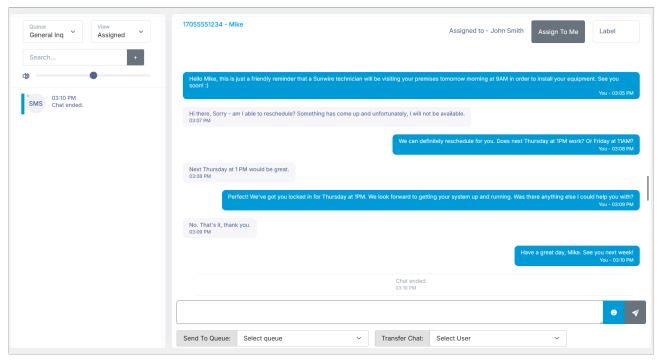
At the bottom of the chat, you can transfer the chat to another user to assign it to them or send the chat to a queue for someone to pick it up.
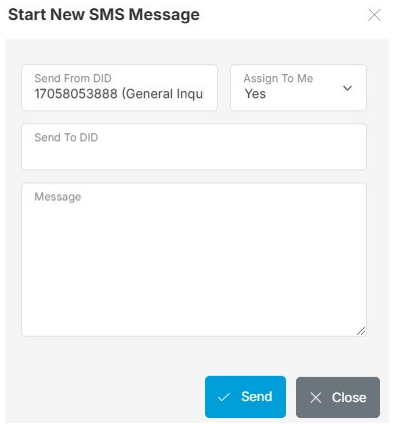
To initiate a new outgoing SMS message, click on the '+' button beside the search bar. Select the DID you wish to send from, the DID you want to send to as well as the message to send out. You also have the option of automatically assigning the chat to yourself.
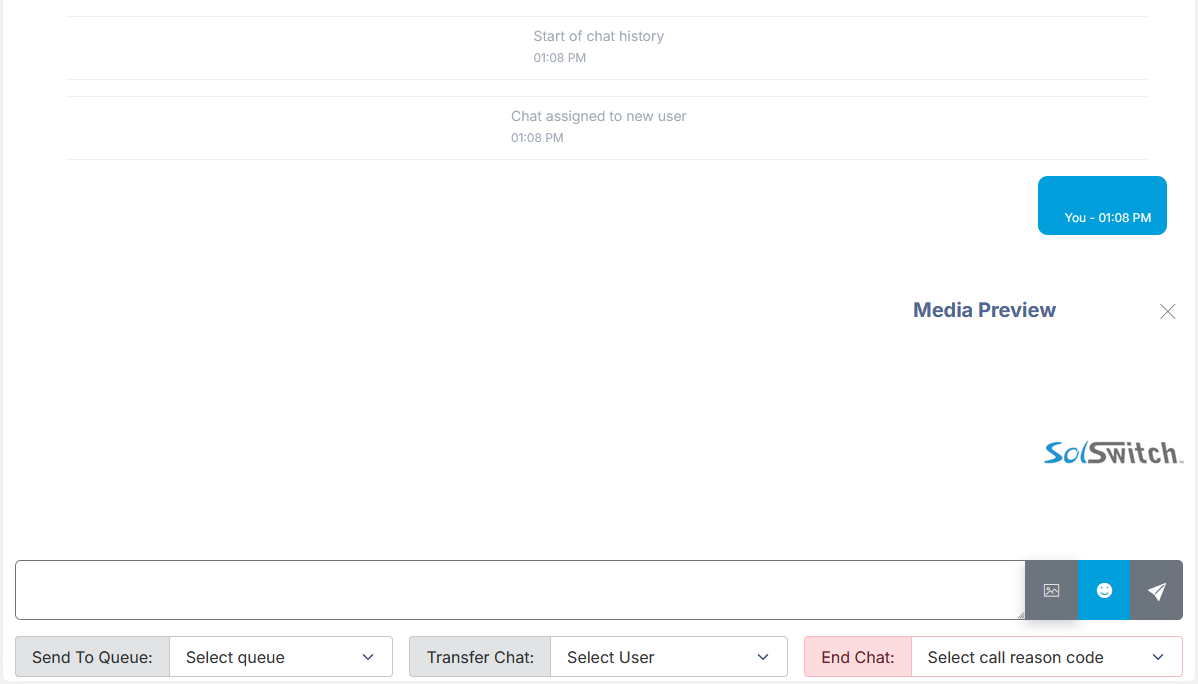
SMS Webchat supports images and videos (MMS). If the DID associated with the webchat is configured to use MMS, an upload button will be available. When a video or image is selected, a preview window will appear. Sending will take a few seconds.
Music On Hold
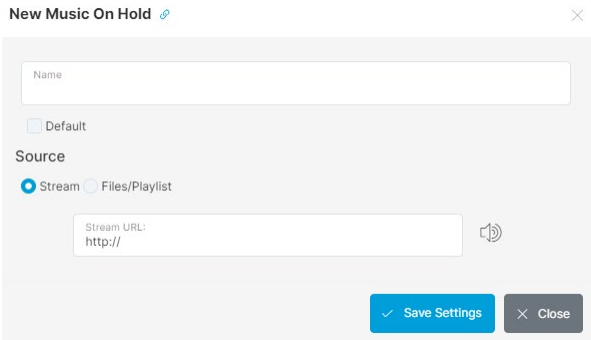
Music on Hold (MoH) is the music that callers will hear when they are put on hold or parked. The three MoH options are the default royalty-free music, the ability to select your own stream from the internet as well as the option to upload a custom playlist supporting WAV or MP3 files. You can have multiple Music on Hold files in the event that different types of music should be played at different times. Click the 'Add New MoH' button to create a new music on hold.
- Name: For reference purposes.
- Default: If checked, this class will be used as the default unless otherwise specified (in a queue, extension, etc.)
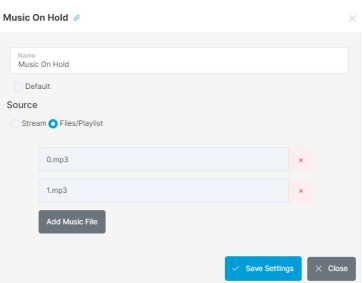
- Source: Select whether this class will be a stream or a playlist.
Adding a Music Stream: If the source is set to 'Stream', you will have the ability to enter a URL as well as listen to the stream to ensure its functionality. Once this is done, hit the 'Save Settings' button.
Adding a Music Playlist: If the source is set to 'Files/Playlist', choose the file you with to upload and his 'Save Settings'. You will have the ability to upload files in WAV or MP3 format. Only one file can be uploaded at a time. If you wish to upload additional files edit the Music On Hold again and add another file.
Paging Groups
Paging Groups can be set up to target specific persons or extension within the phone system. For example, if a caller is looking for a sales representative, but no one person in particular, a page can be sent to the entire sales team. Paging groups are often tied to a paging system. Add a paging group by clicking the 'Add Paging Group' button. Paging is only supported by desk phones.
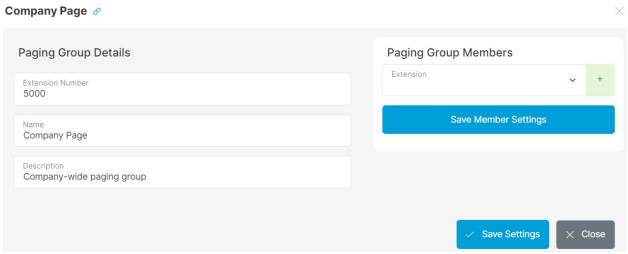
Adding a Paging Group: Before adding members to a paging group, it must first be setup and saved by entering the following information.
- Extension Number: The extension number to dial to activate that paging group.
- Name: For reference purposes.
- Description: For reference purposes.
Once the paging group has been saved, you will have the ability to add members to the group. Members are added by selecting their extension from the dropdown menu and clicking the '+' button then saving.
Parking Lots
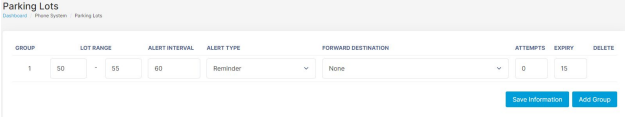
This section is where you configure the extension ranges that you would like reserved as parking lot groups.
- Parking Lot Range: Set the range of allowed parking lots (recommended start: 50, cannot be above 99).
- Alert Interval: The length of time in seconds before an agent is reminded they have a parked call still waiting.
- Reminder Type: Sets the reminder type.
- Reminder: The phone will simply remind you that a call is parked in a specific parking lot.
- Ring Back/Answer: The phone will ring back to you and give you the option to answer the parked call.
- Forward Destination: After the specified number of reminder attempts, the parked call will be forwarded to this destination.
- Attempts: Specify the number of attempts before a call will be forwarded. This option will only work with the 'Reminder' Alert Type.
- Expiry Time: This option allows you to lock a parking lot for a set amount of time. To allow parking and picking up parks without the parking lot shifting to a new parking lot.
Queues
A phone queue allows calls to sit on hold until a phone agent is ready to handle the call. Queues follow rules for inbound calls and are used as a way to handle incoming calls. Many options are made available so that incoming calls are handled exactly as you need them. Queues can easily be manipulated to suit any system and ensure a better chance of never missing a call.
To create a new queue, select the 'Add Queue' button from the Queue List. Queue forwarding is also available using the * code *104 followed by the extension number to be forwarded to. Following is a list of details and their functionality associated with a queue as well as an image of the page layout.
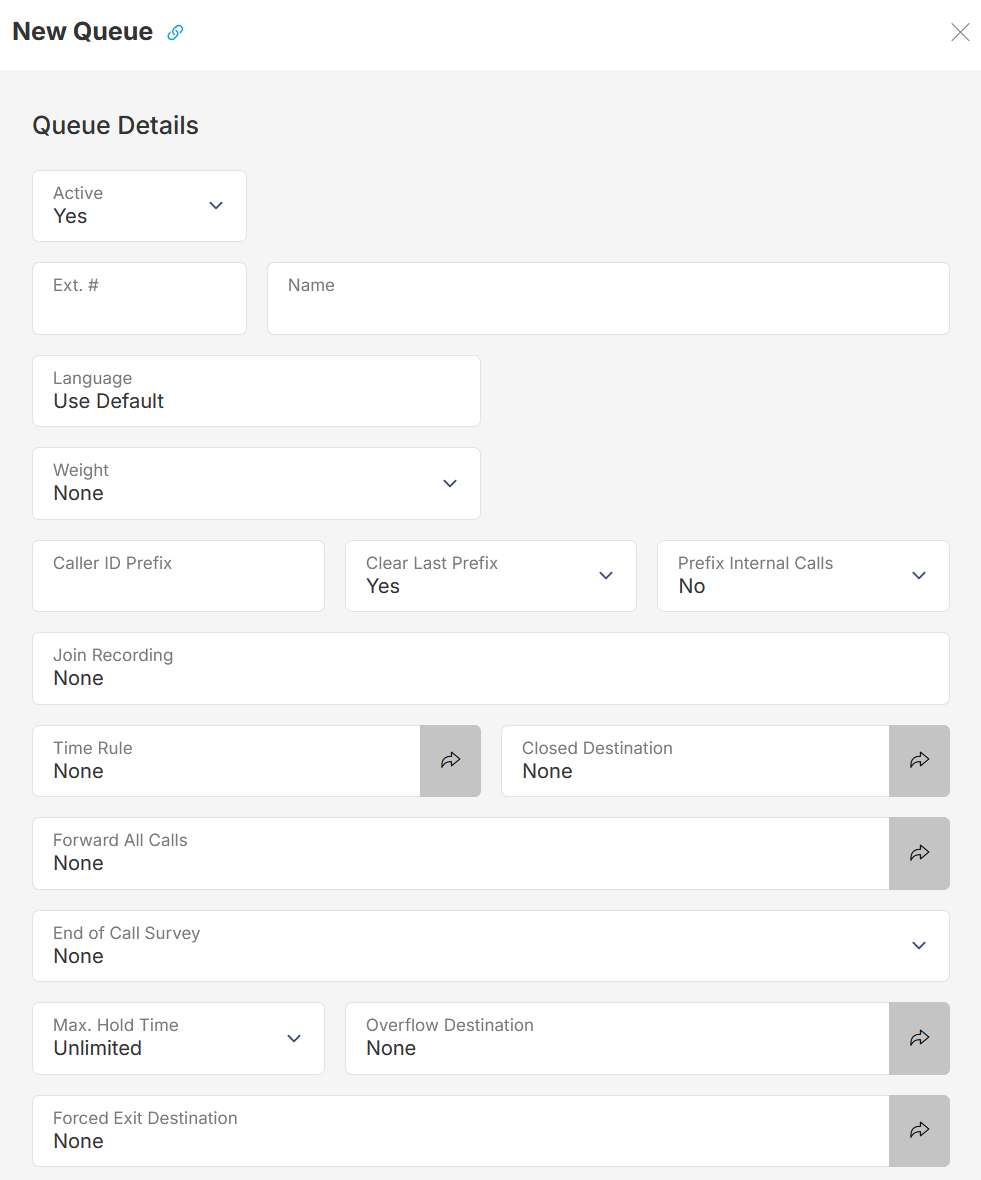
Creating a Queue:
- Active: Choose whether or not the queue is active. If the queue is not active, it cannot be dialled.
- Queue Profiles: If configuration profiles exist for queues, choose a profile from here to automatically fill in details.
- Extension Number: Enter an available extension number for your queue.
- Name: Enter a name you wish to associate with your queue.
- Language: This option determines which language to use in system generated messages. Supports English and French.
- Weight: The weight of the incoming call refers to how much priority to put on calls in this queue compared to other queues.
- Caller ID Prefix: This feature allows agents to know which queue the call is coming from. For example, you could enter 'Sales:' so that the agent knows the call is originating from the Sales Queue.
- Clear Last Prefix: Determines functionality when a call flows through multiple queues. When set to 'Yes", the prefix will always be added to the original caller ID. When set to "No", prefixes from previous queues will still be included. Ex: 'SALES:SUPP:Caller Name'.
- Prefix Internal Calls: Adds a prefix to the Caller ID number of internal users calling the queue to prevent local phone directories from overriding the queue prefix.
- Join Recording: Specify if you would like a message to be played when a caller first joins the queue. These messages are configured in the System Recordings section.
- Time Rule: Select a specific time rule if this queue is only available during certain times. Time Rules are configured in the Phone System menu.
- Closed Destination: If a time rule is set and its status is closed, calls will be sent to the location specified here.
- Forward All Calls: This allows you to forward all calls that go to a queue to a specific internal location on the switch. If it is to go to an external number, simply use the Virtual Extension feature.
- End of Call Survey: At the end of the Call, the customer will be directed to the selected survey.
- Maximum Hold Time: The total amount of time in the queue before the call will be sent to the overflow destination.
- Overflow Destination: Where to send the call when no agents are logged into the queue or when the maximum hold time is reached.
- Forced Exit Destination: This directs the system on how to respond if a customer dials '1' for immediate assistance.
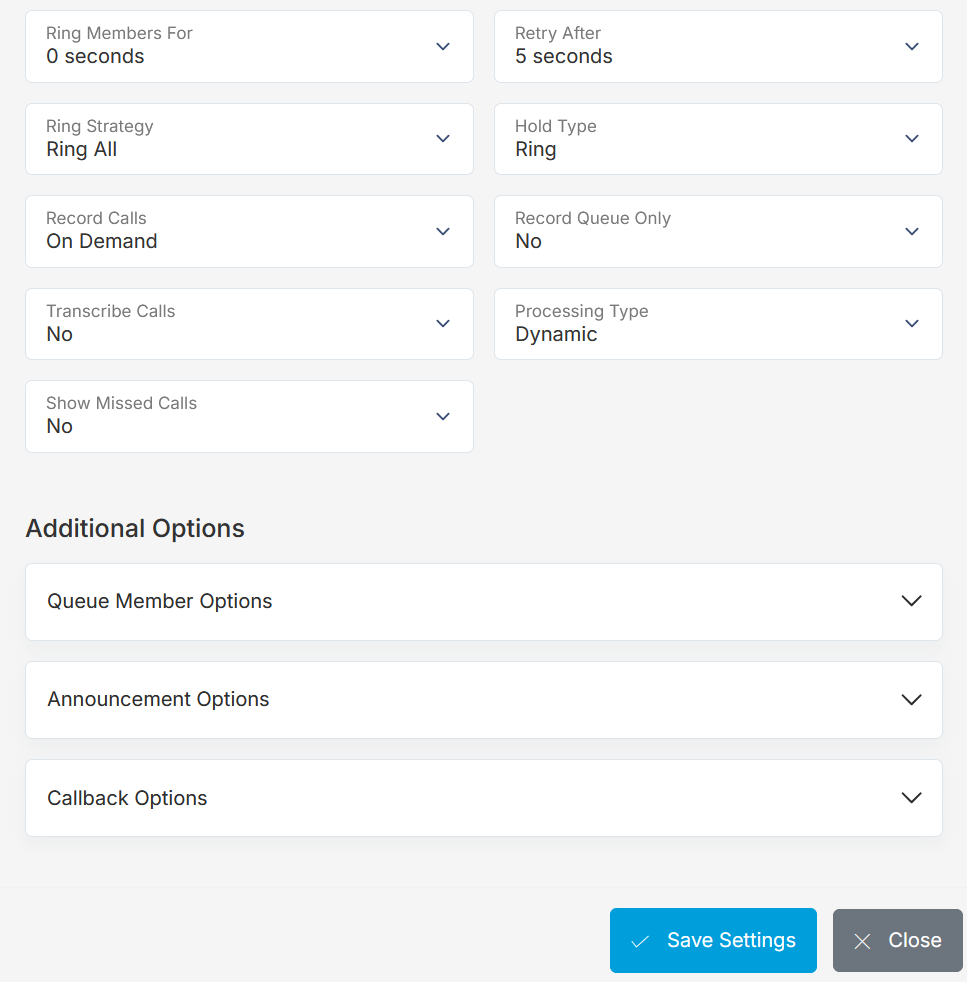
- Ring Members For: How long to ring the agent before trying the next agent in the member list.
- Retry After: Sets the length of time to wait between retrying queue members. Please know any time below 5 seconds is not supported as that is the length of a single ring.
- Ring Strategy: Decides how to distribute calls within the queue. There are three available options:
- Ring All: Ring all agents in the queue at the same time.
- Least Recent: Ring the agent that has been waiting the longest for a call.
- Round Robin: Distribute calls in a circular fashion.
- Fill Calls: By default, queue calls work through pending callers one at a time. If 'Fill Calls" is enabled the queue will attempt to send calls to all available agents at once if there are enough calls in the queue. Fill Calls is only compatible with 'least Recent' and 'Round Robin' ring strategies.
- Hold Type: Whether callers should hear a ringing tone or music while holding in the queue.
- Music on Hold: If the hold type is set to music, this specifies which music on hold to play. Music on Hold is configured in Phone System -> Music On Hold.
- Record Calls: Specifies whether calls in this queue should always be recorded or if they should only be recorded on Demand. To record calls on demand, users must either dial: #1 or hit the 'Record' soft key if it is available.
- Record Queue Only: Only record the queue leg of the call; if transferred away from the queue, the recording will stop unless the destination has recording enabled.
- Show Missed Calls: Toggles whether queue calls that are missed show as 'Missed Call' on the phones of queue members. Calls answered by another agent will not show as a missed call.
Queue Member Options:
- Service Level: Used for reporting how many seconds before a call is answered and is considered as an acceptable service level that all agents should be answering calls within.
- Wrap time: Length of time before the agent is presented to take another call after finishing a call in this queue.
- Auto-Pause Members: If this option is turned on, an agent will be set to 'Not Ready' if they don't answer a call. They will be required to go back to 'Ready' in order to be presented with subsequent calls. To toggle between Ready and Not Ready, dial: *908.
- Allow Member Forwarding: Choose whether or not a member's phone forwarding settings should affect this queue. The default is set to 'No'. This is only compatible with a phone's internal forwarding and not *72/*73.
- Use Call Reason Codes: If 'Yes' is selected, at the end of each call, the SolSwitch will request the agent to enter a reason code for that call. Reason codes are specified under Phone System -> Reason Codes.
- Use Busy Codes: If 'Yes' is selected, every time a user toggles their ready/not-ready status (*908), they will be required to enter a Busy Reason Code. Reason codes are specified under Phone System -> Reason Codes.
Announcement Options:
- Advanced Announcements: If disabled, the queue will use the default announce message style, using the options described below. If enabled an extra button will appear giving the option to Manage Announcements, which gives a wider range of customizability for announce messages (such as having multiple messages with different wait times). See 'Manage Announcements' below.
- Estimated Hold Time: If set to 'Yes', when an Announce Message is played, the system will also announce the estimated hold time of the queue. The estimated hold time is calculated based on an algorithm pertaining to call volume and queue wait time.
- Announce Interval: If an Announce Message is selected, this specifies the interval between replaying the Announce Message.
- Announce Message: The System Recording to use for announcing messages. These are set in Phone System -> System Recordings.
- Announce Position: If set to 'Yes', will announce the caller's current position in the queue.
- Announce First: Allows changing the order of the announce messages, announce hold time and announce interval.
Manage Announcements: When using Advanced Announcements and selecting 'Manage Announcements' the page will direct to the announcement options. This page has similar settings to the ones described above for Announce Message but allows more customization. The following additional options are available:
- Time to First Message: The first Announce Message will play after this time. If set to never, announce messages will not play.
- Time to Next Message: How long to wait before playing the next message in the list. This time starts after this message has finished playing.
- Announce Hold Time/Pos: Select whether the hold time and position messages should be announced before or after this message.
The messages set up on this screen will play in the order they are displayed after the set 'Time to Next Message' has elapsed. Clicking 'Save Settings' will apply these changes and return to the queue edit screen.
Callback Options:
- Enable Callback: This feature allows a caller holding in a queue to press '2' while waiting and a 'Queue Callback' will be created. This means that the caller can hang up and go about their business while keeping their place in the queue. When their call arrives at the front of the queue, the system automatically calls the person back and connects them with the agent.
- Callback Dial Prefix: This field only accepts digits and will prefix the queue Callback number being dialled.
- Callback CID Name: Select the name to display as the Caller ID Name when the system calls the customer back.
- Callback CID Number: Select the number to display as the Caller ID Number when the system calls the customer back.
- Callback Attempts: Select how many times to re-try a callback after an unsuccessful attempt.
- Callback Attempt Interval: Select how long to wait between each dial attempt.
- Callback Fail Notify Email: If a callback fails all of its attempts, a notification will be sent to the email address entered here. You can enter multiple email addresses separated by a comma.
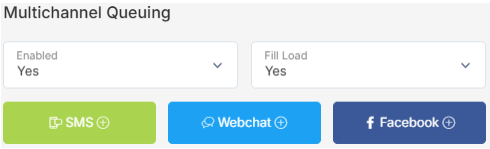
Multi-Channel Queuing: Multi-Channel Queueing (MCQ) is the ability for chats and phone calls from multiple platforms to be handled all together in a streamlined central location. Phone calls will flow as they always have while the addition of chats from multiple platforms will also now ring queue members on phones and allow chats to be managed in the Webchat section of Phone Settings.
MCQ has the following standard options:
- Enabled: Toggle MCQ functionality on or off.
- Fill Load: When enabled, queued items with lower load will skip ahead of higher load items in the queue to fill the available load for agents. When disabled, queued items will only be assigned in the order they are received in the queue. See below for additional information about load.
- Maximum Load: The maximum amount of task load a queue member can handle at one time.
- Phone Call Load: How much load a phone call counts as for a queue member. When set to the same as max load, the queue member will not be available to take any more tasks while on a phone call. High Maximum Load can acoomodate 5 low weight chats or 3 medium weight chats. Medium can handle one medium or two low weight chats. Low can only handle one low weighted task at a time.
Once MCQ has been enabled, it can then be configured to support sending and receiving messages with the following methods:
- SMS/MMS: Text messaging using a DID that has been configured to support SMS/MMS. Standard messaging rates apply for messages sent and received.
- Webchat: A web based chat module that can be customized and then added to an external website.
- Facebook: Connect to a business Facebook page to allow communication with users for messages sent through Facebook messenger.
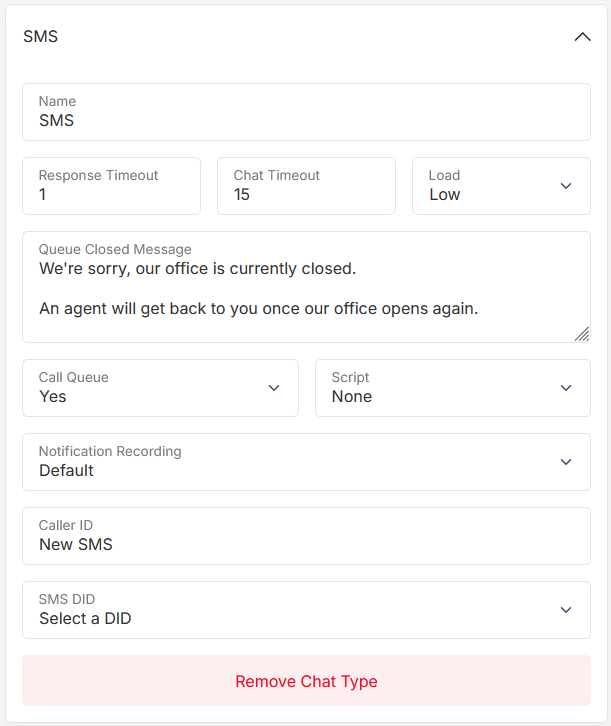
After selecting a communication method, the following settings can be configured for that specific channel:
- Response Timeout: The length of time in minutes to wait for an assigned agent to respond to the initial message before sending the call back to the queue. Set to 0 for unlimited.
- Chat Timeout: The length of time in minutes to wait between messages before marking a chat as inactive. Set to 0 for unlimited.
- Load: Load determines how many of these types of tasks an agent can handle at once. Low: up to 5 at once. Medium: Up to 3 at once. High: Only 1 at a time.
- Queue Closed Message: A message to be displayed if the chat is started when the time rule on the queue is closed. All chats will be deferred until the queue opens again.
- Call Queue: Decides whether or not to call the queue. Agents will be expected to pull new chats from the webchat page if this is set to No.
- Script: Execute a script a message comes into the MCQ.
- Notification Recording: This is the recording that will play when an agent answers a call notifying them that they have been assigned the chat.
- Caller ID: to be used when calling an agent to notify of a newly assigned call.
- SMS DID: Select the SMS DID to receive and send messages from.
- Web Key Salt: This is a unique identifier used to send and receive data to this multimedia chat type. Best left default. If you need to invalidate a key, simply submit a blank key to have a new one generated.
- Captcha v3: to enable Captcha v3 on your webchat enter the site here and the secret key as well.
- Custom Webchat Styling: Here you set the colour of all fonts and backgrounds. You can specify a hexadecimal colour code or click on the colour to use our selector tool. You can also set a custom header image for your webchats. The image must be no larger than 1 MB, and the recommended dimensions for this image are 100 pixels by 25 pixels.
- Template Message: The initial message to be displayed upon opening a webchat. Leave blank to have no initial message.
- Sender Name: The name to be shown to the user when receiving a message from an agent. Default: 'Support Agent'.
- Facebook License Key: This is the license key provider to enable linking a Facebook page to a queue.
After saving a newly created Queue, you will be given the ability to add members to the queue.
Adding Members to a Queue: A new table will now be visible to the right of the Queue Details. Queue Members can be managed in two different ways: "Standard" routing, where members are added and removed from queues manually, and "Skill Based", where members are automatically added and removed based on their skills and the requirements of the queue.
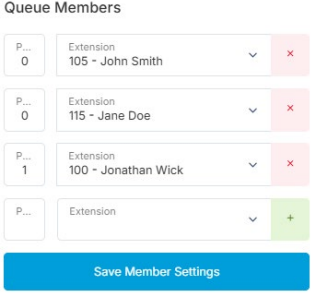
Standard Routing: Add members by selecting their extension from the bottom dropdown, and clicking the '+' button next to that extension. Extensions can be removed by pressing the 'X' button next to them. The penalty section here is used to determine a priority on who should be called first. Those with a higher penalty will receive calls after those with a lower penalty. Once all desired changes have been completed, press 'Save Member Settings' to save the member details.
As an example configuration, the image below would mean the following:
- 105 - John Smith and 115 - Jane Doe would ring first for a period of 25 seconds (Ring Members For option).
- The queue would then wait 5 seconds (Retry After option) and then ring 100 - Jonathan Wick for a period of 25 seconds (Ring Members For option).
- Once the Maximum Hold Time has elapsed the call will be sent to the Overflow Destination.
Skill Based Routing: When enabled, the member list will be locked, only allowing the priority of members to be modified manually. Adding and removing members from the queue is handled automatically based on the selected skills. For more information, refer to Skill Based Routing.

Reason Codes
These are different reason codes that could be set and required from users based on the phone action or activity. See below for the two types of reason codes.
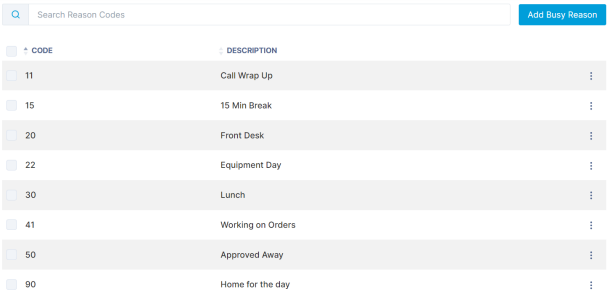
Busy Reason Codes
Located under Phone System -> Reason Codes, Busy Reason Codes are used when agents toggle their ready/not ready status. Whether or not busy reason codes are required is set in the Queue Details (Phone System -> Queues). If the 'Use Busy Codes:' is activated on that Queue, then when a user dials *908 to toggle their status, they will be prompted to enter a Busy Reason Code. Reports can then be pulled using the Queue Agent Not-Ready Report.
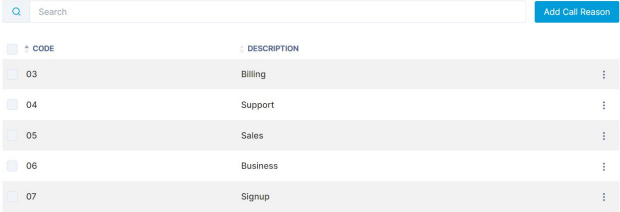
Call Reason Codes
Located under Phone System -> Reason Codes, Call Reason Codes are used when agents complete a call and are required to enter a reason for the call. Whether or not call reason codes are required is set in the Queue Details (Phone System -> Queues). If the 'Use Call Codes:' is activated on that Queue, then when an agent completes a call and the person on the other end of the call hangs up, the system will ask the agent to enter a call reason code. If the agent hangs up before entering a reason code, the SolSwitch will call them back and request it right away. Reports can then be pulled to gather more details regarding the queue, agents and reason codes for specific time periods using the Queue Call Reason Report.
Recording Backup
This section allows you to add an FTP or SFTP server to have call recordings on a specific customer offloaded or automatically deleted if a size quota or time period is set. Use a value of 0 for unlimited. If the size of the recording approaches a certain percentage of the total threshold you can receive an email notification. To adjust settings SolSwitch wide please see 'Recording Backup' in Advanced Tools.
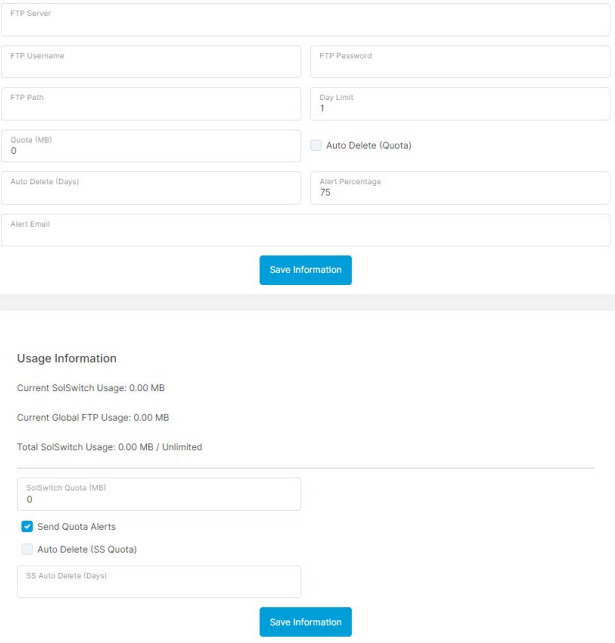
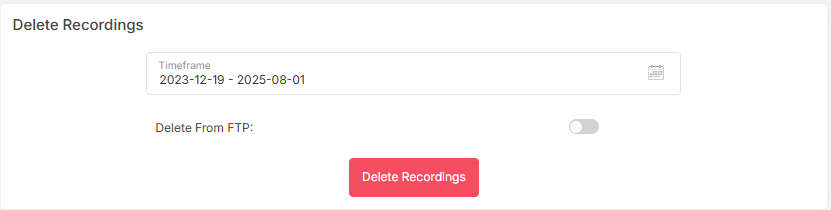
You can also choose to delete recordings within a date range with an option to delete from the FTP/SFTP server as well. If any errors occurred during this process, an excel sheet can be downloaded to detail the errors.
Scheduled Routing
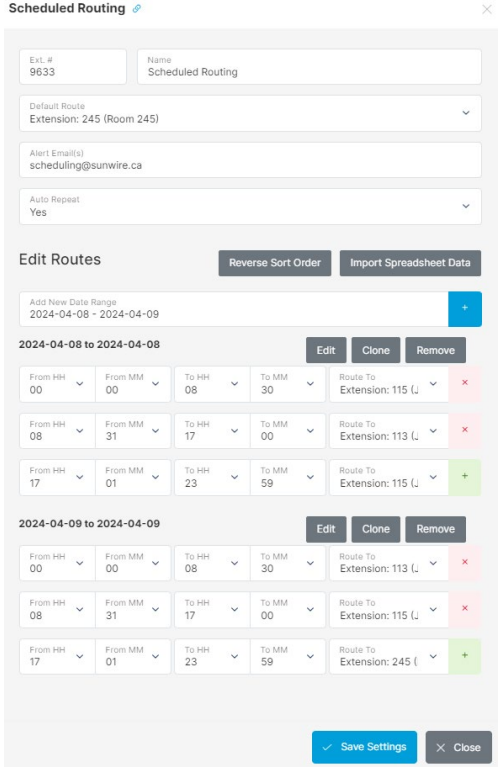
The Scheduled Routing feature allows you to create Scheduled Routes based on date spans. Multiple scheduled routes can be configured to match any schedule. To create a new Scheduled Route, click the 'Add Scheduled Route' button. You can also import a list in the form of a CSV file.
Adding a Scheduled Route:
- Extension Number: Enter an available extension number for your scheduled routing.
- Name: Enter a name you wish to associate with your scheduled route.
- Default Route: In the event that a date/time range has not been specified, calls will route to the default location. This field can be typed in for quick auto-complete selections.
- Alert Email(s): An alert email will be sent if no time specifications are met, meaning that the default route is being used. Separate additional emails with a comma.
- Auto Repeat: If selected, the scheduled routing will be automatically regenerated when routes run out.
- Add Route Schedule: Select a date range by inserting a start and end date then click the '+' button.
- Once a date range has been added, time ranges for that date range can be added.
- Select where on the system you would like the call routed from the dropdown menu and click the 'Add New Rule' button.
You can add multiple time ranges per day range as well as multiple day ranges. Additional options allow you to 'Clone' a daily entry for recurring schedules. Ranges cannot overlap each other.
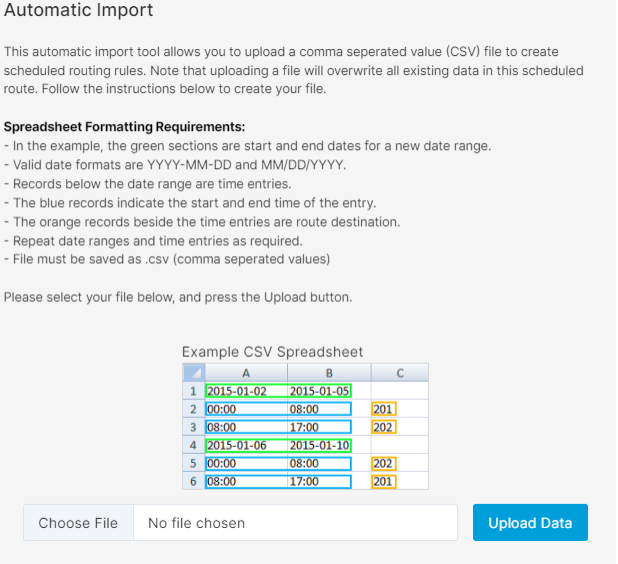
Importing a Scheduled Route:
Scripts
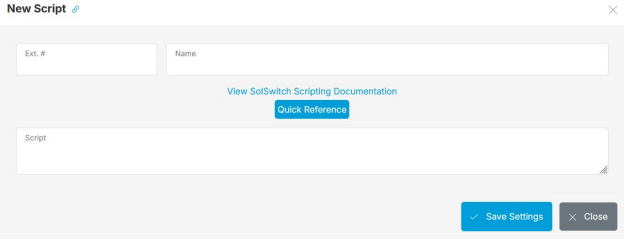
The SolSwitch supports the integration of custom scripts, allowing a low-code implementation of custom functionality that goes beyond the default system features.
Phone calls can be routed to custom scripts in the same way as other system features, and SMS can be configured to run custom scripts upon receiving inbound messages.
Updated documentation on the functionality and available features for custom scripting can be found under the "View SolSwitch Scripting Documentation" link when creating a new script.
Skill Based Routing
Skill Based Routing on the SolSwitch allows agents to be automatically matched with callers based on their skill set, ensuring that callers are always matched with someone that can properly assist them.
Configuring Skill Based Routing is done in three parts: Creating a list of skills, assigning skills to extensions, and configuring skill requirements on queues.
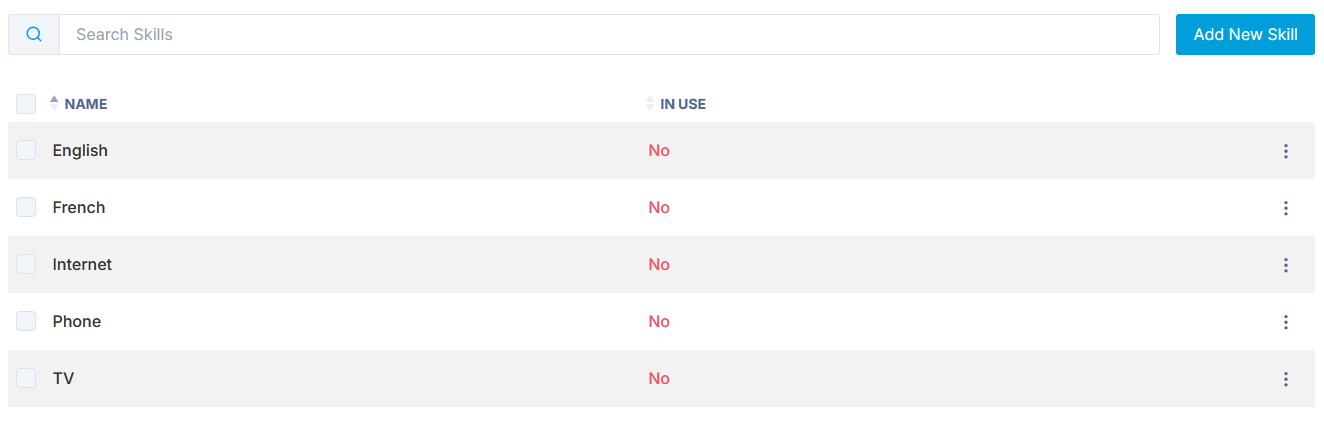
Creating Skills: First, navigate to the Skills page to begin creating skills. Press the 'Add New Skill' button to create a skill, enter a Name for the skill and press save. Create one entry for each unique skill that you would like to use for routing.
For example, if you were creating skills for a telecom call centre with English and French callers, your skill list may look like this:
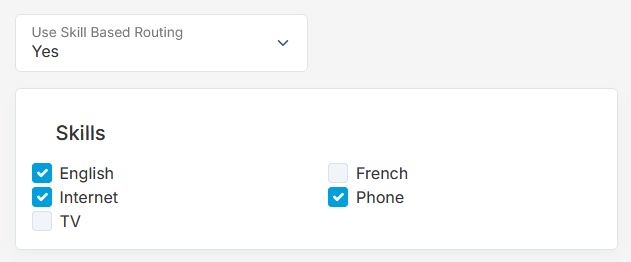
Assigning Skills to Extensions: Once you have created the list of skills, you can start assigning skills to agents. Navigate to the Extensions page, then for each extension that you would like to route based on skills: edit the extension, scroll down to the option that says "Use Skill Based Routing" and toggle it to Yes. Then, check off any skills that this agent/extension has:
Configure Queue Skill Requirements: Finally, navigate to the Queues page to finish the set up. If your queue hasn't been created yet, create it now. Edit the queue, and in the top right of the page toggle the routing type from "Standard" to "Skill Based". Then, check off each skill that is required for members of this queue and press "Save Member Settings". The Queue Members list will then be automatically populated with any extensions that match the required skills for the queue.
Note: Agents will only be added to the queue if they have every required skill.
Smart IVR
Smart IVRs leverage AI functionality to answer calls with an intelligent, automated assistant that can direct calls and process requests.
Currently, the following Smart Agents are available to be configured on the system:
- Standard: The Standard agent functions as a receptionist, receiving and directing calls based on what the caller is looking for.
- TaxiCaller: This agent integrates with the TaxiCaller Dispatch Software to automatically create new orders, including a wide range of details that the agent is able to collect from the caller.
If you would like to inquire about a custom Smart IVR solution for your business, please contact your system administrator for more information.
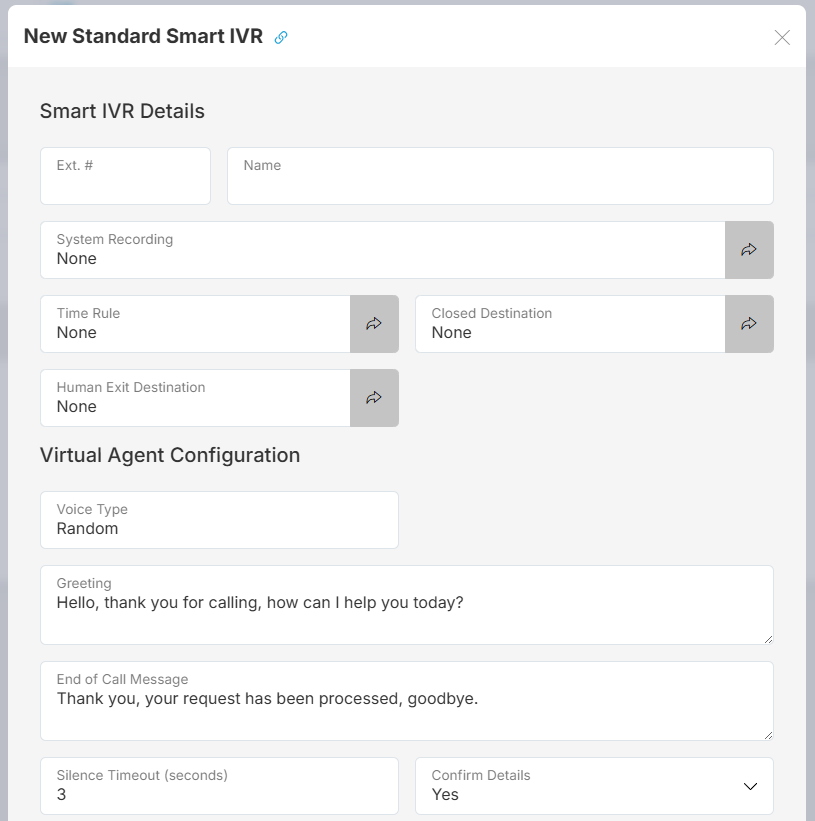
When configuring any Smart IVR, the following standard configuration options are available:
- Extension Number: The extension number for reaching the Smart IVR.
- Name: The name for identifying the Smart IVR.
- System Recording: When set, this recording will play to callers when first reaching the Smart IVR.
- Time Rule: Configure when the IVR is open and closed.
- Closed Destination: Route destination for calls when the Time Rule for the IVR is closed.
- Human Exit Destination: This destination will be used to transfer callers if they request to speak with a person, or if the Smart Agent is for some reason unable to process their request.
- Voice Type: Select the voice that the Smart Agent will use when speaking with callers. Selecting a voice from the dropdown menu will give the option to hear an example of what the voice will sound like. If Random is selected, a voice will be randomly chosen for each new call that comes into the IVR.
- Greeting: The text entered here is how the Agent will greet each caller when first receiving an incoming call. It is recommended to include an initial question as part of the greeting, such as "Where can I direct your call?" or "What is your pickup address?"
- End of Call Message: The text here is how the agent will end each call before finalizing the caller's request – use this to provide any final information that callers should know about their request. Ex: "One moment while I transfer your call." or "Thank you, your request has been submitted. You will receive a text message shortly confirming your pickup."
- Silence Timeout: For the agent to know when a caller has finished speaking, it waits for a few moments of silence. This field configures how long that wait time will be, in seconds. 3 seconds is the system default and serves as a good baseline, but this can be adjusted up or down as needed. Some additional items to note regarding the Timeout:
- Callers may also press the pound key to confirm they've finished speaking. If you expect callers may be calling from noisy environments, including this in your greeting message may be useful.
- If the agent detects that the caller was cut off while speaking due to the silence timeout being too low, it will automatically increase the timeout and ask them to repeat themselves. If the agent continues to have trouble understanding the caller, they will be transferred to the Human Exit Destination for assistance.
- Confirm Details: When set to Yes, this tells the Smart Agent to repeat all gathered information back to the caller to confirm accuracy before ending the call. This is the best way to ensure accuracy in what the agent is processing but will make interactions with the IVR take longer.
Beyond the standard configuration options, each specific Smart Agent type has its own options that can be set:
Standard Agent
For the standard agent, a list of each configured system feature (such as Queues and other IVRs) is available, with each option having a checkbox and a notes field.
The checkboxes beside each system feature controls whether the agent is allowed to transfer calls to that destination.
Beyond the features selected here, the agent will also always be able to transfer calls to any Extensions with the "Dial-by-Name Searchable" option enabled.
The note fields next to the checkboxes are optional, but notes can be added to provide the agent additional information about a destination to improve the accuracy of their transfers.
For example, a note could be added next to a queue with the description: This queue handles requests about customer accounts or billing, such as: Updating account information, requesting details about an account, making payments, or scheduling payments. Only customers with an existing account should be directed here.
TaxiCaller Agent
When configuring an agent to integrate with the TaxiCaller Dispatch Software, the following configuration options are available:
- API Key: This field is required to be able to integrate with TaxiCaller. An API key can be generated by visiting https://app.taxicaller.net/dispatch/api/keys then pressing Create in the API Keys section. Set a name for identifying the key, and set the Subjects field to * then click Create. Copy the API key that is displayed and enter it here.
- Company ID: Also required, this can be seen in the same window as the API Key above, and also displays in the Information section of the API Keys page.
- Provider ID: This field is optional and only required if orders should be booked through a specific provider.
- City, Province, Country: Country is required for the system to be able to properly locate addresses provided by callers. City and Province are optional, but providing them will improve the accuracy of addresses.
Beyond those standard configuration options, there is a list of data that can be collected from the caller by the Smart Agent before booking the order. Any fields that are selected will be required and the agent will specifically ask for that information.
The agent won't ask about fields that aren't selected, but if provided by the caller the agent will still collect that data and include it in the order.
For example, if Number of Wheelchairs is selected then the agent will ask each caller if they need space for any wheelchairs. If not selected the agent won't ask about it, but if the caller says "I also need room for a wheelchair" then that will be included in the submitted order.
SMS Management
Once a DID has been added to DID Management with an SMS provider set it will appear under SMS Management.
- Default Route: Default destination for incoming SMS. Enter "none" for the URL if you want no default route.
- Prefix: When a message starts with this text, the prefix will be stripped and the message will be directed to this URL instead of the default URL. Ex, Messages beginning with "Dev" or "Test" could be directed to a development server. Multiple prefixes and URLs can be added.
- Script: When set, incoming SMS will trigger a script to execute. Create scripts under Phone System settings.
- API Key: An optional key can be set to validate incoming SMS.
- Autoresponder Message: When set, incoming SMS to this number will receive an automatic reply with this message. The Message will be sent a maximum of once every 24 hours per incoming number
SMTP Server
Configure a per-customer SMTP server to use instead of the server-wide SMTP settings found in Advanced Tools > System Settings. This is used in scenarios where the customer is sending out the email themselves, such as in Custom Scripting. Note that SolCast campaign email does not use these settings - it always sends through the dedicated SolCast relay.
- SMTP Server: IP or Domain of customer's SMTP server.
- SMTP Authentication: Toggle on if the SMTP server requires authentication for sending.
- Username & Password: Used for authenticating when auth is enabled.
Surveys
Surveys allow callers to give feedback on their experience once a call has finished.
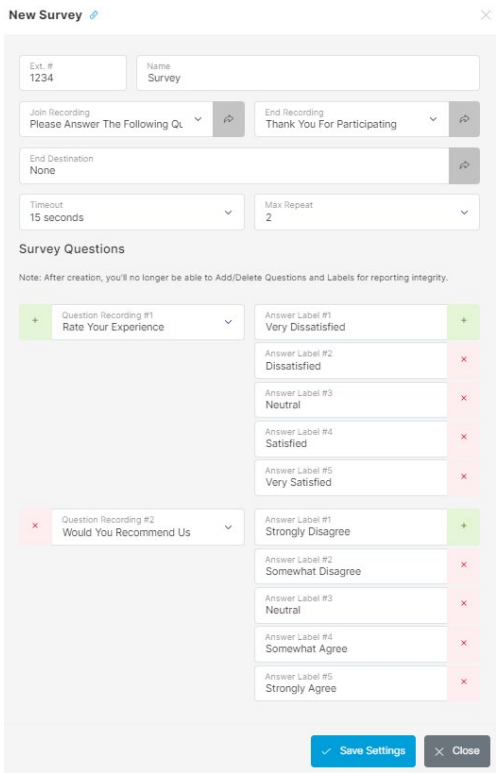
- Extension Number: Enter an available extension number for your survey.
- Name: Enter a name you wish to associate with your survey.
- Join Recording: This recording will be played at the start of the Survey.
- End Recording: This recording will be played once the Survey is complete.
- End Destination: The call will be routed here once the call is complete. If none is selected, the call will end.
- Timeout: The time before the question is replayed.
- Max Repeat: The number of times a question will repeat itself. Intervals are set by the Timeout.
Survey Questions: Each question consists of one recording and a series of answer options starting at #1 and incrementing. The answer labels are for internal reporting/reference only, the recording provided should indicate to the caller which option to pick. Select a System Recording as the Question Recording for the first question to ask and press '+' to add another Question Recording. Add a name in the Answer Label to track what the option is. The Answer Label number will be the corresponding numbers they will dial. To add more answer Label's press '+'. When you are finished hit the 'Save Settings' button. Questions and answers cannot be added or removed once created to preserve reporting integrity.
System Recordings
MP3 or WAV audio files of IVR or Queue greetings, product announcements, company news, business hours, etc are uploaded here.
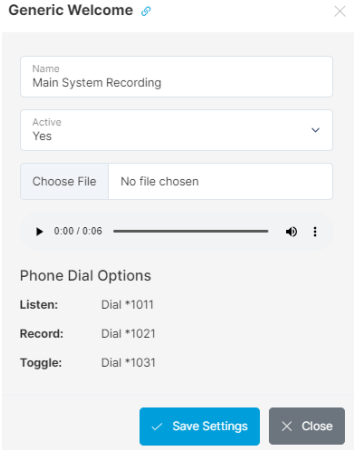
Creating a System Recording: Click the 'Add System Recording' button and enter a name for your recording. Set the 'Active:' field to 'Yes' in order to enable the recording.
Uploading a System Recording: Select the recording type you would like to upload in the Recording Source dropdown field. There are two options such as File Upload and Text-To-Speech Generation.
- File Upload: If you have a sound file you would like to upload, click the 'Browse' button, select your file and then click the 'Save System Recording' button. The system will accept any standard WAV or MP3 file. The SolSwitch handles sound conversion and bit-rate control so you don't have to.
- Generate Text-To-Speech: Enter the text you want generated into the 'Text to Generate' text field. There is a 'Voice Type' dropdown that contains a list of voices that you can preview before you generate your audio. When you find a voice you would like to use and you have your text written, press the 'Generate Recording' button to generate this and it will automatically upload for you. Once this is done, you can listen to the generated audio and you can also regenerate audios if you don't like the previous one.
Recording a System Recording: After naming and activating your system recording, press the 'Save System Recording' button. View the system recording and follow the *-codes to listen, record or toggle the recording.
Time Rules
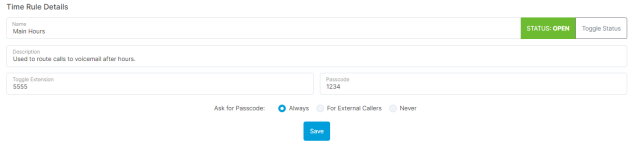
Time rules are used by the SolSwitch to direct calls to the appropriate extensions, virtual extensions, queue, IVR, etc. during the specified times as per the created Time Rules. To add a Time Rule, click the 'Add Time Rule Group' button.
- Time Rule Name: Enter a name to identify this group of Time Rules.
- Time Rule Description: For reference purposes.
- Toggle Extension: Calling this extension will toggle this Time Rule from open to closed or closed to open.
- Passcode: Based on the selection below, callers will be prompted for this passcode in order to toggle the Time Rule.
- Ask for Passcode: Specify when a passcode should be asked for when toggling the Time Rule.
Click the 'Save' button.
Once your group has been created, you can begin creating individual rules. To add a rule, click the 'Add Rule' button. You are able to toggle the time rule on and off within the web portal by clicking the Toggle status button. There are two types of rules that can be added.
Range Rules: Range rules specify a start and an end for a rule. It can be selected based on weekdays or by month and day. To create a range rule by weekday, follow the example below.
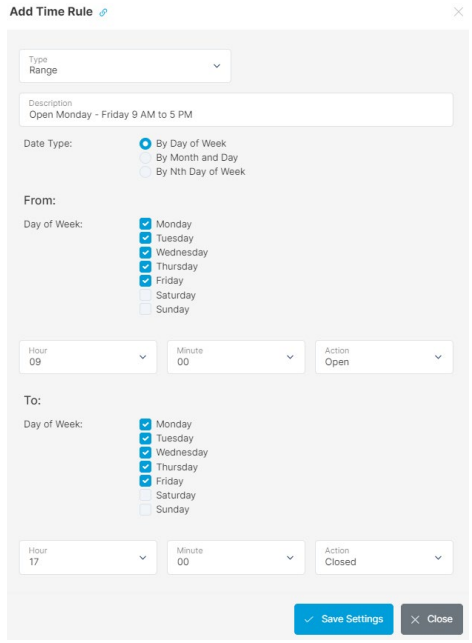
The image above shows that this particular range rule will open Monday, Tuesday, Wednesday, Thursday and Friday at 9:00 AM and will close Monday, Tuesday, Wednesday, Thursday and Friday at 5:00 PM.
Creating a Range Rule based on Month and Day (such as for holidays); the following format would be followed:
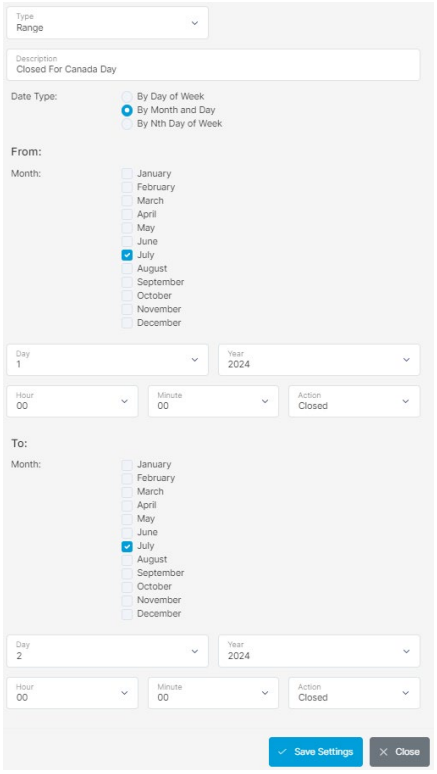
Multiple rules can be used in conjunction with each other in order to adjust the time rule properly.
Instance Rules: An instance time rule does not have a start and end point to the rule. It simply opens or closes a rule based on weekdays or based on month and day. Multiple instance time rules can be used as well. If there are instance rules and range rules, the range rules will take precedence over instance rules. In the screenshot below, the instance rule opens the time rule every weekday at 8 AM.
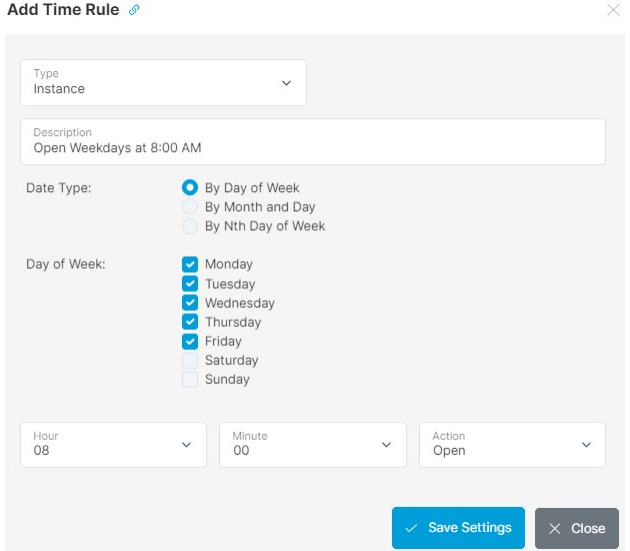
Another instance like the one above could also be made in order to close the Time Rule.
Another example of an instance rule, using the month and day format, would be configured similarly to the following:
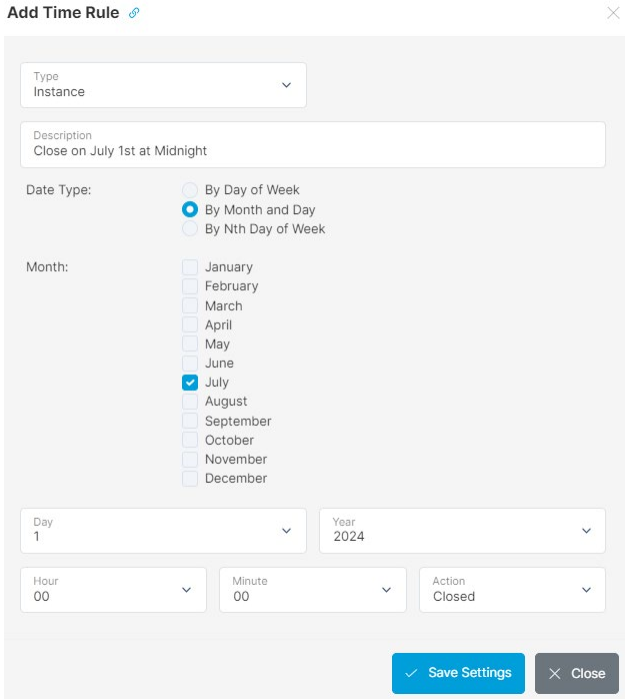
Following the configuration of all the rules within the Time Rule group, a 'Rule Calendar' is displayed on the Time Rule group page displaying when the Time Rule is scheduled to be open or closed.

Virtual Extensions
A virtual extension allows you to create an internal extension number that is attached to an outside telephone number. Therefore, in order to reach an external number; internal users would simply need to dial the appropriate extension. To add a new virtual extension, click the 'Add Virtual Extension' button.
Adding a Virtual Extension:
- Virtual Extension Profile: If configuration profiles exist for virtual extensions, choose a profile from here to automatically fill in details.
- Extension Number: Enter an available extension number for your virtual extension.
- Name: Enter a name you wish to associate with your virtual extension.
- External Number: An external telephone number that will be associated with this virtual extension.
- Extra Dial String: Enter the digits you would like to be dialled after the call is answered.
- This feature is useful in the event that the external number points to an auto-attendant (IVR). Acceptable Characters are: 0-9, *, #, a, A, b, B, c, C, d, D and w (the w is a 0.5 second pause).
- Call Waiting: If set to 'No', this virtual extension will return a busy signal when a call is already in progress.
- Caller ID Type: If set to 'Passthrough', the caller ID will be that specified by the incoming extension. If set to 'Specify', you will have the ability to specify the Caller ID Name as well as the Caller ID Number.
- Time Rule: Select a specific time rule if this virtual extension is only available during certain times. Time Rules are configured in the Phone System menu.
- Closed Destination: If a time rule is set and its status is closed, calls will be sent to the location specified here.
- Record Calls: Checking this box will record all calls directed to this virtual extension. Leaving the box unchecked will not record any call.
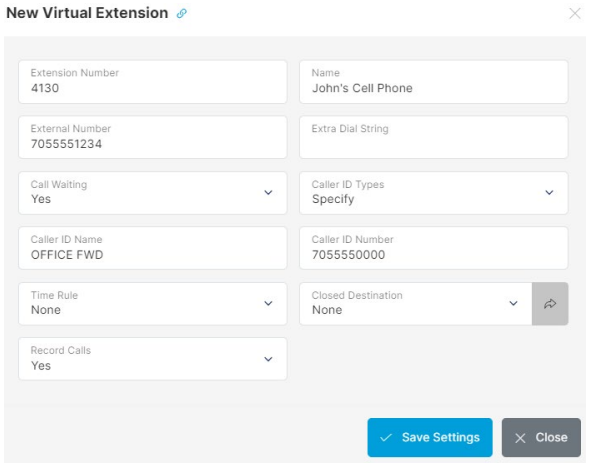
Voicemail
This is where you can control each individual Voicemail extension. Voicemail on the SolSwitch is treated as a standalone feature. Each voicemail is given its own extension number so that it can be used in any way needed. The Voicemail section under Phone System shows a list of all the voicemails on the system. To add a new voicemail box, click the 'Add Mail Box' button. For a more comprehensive understanding of the voicemail layout and all of its options, please see the 'Voicemail' section further in this manual.
Adding a Voicemail Box:
- Voicemail Profiles: If configuration profiles exist for voicemails, choose a profile from here to automatically fill in details.
- Extension Number: Enter an available extension number for your voicemail. This extension number is the number to dial in order to access the voicemail box directly.
- Mailbox ID: This is typically the actual extension number associated with the voicemail. The mailbox ID is the number dictated by the mailbox system when a user is sent to the mailbox and no greeting has been recorded. This recording reads: "The person at extension XXX is unavailable. Please leave a message after the tone." The mailbox ID is also used when forwarding voicemail messages. When adding a voicemail to an extension, it's highly recommended that the Mailbox ID be the same as the extension you are adding it to.
- Name: Enter a name for your voicemail box; for informational purposes.
- Email: The email address entered here will receive a notification message with the .wav file of the voicemail attached to each email.
- Email/SMS Only: Voicemails will be sent to emails and through SMS but will not be stored locally.
- Email Transcript: A transcript of the voicemail will be included in the voicemail email.
- SMS Transcript: A transcript of the voicemail will be sent to the provided phone number in SMS Destination setting. Transcripts up to 600 characters are sent by SMS; longer transcripts are sent as an MMS, cut off at 1000 characters.
- SMS Destination: The cell number where an SMS will be sent to if SMS Transcript is enabled.
- Passcode: This is a 3 to 7-digit number used to access the voicemail. It cannot start with a 0.
- Force Passcode Change: This option forces the user to change his/her passcode on the next voicemail login.
- Exit Destination: This is where a call will be routed if someone dials '0' during the playback of the voicemail greeting.
- Days Valid: The number of days the voicemail will be automatically deleted. A 0 value will require voicemails to be manually deleted.
- Say Caller ID: If this box is checked, the voicemail recording will be preceded by the caller's Caller ID information.
- Say Date/Time: If this box is checked, the voicemail recording will be preceded by the date and time that the message was left.
- Distribution List: When enabled, any messages left on the voicemail will be distributed to the Notify/Distribution Extensions.
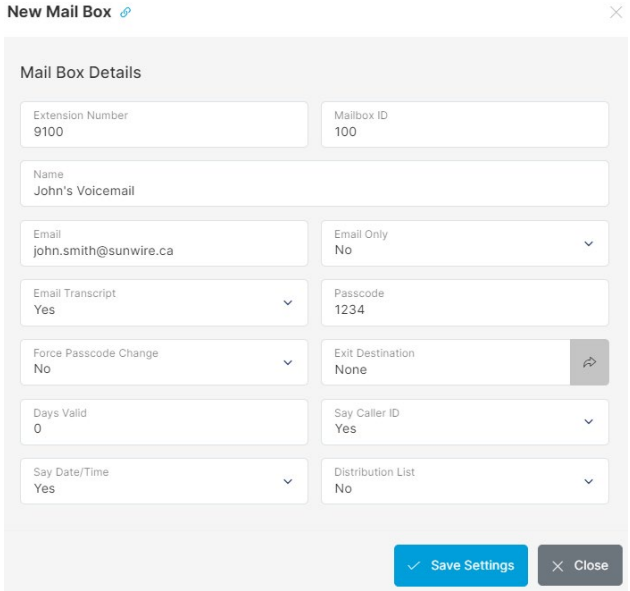
Save the Voicemail Box by clicking the 'Save Settings' button. Once this is completed, you will be given the option to configure the 'Notify Extensions' section. This section lists which users will receive 'Message Waiting Indicator' notifications on their devices when a voicemail message is left in that particular mailbox.
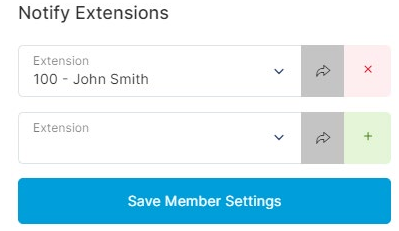
Listening to Messages: Once a message is left, a speaker icon will show up beside the mailbox. Click this speaker to view all of the messages that are in the voicemail box. From there you can play, download or delete them.

Voicemail Greetings: Use the 3 dots on the right and click Greetings to manage all of the greetings that have been recorded on the voicemail. You can play, upload or delete them. For upload, there are options for file upload or text-to-speech generation.
Webchat
When Multi-Channel Queuing is enabled on a queue/extension, all of the chats received by the queue/extension will show up in this section. Sys Admins or users with permission to access Webchat can do so from Webchat under Phone Settings. Extension only users would access Webchat on their extension by clicking on 'Webchat Portal'.
Once in the webchat portal extension users will see all of the chats assigned to them and any chats that are in MCQ queues that they are a member of. When an MCQ chat is received it will show up as a new chat on the left hand side. If the chat is in bold, the chat is still new and has not been read yet. Sys Admin users or others with access will be able to see all of the chats and all of the queues that have MCQ enabled.
If 'Call Queue' is set to 'Yes' on the queue/extension's MCQ settings, when a new chat is received the phones in the queue/extension will all ring. When the queue/extension is answered that person will be assigned the webchat. The Notification Recording set in the queue/extension will play a default message informing the user that they have been assigned a Multi-Channel message or it can play any other system recording.
For Queues, the assigned user must reply to the webchat within the number of minutes the Response Timeout has specified inside the queue. If they do not reply, the call will be sent back to the queue to be assigned to the next person unless it's ended by a user. Once a message is replied to, if a response is not received within the number of minutes that the Chat Timeout has set inside the queue then the chat is marked as inactive.
When a chat becomes inactive or is ended then the user who was assigned the chat now has the ability to take another chat or call based on their current Load up to a maximum total Load value of 10. If the Load is set to Low, each chat will have a Load value of 2, Medium has a value of 3 and High has a Load value of 10. Therefore, a user could have 2 Medium Load chats and 2 Low Load chats at once totaling 10. Normal phone calls will always have a Load value of 10. If Fill Load is enabled and a call with a lower load is behind a chat with a higher load, that chat will skip ahead and be filled to the next agent with an available Load for it.
On the left side, you'll see all of the chats and you can filter chats based on the Chat Type, then what queue/extension they are in or if they are assigned to you. You can also search all of the chats for text that matches the label or the name/number of the person. Label names can be set in the top right to better identify who the contact is.
The ordering of chat placement on the left side is sorted by the following priorities:
- 1. Personal Chats (MCQ for Extensions only).
- 2. Ongoing VS Completed.
- 3. Active VS Inactive.
- 4. Unanswered VS Answered.
- 5. Date of last message.
At the bottom of the chat, you can transfer the chat to another user to assign it to them or send the chat to a queue for someone to pick it up.
To initiate a new outgoing SMS message, click on the '+' button beside the search bar. Select the DID you wish to send from, the DID you want to send to as well as the message to send out. You also have the option of automatically assigning the chat to yourself.
SMS Webchat supports images and videos (MMS). If the DID associated with the webchat is configured to use MMS, an upload button will be available. When a video or image is selected, a preview window will appear. Sending will take a few seconds.
XMPP Presence
Allows the SolSwitch to update user status for XMPP servers.
- Server Address: Address of the XMPP server. Use format: http(s)://hostname:port.
- Type: Server type being used for XMPP.
- Admin Username: Username of the server's admin account.
- Admin Password: Password of the above account.
Call Features
Placing a Call
Depending on how you want to place a call, several operations are available.
- To place a simple call, dial the number and then pick up the handset.
- Speakerphone is available by pressing the speakerphone key and then dialling the number.
- Paging is set up on a soft key and activated by pressing the appropriate button.
- Speed dials can be set as programable soft keys on a phone or you can dial 0(speed dial entry) as defined in the extensions speed dial settings.
- Soft keys can be set by the phone's web GUI, the settings of the phone (depending on the model) or by the SolSwitch if the device is being provisioned.
- Detailed telephone features that can be set up by the agent are explained in the respective SIP Device's manual.
Receiving a Call
To receive a call, you must pick up the handset, press answer on a soft key (will use speaker phone if the handset is hung up), or press the speaker-phone button for speaker phone.
Call Forwarding
Call forwarding allows you to forward calls that are directed directly to a single extension and forward them to another extension or phone number. This feature can be set up in one of two ways.
- 1. Dial *72. When asked to enter the number to be forwarded to, do so, then press the # key. The system will say "Call forwarding enabled" when done correctly.
- 2. This same call forwarding can also be set up in the web portal under Phone System -> Extensions -> Edit Extension menu. Choose the forwarding method as an internal extension or external phone number. When *72 or *73 is dialled, it automatically changes the value in the web portal.
a. To disable the above call forwarding, simply dial *73.
Recording a Call
You might want to record a call for call quality assurance or confirm the details of a prior discussion. Call Recording is done in one of two ways, depending on how the feature is enabled. In the portal under Phone System -> Extensions -> Edit Extension:
- Calls are recorded automatically.
- Calls can be recorded on demand with a soft key or by dialling #1. Even in the last 2 seconds of a call, if the record soft key is pressed, it will record the entire call no matter how many transfers may have occurred.
- An email will be sent to an email address you entered in the Edit Extension area and will contain an audio copy of the call.
Parking a Call
Inbound or outbound calls can be parked (put on public hold) by way of a soft key or by dialling ##. This allows you to pick up the call from any other device on the phone system.
- Park Call-## - Parked calls are calls on hold that are available for anyone to pick up.
- Answer Parked (dial lot#) - (Lot # is specified in Phone System -> Parking Lots).
Do Not Disturb (DND)
All calls directed to the extension will not ring the extension, but will immediately follow a queue rule. This is activated only on a hard key from the phone.
Do Not Disturb - A hard key on certain phones used to ignore incoming calls. Your inbound calls will follow a previously-configured rule such as forwarding or voicemail.
Roaming Extensions
This feature allows an agent to log into any phone on the system and carry the extension with them.
- Log out of the existing telephone. Use dial code *12.
- Login to the new phone. Use dial code *11. When asked to enter your extension number, do so, then press pound. When asked to enter your passcode, do so, then press pound.
- *13 will tell you the extension you are logged into or if you are not logged on to any extension.
Login/Logout of Queue
Any extension on the system has the ability to log itself in or out of a queue using the following codes:
- Login: *16 + (Queue Number) + Dial/Send.
- Logout: *17 + (Queue Number) + Dial/Send.
Logging in and out of an extension can only be done remotely if the number performing the login or logout has a virtual extension on the system. In order to achieve this, a call must be placed to an IVR. Once the IVR answers, assuming the call display associated with the number calling is visible and a virtual extension is pointed to that number, then the following commands will achieve the desired result:
- Login: Dial 016 + (Queue Number).
- Logout: Dial 017 + (Queue Number).
In the event that the device you are calling from has its caller ID number blocked and the system isn't aware the device is tied to a virtual extension, the following command must be entered:
- Login: Dial 016 + (Queue Number) + * + (3-5 digit Virtual Extension).
- Logout: Dial 017 + (Queue Number) + * + (3-5 digit Virtual Extension).
Agent Ready/Not Ready
All phones by default are set to Ready, if you would like to set yourself to Not Ready you must dial *908 and enter a reason code supplied to you by your company. An agent will not receive calls from a queue until his/her phone is set back to Ready. To return to Ready, simply dial *908 again.
Call Monitoring
This feature is often used to monitor calls on an extension from a managerial level between a caller and an agent and can be useful in training. An extension must have previously been given authorization to use the monitoring feature. To give permission, go to Phone System -> Extensions -> Click the Extension and navigate to Can Monitor Calls under Miscellaneous Options, select a Monitor Type, then click Save Settings. In some cases, you'll want to exclude extensions from being monitored which is called Privacy Exclusion. This can be done in the Call Options menu. Simply choose the extension you would like to exclude, set Privacy Enabled to Yes then press Save Settings. If supervisors try to monitor an extension that has Privacy Enabled, they will be prompted that they do not have permission to monitor that extension.
Silent Mode
Silent monitoring allows a supervisor to monitor an agent without the agent knowing. The agent or caller will not hear the supervisor. To begin using this feature use the star code *111. You will be prompted to enter the extension and press #. When you are finished monitoring, simply hang up or the monitor will stop when callers hang up.
Coaching Mode
Coaching allows a supervisor to coach agents during a call. When supervisors speak, they will be heard by the agent but not by the caller. To begin using this feature use the star code *112. You will be prompted to enter an extension and press #. When you are done monitoring, simply hang up or the monitor will stop when callers hang up.
Barge-In Mode
Barge-In mode allows a supervisor to barge into a call. This essentially turns the call into a threeway conference. All parties will be heard when they speak. To begin using this feature use the star code *113. You will be prompted to enter an extension and press #. When you are done, simply hang up or the monitor will stop when callers hang up.
Monitor Type: Single Call
This Monitor Type is the default. It allows the person monitoring to listen to an extension until the call ends. Once the call ends, simply hang up or the monitor will stop when the callers hang up.
Monitor Type: Continuous Monitoring
This Monitor Type allows the person monitoring to continuously monitor calls on an extension. Once the extension caller hangs up a call, the monitor will be placed on a loop until the extension is in another active call which you'll then be connected to. When you are done monitoring, simply hang up.
Paging Groups
Telephone-wide intercom and group-specific paging can be set up. For example, if you would like to page only the sales group, that feature is set up here. Soft keys are used to activate this feature, or by dialling a page extension that's set in Phone System -> Paging Groups. Page extensions can specify a group of extensions to be paged such as sales, accounting, etc., and only the phones set up in those respective groups will follow their respective rules.
Anonymous Calling
In the event you want to make a call but do not want to display your identity, dial *67, wait for a dial tone and dial the number. Your number will not be displayed on the recipient's phone.
Call Transfer
Transfer - A hard key on certain phones used to transfer a call as attended or blind. An Attended transfer allows you to speak to the caller before transferring a call. A Blind transfer will send the call straight to that extension.
Transfer Blind Mitel:
- While on a call, press the transfer button. That places the call on hold.
- Dial the extension or phone number you wish to transfer the call to and then press the transfer key again.
Transfer Attended Mitel:
- While on a call, press the transfer button. That places the call on hold.
- Dial the extension or phone number you wish to transfer the call to and then press the Dial key.
- Once you are finished speaking with the person who you are transferring the call to, press the transfer key again. If they cannot take the call press the drop key over their call and take the call back off of hold.
Transfer Blind Polycom:
- While on a call press the Transfer button. That places the call on hold.
- Press the Blind button.
- Dial the extension or phone number to transfer and press Send to send a call to another phone number or extension.
Transfer Attended Polycom:
- While on a call, press the transfer button.
- Dial the extension or phone number to transfer to and then press send.
- Once you are finished speaking with the person who you are transferring the call to, press the transfer key again. If they cannot take the call press the cancel softkey to take the call back off of hold.
Call Conference
Conference - A hard key or soft key on phones used to allow more than one person to be part of a call.
Mitel Conference:
- While on a call, press the conference button. That places the call on hold.
- Dial the extension or phone number you wish to conference in then press the dial key.
- Once you are speaking with the second party press the conference button again to bring the first party back into the call.
- To remove someone from the conference call highlight their number with the directional keypad then hit the Drop key. You can also press "Leave" to exit the conference and have the call continue for the other participants.
Polycom Conference:
- While on a call, press the conference button.
- Dial the extension or phone number you wish to add to the conference call and then press send. Your current call will be placed on hold while you call that number.
- Once you are speaking with the second party press the conference button again to bring the first party back into the call.
- While on a conference call, you can split the call again by using the Split key which places both calls on hold on your 2 lines. Use the line keys to select the line you want to talk to.
Telephone Feature Codes
By using the dial codes, features can be enabled or disabled.
| Extension Features Codes | Dial Code | Soft Key* | Hard Key** |
|---|---|---|---|
| Extension Login | *11 | Login | N/A |
| Extension Logout | *12 | Logout | N/A |
| Extension Status | *13 | Status | N/A |
| Extension Ready (Queue) | *14 | Ready | N/A |
| Extension Not Ready (Queue) | *15 | Not Rdy | N/A |
| Queue Login | *16 + Queue | N/A | N/A |
| Queue Logout | *17 + Queue | N/A | N/A |
| Queue Forwarding | *104 + Ext. # | N/A | N/A |
| Queue Forwarding Toggle | *104 + Queue # | N/A | N/A |
| Extension Login/Logout Toggle | *904 | In Out | N/A |
| Extension Ready/Not Ready Toggle | *908 | Rdy? | N/A |
| Access Voicemail system | *98 | N/A | Messages |
| Block name/number per call | *67+Number | N/A | N/A |
| Call forwarding Enable | *72 | N/A | N/A |
| Call Forwarding Disable | *73 | N/A | N/A |
| Record Call | #1 | Record | N/A |
| Hold Call (for local phone only) | N/A | Hold | Hold |
| Park Call | ## | Park | N/A |
| Answer Parked (dial lot #) | 50-70 | Park xx | N/A |
| Redial | N/A | N/A | Redial |
| Do Not Disturb | N/A | N/A | Do Not Disturb |
| Transfer | N/A | Transfer | Transfer |
| Conference | N/A | Conf | Conference |
| Intercom Call | *22 + Ext | N/A | N/A |
| Remote Call Pickup | ** + Ext | N/A | N/A |
| Manager Feature Codes | Dial Code | Soft Key* | Hard Key** |
|---|---|---|---|
| Call Monitoring | *111 | Monitor | N/A |
| Call Coaching | *112 | Coach | N/A |
| Call Barge-in | *113 | Barge | N/A |
| Record Names for Staff Directory | *88 + Ext |
| Meet-Me Room Feature Codes | Dial Code |
|---|---|
| Help Menu: Announces all the * codes and their function | *1 |
| Reach Operator: When dialled by any participant, they will be redirected from the meet-me room to the local operator as defined in Phone System -> Miscellaneous Settings. | *0 |
| Mute / Un-Mute Self: Toggles the mute/un-mute status of only the person who dialled the * code. | *6 |
| Participant Count: This option will privately read out the current participant count for the meet-me room. This option is for administrators only. | *91 |
| Lock / Unlock: This option will lock or unlock the room. This option is for administrators only. | *94 |
| Mute All Participants: This option will mute all participants, except for other admin users. This option is for administrators only. | *96 |
| Un-Mute All Participants: This option will unmute all participants. This option is for administrators only. | *97 |
| Record Call: Dialing *22 during the call will start to record the call in its entirety. Once all participants have left the call, a secure (MD5 hash-based) recording URL will be emailed to the email (addresses) specified in the meet-me room settings. | *22 |
Speed-Dial Keys
Speed-Dial Keys can be added and managed from your telephone set or through the portal under Phone System -> Extensions.
Voicemail
The SolSwitch includes a voicemail system. Among the features that it offers are:
- Three different types of greetings and the ability to import them as .mp3 or .wav.
- Notification of new messages through email. The notification message may also include an audio file containing the complete message. Or a text transcription of the message if it'sincluded in your package.
- Mailboxes are all password-protected.
- Can optionally allow callers to review and re-record messages.
Accessing the Voicemail
Locally:
- From any phone, press the messages key, or dial *98.
- Alternatively, dial *98(voicemail extension #) of the voicemail you want to access.
Remotely:
- Call into an IVR and dial the voicemail extension number or call the person's extension and wait for the voicemail to come on.
- Dial * when the voice prompt begins to handle your call in your voicemail then enter your passcode.
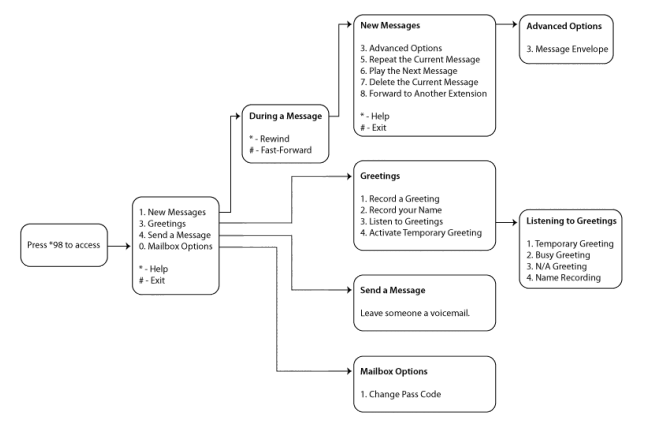
Types of Greetings
A greeting is intended to let the caller know that you are not able to answer their call. The greeting can also be used to convey other information like when you will be available, other methods to contact you, or other options that the caller can use to receive assistance. The SolSwitch has 3 types of greetings:
- Busy Greeting
- The person at extension number is on the phone.
- Recorded name is on the phone or the busy greeting can be a message that you record.
If the SolSwitch thinks that you are on the phone, the caller will hear your "busy" greeting. Your busy greeting can either be a generic message, like:
- Unavailable Greeting
- The person at extension number is unavailable.
- Recorded name is unavailable. Or the unavailable greeting can be a message that you record.
If the SolSwitch thinks that you are unavailable (e.g. you don't answer the phone or your phone is not connected to the network) the caller will hear your "unavailable" greeting. The unavailable greeting can either be a generic message, like:
- Temporary Greeting
You can also record a temporary greeting. A temporary greeting will always be played regardless of your "busy" or "unavailable" status. This could be used, for example, if you are going on vacation and want to inform people not to expect a return call anytime soon, but you do not want to re-record your busy and unavailable greetings when you come back.
Leaving a Message in a Mailbox
If you are not able to answer a phone call, your administrator may have configured the SolSwitch to allow the caller to record a message that you can listen to later. Depending on how the SolSwitch system was configured, the caller may first hear a greeting and/or some instructions before being allowed to record a message. The process of leaving a message looks like this:
1. Play the appropriate greeting. The SolSwitch administrator can control whether a greeting is played or not.
2. Play some short instructions. Again, the SolSwitch administrator can control the instructions.
3. Play a beep.
4. Record the message, and optionally allow the caller to review the message.
While listening to the greeting or the instructions, the caller can press any of the following buttons:
- "#" Skip the rest of the greeting and instructions and immediately begin recording the message.
- "*" Transfer out of the message recording application. Typically used by the SolSwitch administrator to allow users to access their mailboxes.
- "0" Transfer to an operator.
After the greeting and the instructions have played the caller will hear a beep and then the system will start recording a message. To end the recording, the caller can hang up the phone or press the "#" button.
If the caller hangs up the phone to end the recording, the SolSwitch system will put the message in your "New" folder.
If the caller pressed the "#" button to end the recording the caller will be presented with the following options:
- "0" Transfer to an operator.
- "1" Save the message.
- "2" Review the message.
- "3" Re-record the message.
If the caller presses "1" the message will be placed in your "New" folder. If the user presses "0" the message will be cancelled, and the user will be transferred to the operator that's configured by a SolSwitch Administrator.
Logging Into your Mailbox
Your phone may have a special button on it that has been configured to allow access to your mailbox. If not, you can access your voicemail by dialling *98.
To access your voicemail externally simply call your extension and press * when your voicemail answers. You will be prompted to enter your passcode.
The First Time You Log In
The first time you log into your mailbox, you may be required to change some settings. In particular, you may be required to:
- Record your name.
- Record your busy greeting.
- Record your unavailable greeting.
- Change your password.
Voicemail Menu Options
As outlined in the above diagram, each menu within the voicemail system has its own set of commands.
Main Menu
"1" - Listen to messages in the currently selected folder. If you have any new messages, the "New Messages" folder will be selected. If you have no new messages, the "Old Messages" folder will be selected.
"3" - Greetings.
"4" - Send a Message.
"0" - Mailbox Options.
"*" - Repeat the menu options.
"#" - Exit from the voicemail system.
Greetings
"1" - Record your Greetings.
"2" - Record your Name.
"3" - Listen to Greetings.
"4" - Activate Temporary Greeting.
"#" - Return to Main Menu.
Mailbox Options
"1" - Change your password.
"#" - Return to Main Menu.
During Message Playback
"*" - Rewind the message by 3 seconds.
"#" - Fast forward the message by 3 seconds.
"0" - Pause the message playback. Press '0' again to resume playback.
"345678" - Pressing any of these buttons will halt the playback of the message and perform the corresponding action from the post-playback options.
After Message Playback
"3" - Advanced options.
"4" - Go to the previous message in the folder.
"5" - Replay the current message.
"6" - Go to the next message in the folder.
"7" - Delete or undelete the message.
"8" - Forward the message to another user on the system.
"*"- Replay the prompt.
"#"- Exit the voicemail system.
- Position.
- Date and time that the message was received.
- Caller ID information.
- Duration of the message.
Advanced Options
"3" - Play the message envelope. The voicemail system will play back the message "envelope". Depending on how the voicemail system has been configured, the message envelope may consist of the following items:
Pressing "1" at any time during the playback of the message envelope will skip to the message playback. The voicemail system will then play back the message.
SolSwitch Connect
Accounts
Configure SSC accounts to set up for phone calls and/or messaging. You can view a Login Report of all accounts and their most recent login, Import or Export contacts and view or add Presence Accounts. Note that each Presence Account will use an available SSC licence. Click 'Add User' to create an account if you have a licence available. Accounts can be deleted by selecting 'Delete' and that will remove them from the server. Selecting 'Delete (Local Only)' will remove the account that's stored locally on the SolSwitch but the account will remain on the SolSwitch Connect server and still function.
- SSC Account Details: Manage all of the settings related to the SolSwitch Connect account.
- Active: Setting the user to inactive suspends their SolSwitch Connect account.
- Username: Full username for login will include the domain at the end of the field.
- Password: The password log into the SolSwitch Connect account.
- Display Name: This is the name that will show up in other user's rosters.
- Email: When viewing a contact in a roster it will display this email address.
- Messaging: Enable/disable the messaging feature for the account. If enabled, choose the rosters they will participate in.
- Messaging vCard: Set information for the account such as Work/Mobile phone number, Department, and Title.
- Misc Settings: Additional optional settings.
- SSC Tools: If enabled, it gives the user access to the SSC tools tab in desktop clients.
- SMS: Allows SMS to be sent and received via the SSC client.
- SIP Settings: Set the SIP accounts and server here for the account to function. SSC can support up to 2 SIP accounts at once. A Line Label must be set for each SIP account to function.
- Incoming Call Routing: Handles how certain calls can be routed.
- Auto Answer: When enabled, incoming calls will automatically be answered after the specified time.
- SSC Desktop/Mobile: Enable or disable incoming calls coming directly or through a queue.
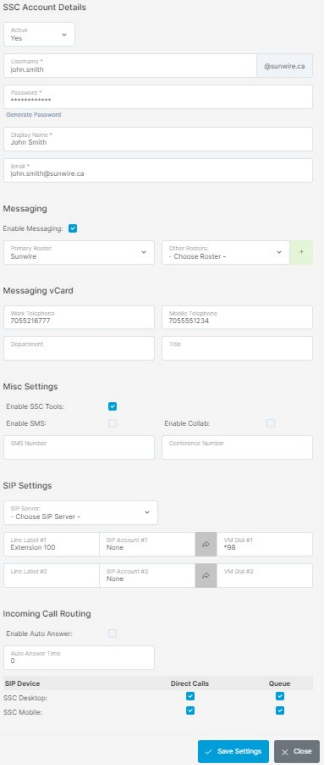
Exporting SSC Accounts to CSV: There is an option to export all existing SSC accounts located on the list SSC Accounts page, which allows a user to import the CSV to another system or customer.
Note: Passwords cannot be exported so that field will be left blank. To import this information, a password must be provided manually in the CSV.
Importing SSC Accounts from CSV: To mass import SSC Accounts, along with Roster Groups. Simply download the CSV template from the SSC Accounts CSV Import page. Fill it out accordingly and upload it back to the system. Below is a list of each column of the CSV file and what information is held in the field.
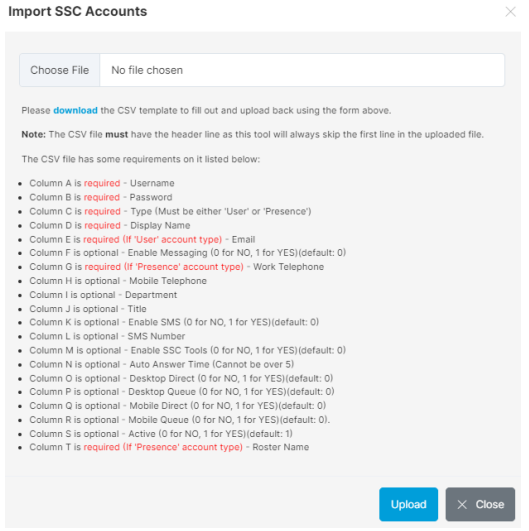
Note: The CSV file must have the header line. The tool will always skip the first line of the CSV file.
SolSwitch Connect Download
A list of downloadable SSC clients for various platforms including Windows, Mac, Android and iOS.
SolSwitch Connect Rosters
Manage rosters for SSC. These function as a space where members of the roster can communicate with each other via private messaging or chat rooms. Contacts may also be manually added to Rosters as Common Contacts. A JID is required for each Common Contact for it to be displayed in SSC. JIDs follow the same format as an SSC Username: name@group The JID domain name must match the group name. Connon Contacts also require a Display Name, and either a Work Telephone, Extension or Mobile Telephone.
Microsoft Teams
The SolSwitch supports connecting Microsoft Teams accounts to an extension, enabling Teams to work as a fully functional softphone that can place and receive calls, tie to a voicemail box, and make use of any of the standard call features on the system such as call transferring or forwarding.
In order to enable this functionality the administrator for the Teams accounts will need to follow the configuration steps below in the Teams Admin portal.
Configuring MS Teams for use with SolSwitch
Before getting started:
To configure Microsoft Teams to be able to be used for end-user extension on the SolSwitch, a few additional items are necessary to be able to complete the configuration. These are:
- A Microsoft 365 license for each user that includes Microsoft Teams.
- A "Microsoft Teams Phone Standard" license for each user.
- Two "Microsoft Teams Phone Resource Account" licenses.
Additionally, the required permissions within O365 tenant required for the various tasks will be:
- User Administrator
- License Administrator
- Domain Administrator
- Teams Administrator
Configuring needed domains for Microsoft Teams:
The domain to be used for direct routing voice routes in teams will be a subdomain of the FQDN of the SSTeams SBCs using the O365 domain for the subdomain name. Domain separators are separated with a dash, EG: sunwire.ca's subdomain for use with MS Teams integration would be both sunwire-ca.ssteams1.solswitch.com & sunwireca.ssteams2.solswitch.com.
To add the domain, an account with either the Global Admin or Domain Admin privileges will be required to add the needed subdomain to the tenant's domains page in the Microsoft admin panel via a DNS TXT record: https://admin.microsoft.com/#/Domains
For convenience, you'll want to have two browser tabs go through the process simultaneously as a record will need to be created for both subdomains of: ssteams1.soslswitch.com & ssteams2.solswitch.com. For each:
- 1. From the domains page found at the link above, select "add a domain".
- 2. Using the previous outlined naming convention, enter the subdomain as the domain name to be added and select "Use this domain".
- 3. Select "Add a TXT record to the domain's DNS record" and select "Continue".
- 4. Once provided the TXT name and TXT values for both domains, relay this information via email to tier2@sunwire.ca. Our team will confirm once the records have been added, at which point you can proceed and select "verify".
- 5. On the "How do you want to connect your domain?" page, select "more options", then "Skip and do this later (not recommended)" and then press "Continue".
- 6. Select "Done".
IMPORTANT: Once on the "Add a record to verify ownership" page, do not close the window as it will reset the TXT verification process complete.
Getting Started:
The following steps are to be done in the Teams Admin portal and will require the use of a Microsoft Teams admin account: https://admin.teams.microsoft.com/
Step 1: Set voice Routing Policies.
- 1.1. From the left-hand side menu, select "Voice" and then "Voice routing polices" from the submenu and select "Add" to open the voice routing policy creation page.
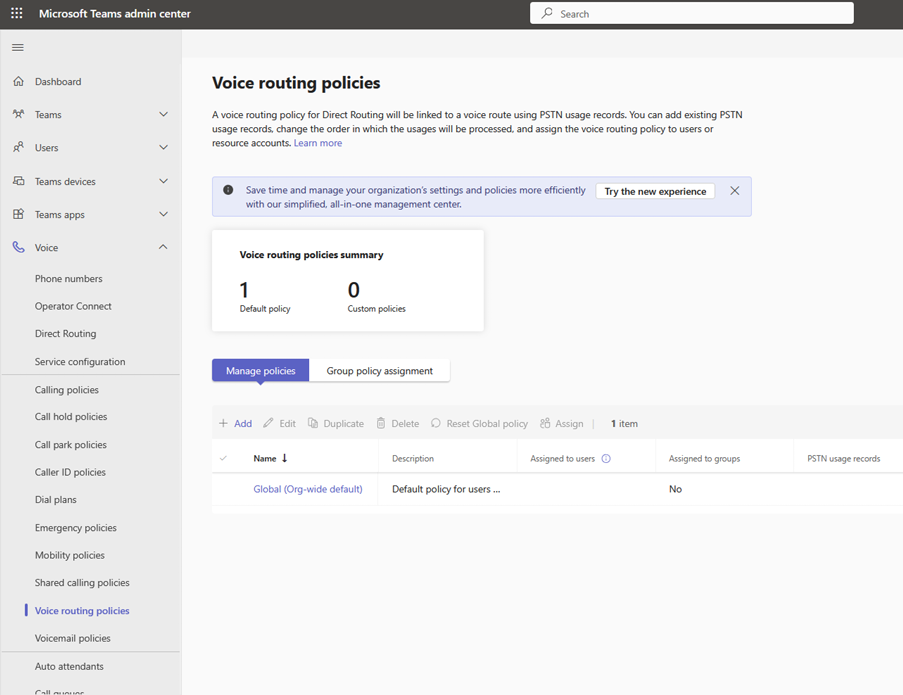
- 1.2. Name the new Policy "US and Canada" and add the description "Domestic".
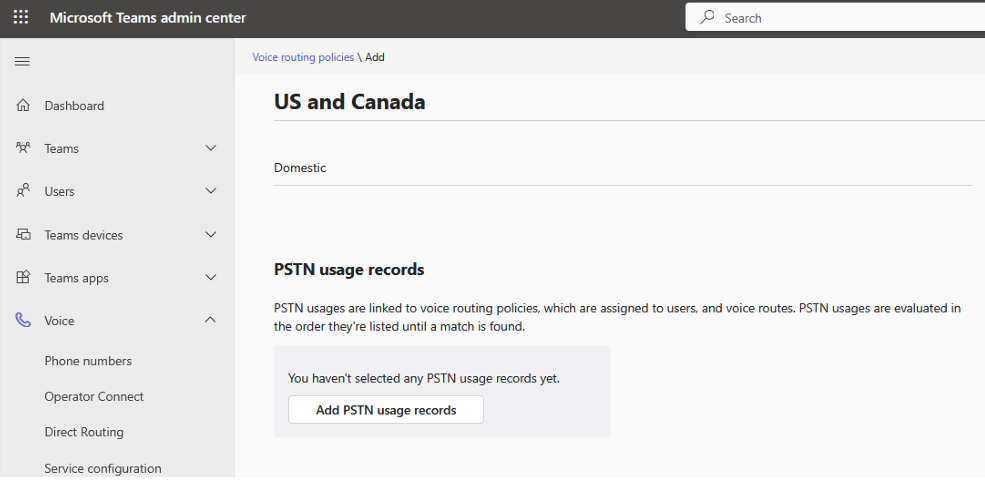
- 1.3. Select "Add PSTN usage" and select "US and Canada" from the righthand slide menu and select "Apply."
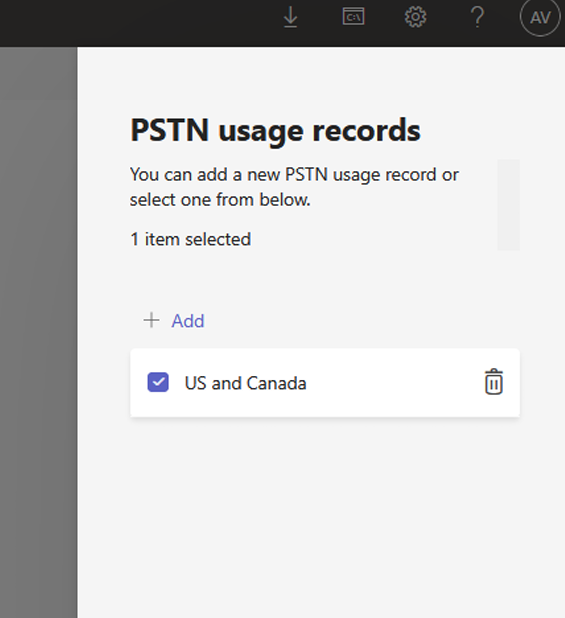
- 1.4. Select Save from the bottom of the window.
Step 2: Disable Call Park within Teams.
- 2.1. Select "Call park policies" from the left-hand side menu found within the "Voice" sub-menu.
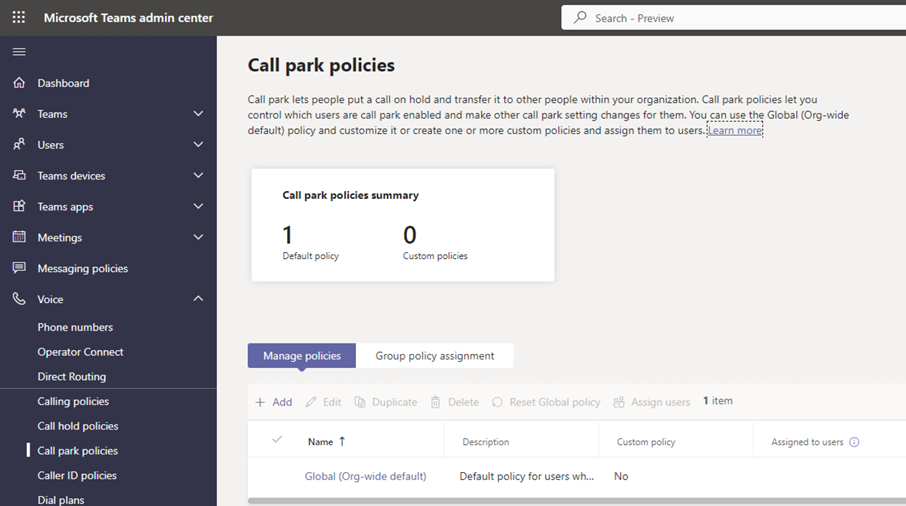
- 2.2. Select "Global" from the list of available policies list and select "edit" from the table's ribbon menu.
- 2.3. Ensure the option "Call park" is toggle to "Off".
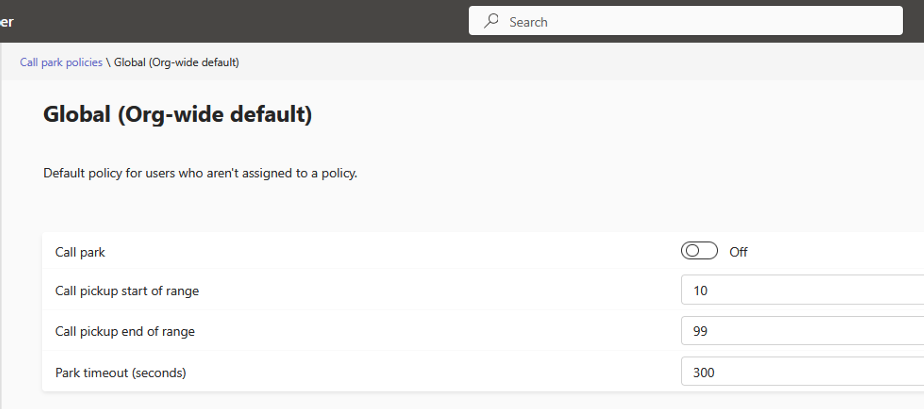
- 2.4. Save the configuration using the 'Save' button at the bottom of the page.
Step 3: Set Dial plans to enable calling of SolSwitch extensions and the use of call features.
- 3.1. From within the same "Voice" sub-menu, select "Dial Plans" from the left-hand menu.
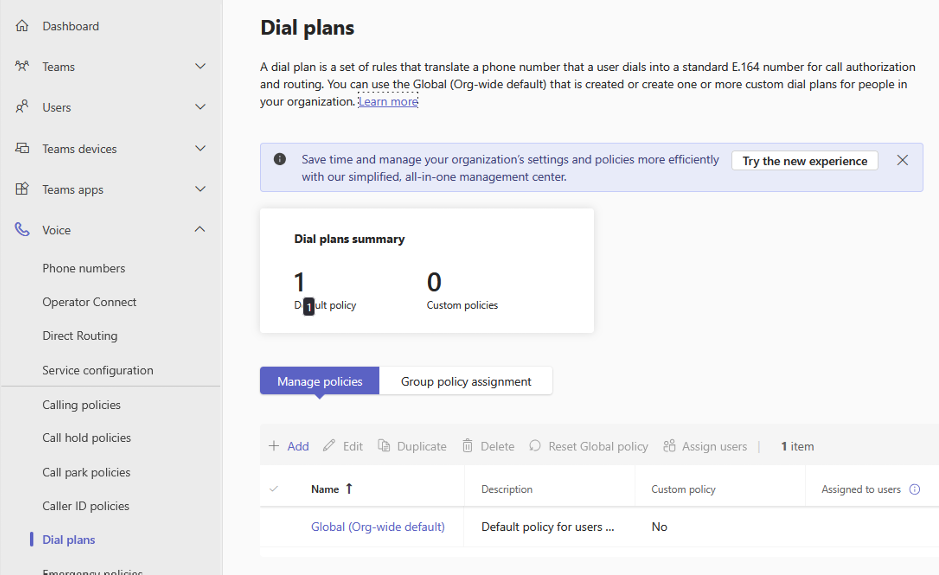
- 3.2. Select the "Global (Org-wide default)" from the populated list. Under "Normalization rules", we'll need to create two rules to accommodate the use of both internal calls to extension numbers and SolSwitch features that make use of star codes.
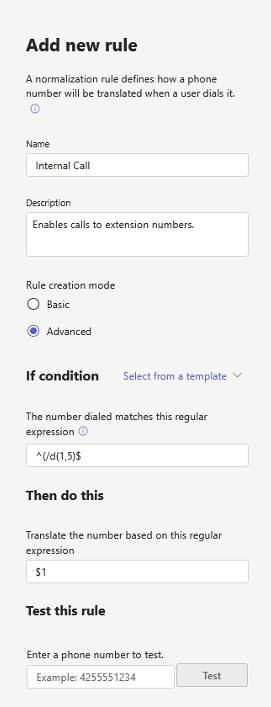
- 3.3. To create a rule for internal calls:
- 3.3.1. Under Normalization rules, select "Add" from the table's ribbon menu to open the right-hand slide menu.
- 3.3.2. Under Name enter: "Internal Calls".
- 3.3.3. Use the radio buttons to set "Rule creation mode" to "Advanced".
- 3.3.4. For the "If condition" enter: ^(\d{1,5})$
- 3.3.5. For the "Then do this" enter: $1
- 3.3.6. Select "Save".
- 3.4. To create a rule for star codes:
- 3.4.1. Under Normalization rules, select "Add" from the table's ribbon menu to open the right-hand slide menu.
- 3.4.2. Under Name enter: "Star Codes".
- 3.4.3. Use the radio buttons to set "Rule creation mode" to "Advanced".
- 3.4.4. For the "If condition" enter: ^(\*{1,2}\d{1,7})$
- 3.4.5. For the "Then do this" enter: $1
- 3.4.6. Select "Save".
- 3.5. Once both entries are completed use the save button at the bottom of the policy page to save the new rules.
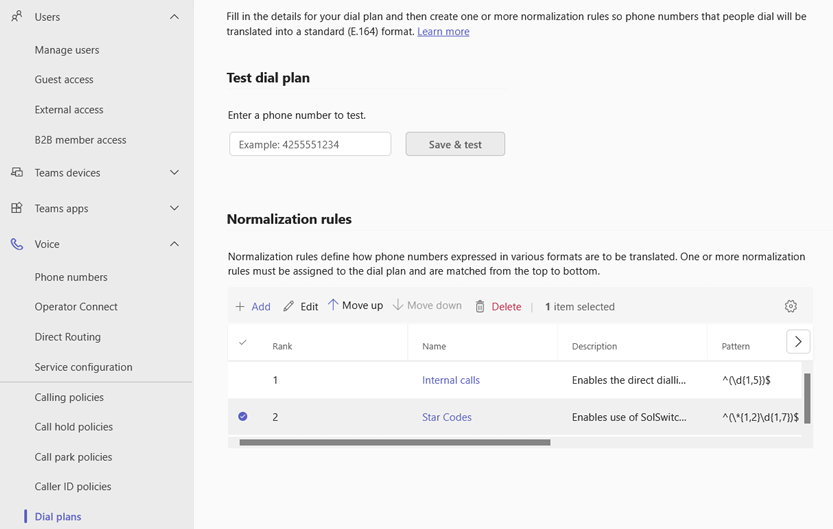
Step 4: Setting Caller ID Policy
- 4.1. In the left-hand menu, under "Voice", select "Caller ID policies".
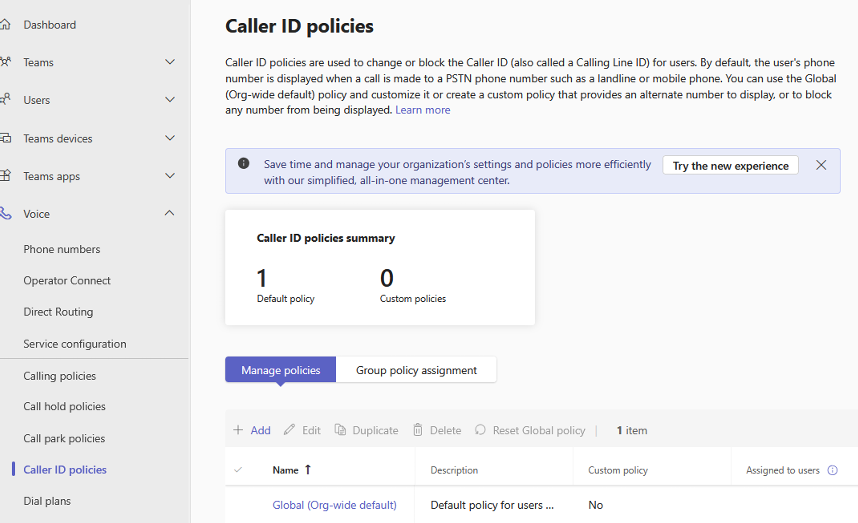
- 4.2. From the listed policies, we'll want to select Global (Org-wide default) and ensure the "Replace the caller ID with" option is configured to "User's number".
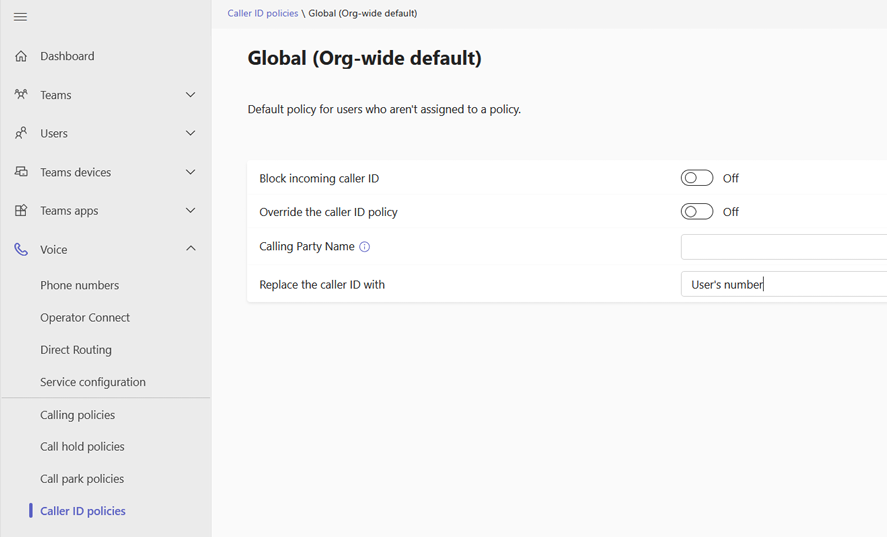
- 4.3. Save the changes using the save button at the bottom of the page.
Step 5: Setting up individual users.
- 5.1. Each user will need to be set up individually. From the left-hand menu, select "Manage users" found under the "Users" sub-menu.
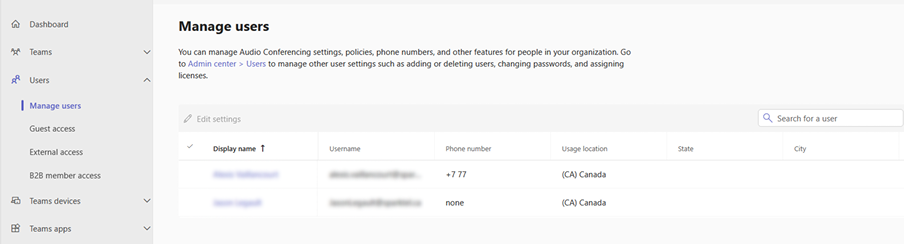
- 5.2. For each user:
- 5.2.1. Under the "Account" tab, click the "Assign Primary phone Number" button, add the extension number into the "Assigned phone number field" in the slide menu and apply the settings.
- 5.2.2. Under the "Voice" tab, set the "If unanswered" option to "None" and the redirect timer to 60 seconds.
- 5.2.3. Under the "Policies" tab, with the policy type: "Voice Routing Policy" selected, click "edit" from the table's ribbon menu, update the policy to "US and Canada" and click the apply button found at the bottom of the slide menu.
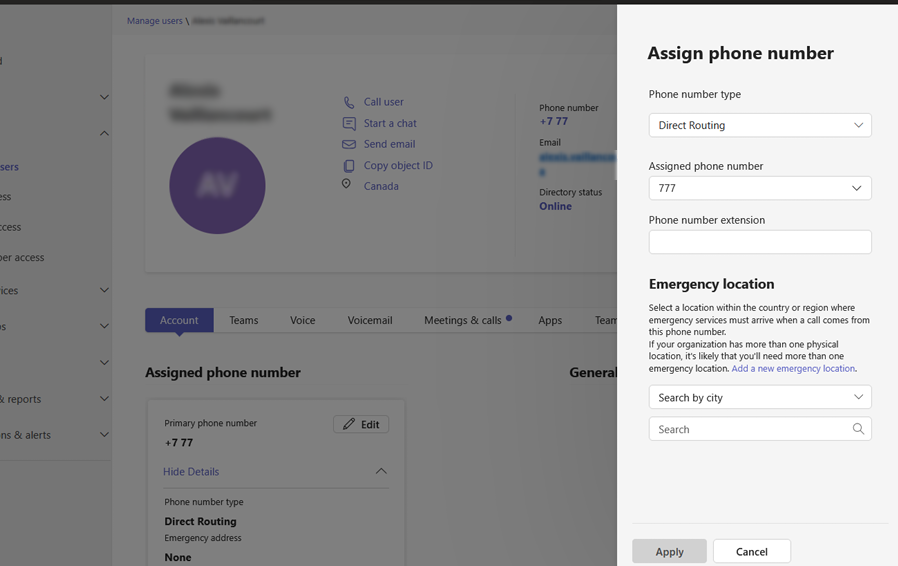
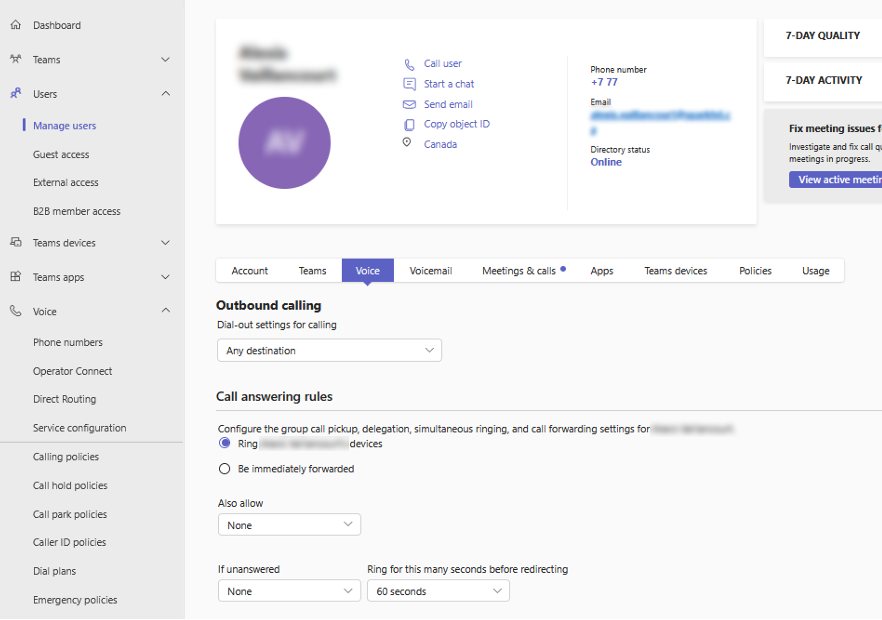
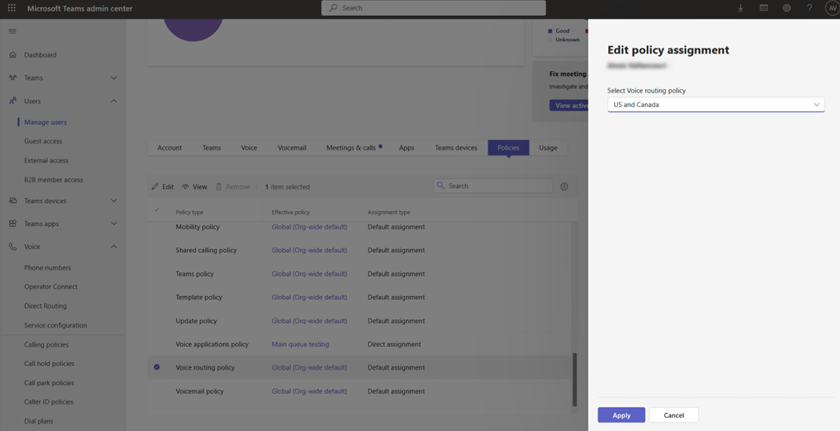
Step 6: Configure a Resource Account to activate the domains for use as a voice trunk.
- 6.1. Select "Resource Accounts" found under the "Voice" submenu.
- 6.2. For each of the sub-domains we added, for ssteams1.solswitch.com and ssteams2.solswitch.com, you'll need to:
- 6.2.1. Select "Add" from the table's ribbon menu to open a slide menu where a resource account can be created.
- 6.2.2. For Domain name, select the sub domain that was added from the list available.
- 6.2.3. Under Display name enter: "ssteams1" or "ssteams2" depending on the domain name used.
- 6.2.4. For field "Unique Username" enter the same as the "Display name".
- 6.2.5. For resource account type, select: "Auto attendant".
- 6.2.6. Save the resource account using the "Save" button found at the bottom of the slide menu.
NOTE: If the UI doesn't display the full name, hovering your mouse over the entry will display the full name in a tooltip box.
Step 7: Assign Licenses to the new Resource Accounts.
- 7.1. After having created the resource accounts, go to: https://admin.microsoft.com/#/users
- 7.2. From the table, select the resource accounts and select "Manage product licenses" form the ribbon menu at the top of the table.
- 7.3. Select "Assign More" from the options presented in the slide menu and select "Microsoft Teams Phone Resource Account" from the list.
- 7.4. Save the changes.
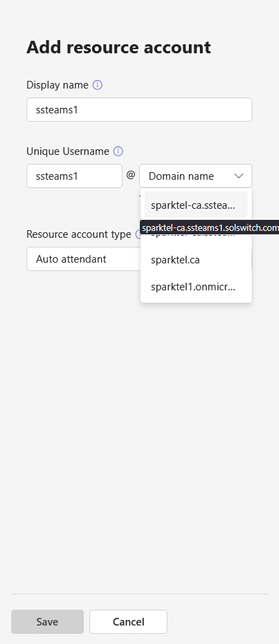
Step 8: Install the MicrosoftTeams Module for PowerShell:
- 8.1. Check for a current version of the MicrosoftTeams
- 8.2. If installed, update to the latest version:
- 8.3. If the module is not installed, and the Get-InstalledModule returned nothing, install the module anew by running:
Configuration of a voice route for the use of direct routing is done through PowerShell. The following commands will need to be run using an account with both Teams admin privileges and local privileges to install a PowerShell module.
Get-InstalledModule -Name MicrosoftTeams
Update-Module -Name MicrosoftTeams
Install-Module -Name MicrosoftTeams
Step 9: Download and enable script to create the voice routes.
To get our route setup script, copy and paste this URL into your browser: https://www.sunwire.ca/downloads/configure-voice-routes.ps1.
This is the .ps1 file that contains the commands for creating the voice routes. The file can be executed by right clicking and selecting "Run with PowerShell".
Note: To run a PowerShell script file that is unsigned, you may need to set go to Windows Settings app under System > For developers > PowerShell and toggle ON the setting "Change execution policy to allow local PowerShell scripts to run without signing. Require Signing for remote scripts". Otherwise, you can run the lines in the file individually.
Step 10: Running the included script to create voice routes.
- 10.1. Upon running the script, you'll be presented with a Microsoft Sign-In prompt to sign in with a Teams Admin account to add the needed settings.
- 10.2. Once signed in, the script will prompt you twice for an input. Both prompts will be for the domains to be used for teams' calls. These will be the two sub-domains that were added to your Microsoft365 tenant that Sunwire has validated prior to the other configuration.
- 10.3. When the script has completed successfully, you'll be presented with the configuration that was set followed by a line confirming the script has completed.
Calling should now be working for any configured extensions. If you have any questions, or encounter any errors, please reach out to tier2@sunwire.ca for support.
SolCast
SolCast is a multi-channel outbound communications platform that allows you to reach contacts via Phone, SMS, and Email through automated campaigns. Build contact lists, create campaigns with customizable scripts, and track delivery results from a central dashboard.
Dashboard
The SolCast Dashboard provides a high-level overview of campaign activity. At the top of the page, two summary cards display the current number of Active Campaigns and Pending Contacts (contacts that have not yet been reached).
Below the summary cards is a Contact History section that shows historical delivery statistics. Use the period selector to filter by:
- Today
- Month-To-Date
- Last Month
- Year-To-Date
- All Time
The historical section includes:
- Successful Contacts: Total number of contacts that were successfully reached during the selected period.
- Failed Contacts: Total number of contacts where delivery failed during the selected period.
- Daily Results Chart: A line chart showing the trend of successful and failed contacts over time. When viewing "Today", the chart displays hourly results; for all other periods, it shows daily results.
- Contact Types Chart: A doughnut chart showing the breakdown of contacts by medium (Phone, SMS, Email).
Campaigns
Campaigns are the core of SolCast. Each campaign defines the message content, delivery channels, and the list of contacts to reach. The Campaigns list page displays all campaigns with their Name, Status, and Last Activity timestamp.
Campaign statuses are:
- Stopped: The campaign is not running. No contacts will be processed.
- Running: The campaign is actively processing and delivering messages to contacts.
- Closed: The time rule for the campaign is currently closed, the campaign will switch back to Running when the time rule opens.
- Completed: All contacts in the campaign have been processed.
Creating a Campaign
Click Add Campaign to begin. Campaign creation follows a step-by-step process:
Step 1 - General Settings:
- Name: Enter a descriptive name for the campaign.
- Time Rule: Optionally select a Time Rule to restrict when the campaign runs. If set, the campaign will only process contacts during "Open" hours defined by the rule. If no Time Rule is selected, the campaign will run at all times until completed.
- Custom Fields: Add custom data fields that can be configured per-contact (e.g. "Account Balance", "Appointment Date"). Custom field values can be inserted into scripts using ${Field Name} syntax. Click the + button to add fields or the x to remove them.
Step 2 - Channel Settings and Contacts:
After saving the general settings, configure the delivery channels and manage contacts.
Phone Settings:
- Generate Phone Calls: Toggle to enable outbound phone calls for this campaign.
- CID Name: The caller ID name displayed on outgoing calls.
- From DID: Select the phone number to place calls from.
- Max Concurrent Calls: The maximum number of simultaneous outbound calls (1 - 100).
- Retries on Fail: Number of times to re-attempt if a call doesn't connect (0 - 5). Note: Reaching a voicemail will count as a successful call.
- Retry Delay (Hours): Minimum delay in hours from the last attempt before trying again.
- Voice Type: Select the text-to-speech voice for automated messages. Use the audio player to preview each voice. The "Random" option randomly selects a voice for each call.
- Call to Person Script: The message spoken when a person answers the call.
- Call to Voicemail Script: The message left when the call reaches voicemail.
- DTMF Triggers: Configure keypad options that contacts can press during a call. Each trigger maps a key (1 - 9) to a destination, such as routing to a queue, an extension, replaying the message, or unsubscribing. Note: To comply with anti-spam laws, at least one option should provide contacts a way to unsubscribe (which could be through the Unsubscribe option, or just by having a way to speak with an agent and request it).
SMS Settings:
- Send SMS Messages: Toggle to enable outbound SMS for this campaign. Standard messaging rates apply.
- From DID: Select the phone number to send SMS messages from.
- SMS Script: The text message body. "Reply STOP to unsubscribe." is automatically appended to all outbound messages.
- Response Triggers: Configure automated actions based on SMS replies. Each trigger consists of:
- Keyword(s): The word or phrase to match against incoming replies (case-insensitive, must match the full message). Leave blank to set a default action for unmatched replies.
- Action - Route: Forward the conversation to a multimedia queue, extension, or custom script.
- Action - Respond: Send an automated reply message back to the contact.
Email Settings:
- Send Emails: Toggle to enable outbound email for this campaign.
- From Name: The sender name displayed in the email.
- From Email Address: The email address to send from.
- Subject: The email subject line.
- Email Body: A rich-text editor for composing the email content. Images can be uploaded directly into the email body. All emails will automatically include an 'Unsubscribe' link at the bottom of the email.
Test Campaign:
Before starting a campaign, you can send test messages. Expand the Test Campaign section, fill in any custom field values for the test, then enter a phone number, SMS number, and/or email address to receive the test. Click Save Settings and Send Test(s) to deliver the test messages.
Scripts and Custom Fields:
All scripts (Phone, SMS, and Email) support variable substitution. Use ${Name} to insert the contact's name, and ${Field Name} to insert any custom field value. For example, a custom field called "Account Balance" can be referenced as ${Account Balance} in any script.
Managing Campaign Contacts
The bottom of the campaign page contains the Manage Contacts section where you add and manage the people who will be contacted by the campaign.
- Keep Contacts in Sync: When enabled, contacts imported from a Contact List will remain synchronized between the campaign and the original list. Changes made in either location will be reflected in the other.
- Add Contact: Manually add individual contacts with their name, phone number, SMS number, email address, and any custom field values.
- Import: Import contacts in bulk using either:
- CSV Upload: Upload a CSV file with columns for Name, Phone, SMS, Email, and any custom fields defined on the campaign. Exported campaign contacts include a *ContactID column that allows re-importing to update existing contacts rather than creating duplicates.
- Contact List: Import from an existing SolCast Contact List. If a contact already exists in the campaign (matched by Contact ID), it will be updated; otherwise, a new campaign contact will be created.
- Export: Export the campaign's contacts to a CSV file.
The contacts table displays each contact's name, contact information, custom field values, and their delivery status. The Last Activity column shows the most recent delivery attempt and its result.
Running a Campaign
Once contacts and settings are configured:
- Click Save and Start Campaign to save settings and begin processing immediately, or Save Settings to just save the campaign but not set it to Running.
- Use the Start / Stop buttons in the status bar to control the campaign at any time.
- If a campaign has failed contacts, Save and Re-Try Failed Attempts can be used to clear the failed status and re-queue those contacts for another attempt.
Progress bars in the status area show real-time completion for each channel (Phone, SMS, Email) and a combined total, broken down into Completed, Failed, and Pending.
Copying a Campaign
To create a new campaign based on an existing one, use the Copy Settings From option when creating a new campaign. This will duplicate all campaign settings and contacts into a new campaign, with the contacts' delivery statuses reset.
Email Authentication
Before SolCast will send email from a "From" address, the domain it sends from must be authenticated through DNS. This is required to keep deliverability acceptable: modern mail providers (Gmail, Outlook, Yahoo, etc.) reject or junk mail whose sending domain isn't properly authenticated.
Each customer is responsible for publishing four DNS records on the domain they want to send from: SPF, DKIM, DMARC, and a bounce CNAME. SolCast verifies these records (plus a supporting MX check) automatically before any campaign email goes out, and re-checks them every hour. Domains that aren't verified are not blocked from being saved on a campaign, but the campaign will not actually send any email from them until verification succeeds.
Choosing a From address: We recommend sending from a dedicated subdomain (e.g. news.example.com rather than example.com) so that campaign mail builds its own sending reputation separate from the organisation's day-to-day email. This is a recommendation, not a requirement - an apex (root) domain From address works as well.
For questions about the configuration process for your specific DNS provider, refer to the provider's documentation or discuss with your system administrator.
The Records
The exact values to publish are generated per-domain and shown directly under the "From Email Address" field on the campaign settings page. The record types are:
- SPF (Sender Policy Framework): A TXT record on the root of the sending domain that authorises our outbound relay (via
include:_spf.solcast.ca) to send mail on behalf of the domain. If the domain already has an existingv=spf1record (e.g. for Microsoft 365 or Google Workspace), theinclude:directive must be added to that existing record rather than publishing a second SPF record. Multiple SPF records on the same domain will cause all SPF checks to fail. - DKIM (DomainKeys Identified Mail): A TXT record published at a selector-specific host (
{ss-name}-s{n}._domainkey.{domain}) containing a 2048-bit RSA public key. SolSwitch generates a fresh keypair the first time a campaign is configured with that domain, stores the private key locally, and signs every outbound message with it. Receivers fetch the public key from DNS and verify the signature. - DMARC (Domain-based Message Authentication, Reporting and Conformance): A TXT record at
_dmarc.{domain}that tells receivers what to do with mail that fails SPF or DKIM, and where to send aggregate reports. Any existing policy is accepted,p=noneincluded, and a record on a parent (organisational) domain covers a sending subdomain - if you already publish DMARC anywhere up the chain, the check passes and your existing record is shown back to you with a green check. Only a domain with no DMARC record at any level is blocked from sending. In that case the banner shows a record to add:p=nonewhen sending from an apex domain (so the new policy doesn't affect the rest of the organisation's mail), orp=rejectwhen sending from a dedicated subdomain. - Bounce CNAME (required): A CNAME record at
bounce.{domain}pointing to this SolSwitch's bounce hostname. This is required so bounce notifications can be received and undeliverable addresses handled. It also supplies the domain's bounce MX (see below), since the CNAME target carries the MX record.
An MX check is also run and must pass: an MX record has to resolve for the bounce host so bounce notifications can be received. For a normal customer domain this is satisfied automatically by the bounce CNAME above (the CNAME target, bounce-{ss-name}.solcast.ca, carries the MX), so there is no separate MX record for the customer to publish.
Setup Process
To configure a sending domain:
- On the campaign settings page, expand the Email Settings section, toggle Send Emails on, and enter the desired From Email Address.
- A banner appears under the email field showing the DNS records that need to be published, with the exact Host and Value for each. The Status column indicates what to do with each record: Add means publish a new record, Update existing means modify a record you already have (the banner shows your current value beneath the target so the change is clear), and a green In place means the record is already correct and needs no action.
- In your DNS provider's system (Cloudflare, GoDaddy, Route 53, etc.), add or update each TXT record exactly as shown. For SPF in particular, if you already have a
v=spf1record the value shown is your existing record with ourinclude:merged in - publish that single combined record rather than a second SPF record. Note that some DNS interfaces strip the domain off the host field (e.g. enter_dmarcinstead of_dmarc.example.com) - refer to the provider's documentation if unsure. - Wait for DNS propagation. This is usually within a few minutes but can take up to several hours depending on the provider and any previous TTL values.
- Back on the campaign page, click Re-check now. The banner will refresh with the result of each check.
Once all required checks (SPF, DKIM, DMARC, the bounce CNAME, and MX) pass, the banner turns green and confirms the domain is authenticated. Campaigns using a "From" address on that domain will send normally from that point on.
Verification States
- Green banner - "Sending domain authenticated": All three required records pass. Emails will send normally.
- Yellow banner - "Sending paused for {domain}": One or more records are missing or incorrect. The banner lists the per-check result and the records that need to be published. The campaign can still be edited, saved, and started; email contacts simply stay queued until verification passes. Phone and SMS contacts on the same campaign are unaffected.
- Red banner - "Could not check sending domain": The verification request failed (e.g. invalid domain format, internal error). Confirm the From Email Address is well-formed and try again.
Ongoing Verification
Each verified domain is re-checked once per hour. If any of the three required records becomes invalid the domain is marked as unverified and sending pauses until the records are corrected. In-progress campaigns will pause their email channel mid-run on the next dispatcher cycle; pending email contacts stay queued rather than being marked as failed, so no work is lost.
Rotating the DKIM Key
The Regenerate DKIM key button on the banner generates a fresh DKIM keypair for the domain. This is useful for periodic key rotation as part of a security or compliance policy. Regenerating immediately invalidates the current key: the domain returns to an unverified state and sending pauses until the new key is published and re-verified. Each regeneration uses a new selector (the -s{n} suffix on the DKIM host increases), so you publish a new DKIM record rather than editing the existing one - this takes effect as soon as the new record propagates, with no need to wait out the old record's TTL. The old record can be removed once the new one verifies.
Contact Lists
Contact Lists are reusable collections of contacts that can be imported into one or more campaigns. They allow you to maintain a central directory of contacts separately from any individual campaign.
Creating a Contact List:
Click Add Contact List and enter a name. Once created, click on the list or the gear icon under Manage Contacts to open the contact management page.
Managing Contacts:
Within a contact list, each contact stores:
- Name: The contact's name.
- Phone: Phone number for voice calls.
- SMS: Phone number for text messages.
- Email: Email address.
Contacts can be added individually by clicking Add Contact, or in bulk:
- Import: Upload a CSV file with columns: Name, Phone, SMS, Email. When contacts are imported, they are automatically synced to any active campaigns that reference this contact list.
- Export: Download all contacts in the list as a CSV file.
Reporting
The SolCast Reporting page provides a detailed log of all campaign delivery attempts. Use the search filters to narrow results:
- Date Range: Select the time period to search.
- Campaign: Filter by a specific campaign or view all campaigns.
- Destination / Ref ID: Search for a specific phone number, email address, or reference ID.
- Medium: Filter by Phone, SMS, and/or Email contact methods. At least one must be selected.
Choose which columns to display in the results:
- Time: Timestamp of the delivery attempt.
- Campaign Name: The name of the campaign.
- Medium: The delivery channel (Phone, SMS, or Email).
- Destination: The phone number or email address contacted.
- Ref ID: A reference identifier for the delivery attempt. For Phone Calls this is the CDR Call ID, for SMS it is the SMS ID from the SMS Log.
- Status: Whether the attempt was successful or failed.
- Response: Any response details from the delivery (e.g. error messages), or responses from the receiving user.
Results can be exported to a CSV file by clicking the download icon next to the results heading.
Unsubscribes
The Unsubscribes page tracks contacts who have opted out of receiving SolCast messages. Contacts can unsubscribe themselves (e.g. by replying "STOP" to an SMS, or clicking the "Unsubscribe" link in an email), or they can be manually unsubscribed by an administrator.
A contact that has unsubscribed will no longer receive messages sent by the initating campaign or messages sent by the sender they unsubscribed from. E.g. a contact that unsubscribes using the link in an email sent by billing@example.ca for the campaign "Billing Campaign" will not receive any emails from that campaign even if the from email is changed, and will not receive emails from any campaigns using billing@example.ca as the from email.
The unsubscribe list displays:
- Name: The name of the contact who unsubscribed.
- Time: When the unsubscribe occurred.
- Medium: The channel they unsubscribed from (Phone, SMS, or Email).
- Contact Info: The contact's phone number or email address that was unsubscribed.
- Sender: The sending phone number or email address that the contact unsubscribed from.
- Initiated Campaign: The campaign that triggered the unsubscribe.
Manual Unsubscribe:
Click Manual Unsubscribe to add an unsubscribe record for a contact. Fill in the following:
- Name: The contact's name.
- Medium: Select Phone, SMS, or Email.
- Contact Information: The phone number or email being unsubscribed.
- Unsubscribe From: Choose "All Senders" to block messages from all sending numbers/addresses, or "Specific Sender" and enter the particular sending number or email address.
Removing an Unsubscribe:
Unsubscribe records can be removed through the options menu on each row. Warning: Removing an unsubscribe record may violate anti-spam laws (including CASL, CAN-SPAM, and GDPR) if the contact hasn't consented to being re-subscribed. Only remove a record if the contact has explicitly confirmed their wish to re-subscribe. Removing an unsubscribe without clear consent can result in legal penalties and complaints.
Reporting
Call Detail Records
Perhaps one of the more powerful reporting tools on the SolSwitch for general call information, the Call Detail Records shows a breakdown of all the calls on the system during the specified period. Additional search fields are available and include inbound and outbound calls, extension or routing type and offer an overview of which agents are taking calls from the queue, or which calls went to voicemail. There is also an option to select a Report Type to show recording calls only, which will only show calls that were recorded on the system as well as an option to see each leg of the call.
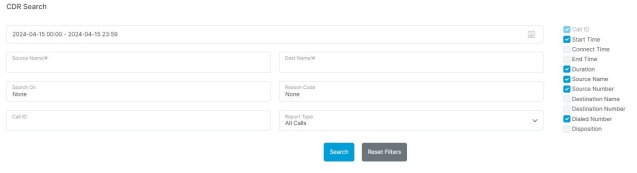
Once the search results are displayed, you will have the option to export the results to a CSV file for further processing by clicking on the blue down arrow. If there is a recording of a particular call, a small microphone will be displayed next to that call. For more details regarding the call, simply click on the call.

Clicking the call will display details such as when the call was initiated, where the call was routed, who answered it, as well as who ended it. If the call passes through specific IVRs or Queues, it will all be displayed. This is also where you can playback or save call recordings. If you have the right permission, you can also delete the recordings which will also delete the recording from the FTP/SFTP server if it's backed up. If transcription or call summaries are enabled, clicking on the message icon will open up a transcription log at the bottom.
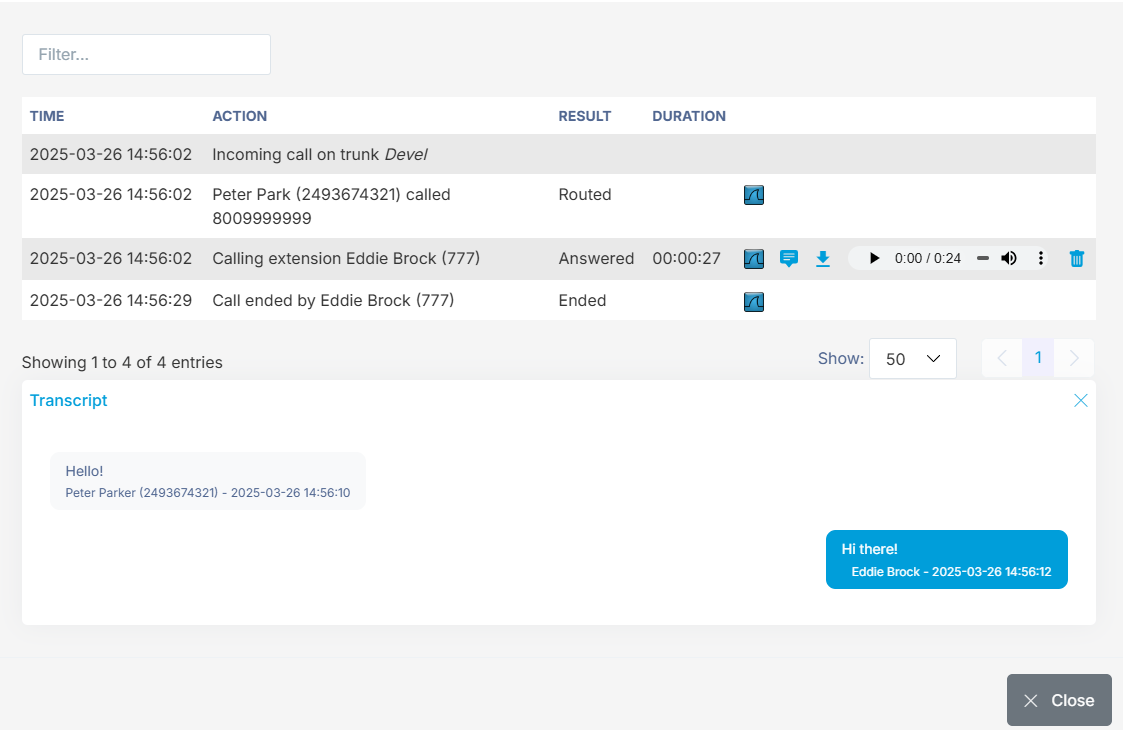
Call Report Builder
The Call Report Builder is similar to the Call Detail Records although it allows you to customize the type of CDR report you would like. Your custom reports can also be saved in the system for future use. Creating a report is as simple as entering a date range, checking off which columns to include in the report as well as adding optional filter(s) and choosing how to sort the report. To save a report, simply enter a Name for the report at the bottom of the page and click the '+' button. Saved reports will be displayed in the dropdown menu for future use. Clicking the 'Search' button will display the results on the screen. To download a file of the report, click the square button with 9 dots.
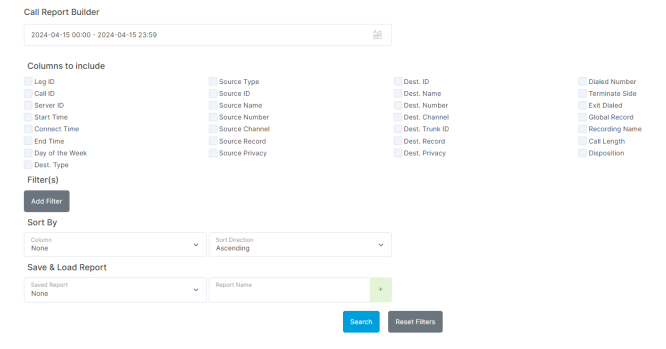
Current Calls
The current calls screen displays all active calls currently in place on the system or just the current customer if the system has a Multi-Tenant licence. Each active call has data concerning the source, direction, destination, duration, source channel, destination channel as well as the ability to hang up the call. Only current active calls are displayed here.

Extension Time Report
This page gives a detailed summary report of all calls sorted by extension for any specified time period. An example report would be the following:
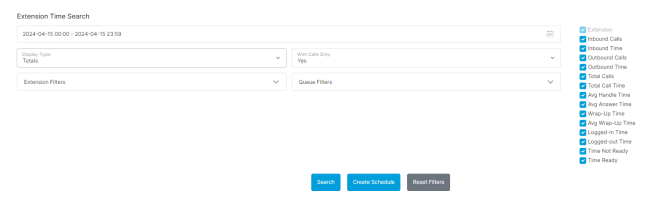
The results would return:
- Total Inbound Calls & Total Time on Inbound Calls.
- Total Outbound Calls & Total Time on Outbound Calls.
- Total Calls & Total Call Time.
- Total & Average Wrap-Up Time.
- Total Log-In Time and Log Out Time (Returns the total amount of time the extension was logged in for or logged out for).
- Total Break Time (Returns the length of time agents were on break).
- Total Time Ready (Returns the total length of time agents were available for a call).
Live Agent Stats
The Live Agent Stats page shows live details for specific agents (extensions). The following statistics are shown for each agent:
1. Inbound Calls.
2. Outbound Calls.
3. Total Calls.
4. Average Handle Time (Average time spent on calls).
5. Average time to Answer.
6. Service Level (Based on service level of queues that the agent is a part of).

Live Queue Stats
The Live Queue Stats page will show you live details for all queues, agents and current calls. Queue Statistics include information for each queue relating to:
1. Calls.
2. Callbacks.
3. Available Agents.
4. Answered.
5. Abandoned.
6. Waiting Time.
7. Estimated Wait Time.
8. Voicemails.
9. Service Level.
10. Chats.
11. Chats Assigned.
Queue Member Status shows the last updated time, a list of extensions as well as what queue(s) that extension belongs to, it's current status, if the status is on the phone, which queue the call came from as well as the duration of the call if one exists. In addition, you are able to change what queue stats to display, whether all or some of the queues.
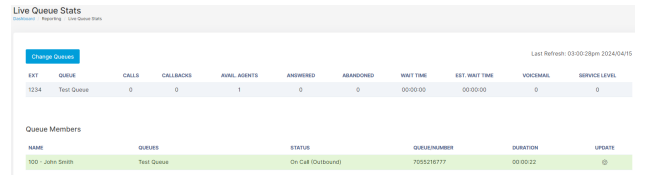
Live Stats Report
The Live Stats report shows the last updated time and live details for all or select queues. Stats are split into two sections the Queue Statistics, and the current agent status. We are able to see the call taken and missed by the agents in addition to the overall taken/missed calls of the queues.
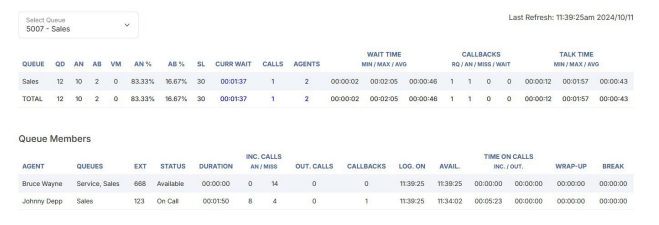
Multichannel Messaging
All activity in the webchat portal is recorded and can be found with the Multichannel Log Search. Start by selecting a time frame to search for multichannel logs. You can also specify the Session ID, search any text in the Message, if the Direction was incoming or outgoing, the user that sent the message and the Handler is the type of chat either SMS, Webchat, Facebook or an API.
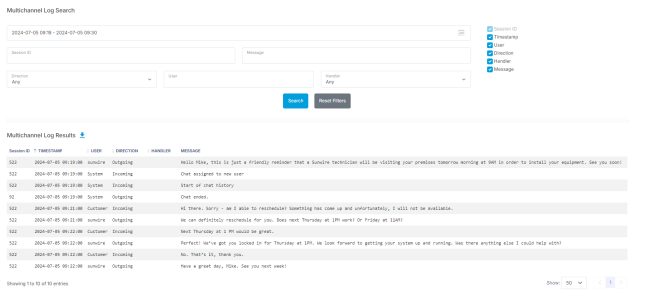
Queue Agent Busy Report
This page gives a detailed report of busy reason codes by an agent. This report can be filtered by queue (one, multiple or all), by agent (one, multiple or all) or by reason code (one, multiple or all). Based on these filters, the display of the report can be grouped by day or by queue.

Queue Alerts
The Queue Alerts page allows the configuration of alerts that can be sent based on queue statistics. These alerts are checked every minute on the system, and if any of the items are over the set limit on this page an email will be sent to the specified email(s). The page allows for the creation of multiple 'Alert Groups' for the same queue, meaning that different thresholds and emails can be set for the same queue. The Notify Interval can also be set, which limits how often emails will be sent.

Queue Call Breakdown
A historical report of inbound calls answered and inbound calls abandoned (Inbound calls that hang up before being answered). These stats also display wait time minimum, maximum and averge which is how long each caller spent in the queue before being answered. Abandoned and answered rate shows a percentage of call where a caller ends the call before being answered and a percentage of calls that make it through to an agent. The Average Handle Time shows the average time spent on calls during the selected time period.
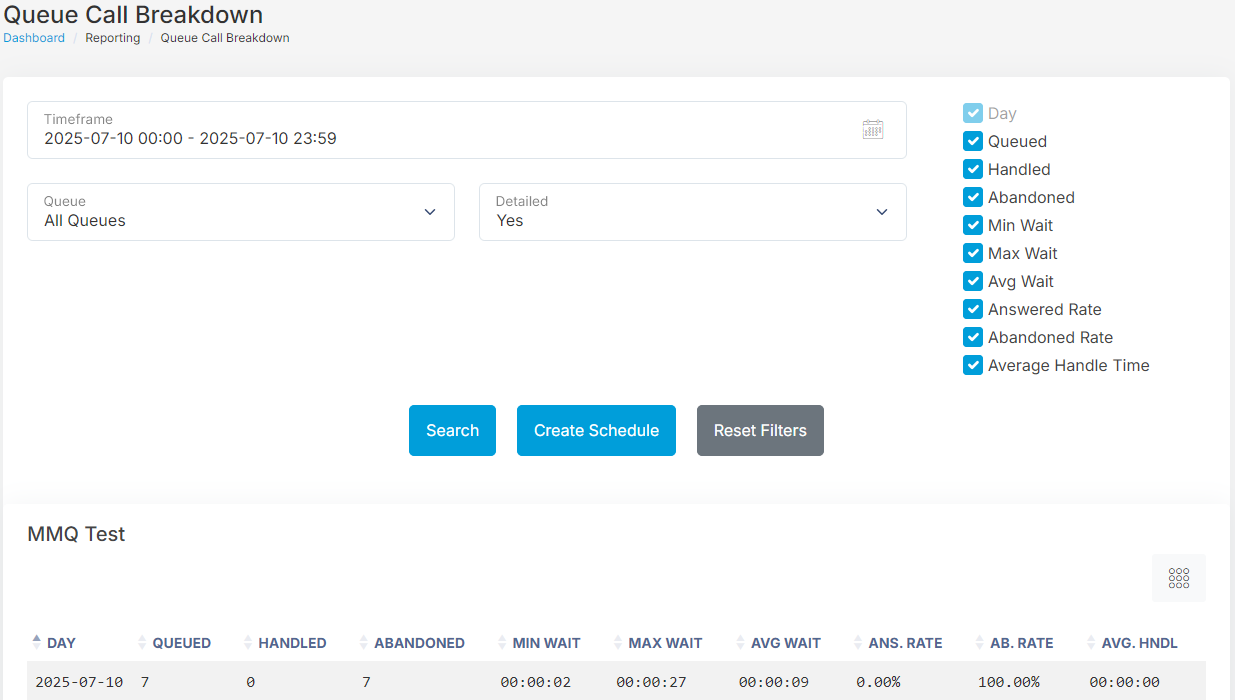
Queue Call Reason Report
This page can be filtered by start date/time, end date/time, queue (one, multiple or all), agent (one, multiple or all) or by reason code (one, multiple or all). Based on these filters, the display of the report can be grouped by day or by queue.
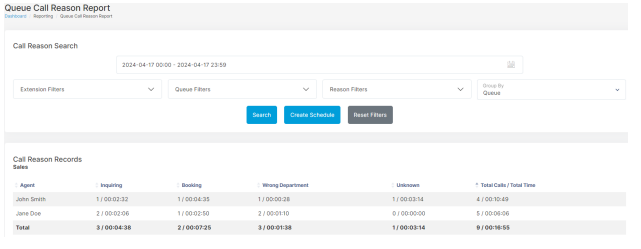
Queue Callback Details
Here you can manage all of the callbacks that were requested on any queue. You see the queue that the callback is in, cancel the callback or see how many callback attempts are remaining.

Queue Graphs
This report generates a graph which represents queue activity between selected dates and times. The report will show the number of calls that were waiting in a queue as well as the number of calls that were spent talking in a queue. Below is a sample report:
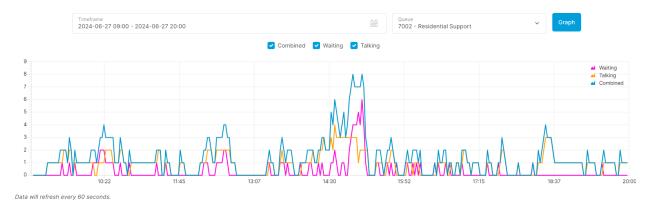
Queue Service Level Report
This page allows a user to pull a report between two dates and filter by selecting queues answer/abandoned calls, then displays that pulled record to see all the answered and/or missed calls.
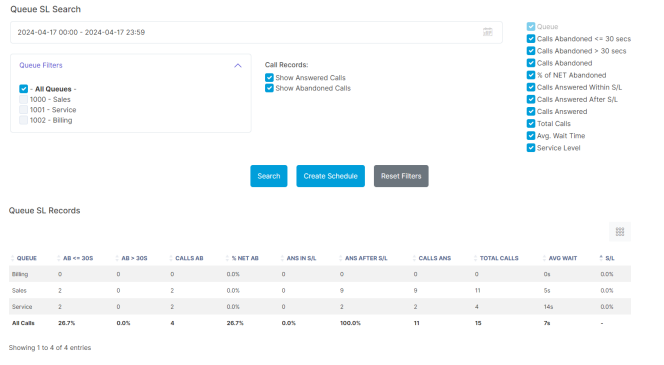
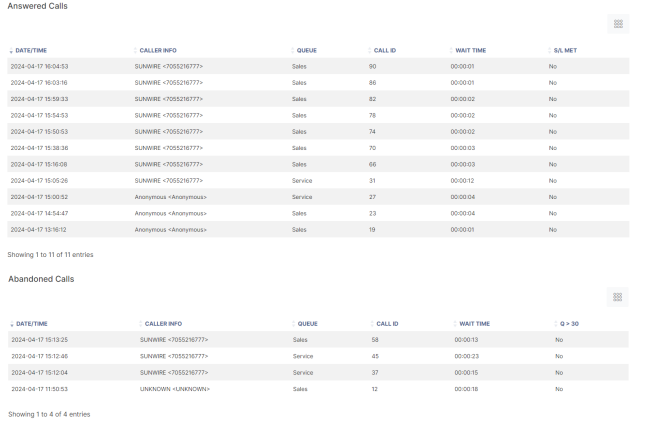
Scheduled Reporting
The scheduled reporting page allows select reports to be set to run at regular intervals. The report will automatically run on the select day/time, for the selected time range, and the results of the report will be sent via email.
The initial page shows currently scheduled reports, their next run time, and gives the option to Add, Edit, Disable and Delete reports.
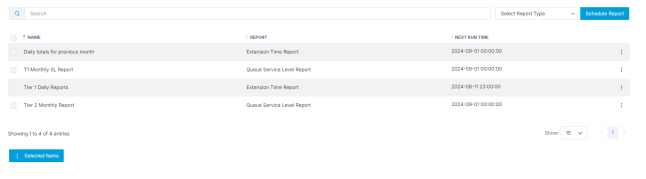
To add a report, select report type then Schedule Report. You can also go directly to the report in question and click Create Schedule. Once a Schedule is created it will show the details page that allows the user to set up a wide range of options for when and how the report should run. The following options are available on this page:
- Enabled: This allows the report to be disabled or enabled at any time.
- Schedule Name: Name for the report, used to identify the reports on the initial page as well as when the results are emailed.
- Email Results To: The email accounts that should receive the results. Multiple email accounts can be added by separating them with a comma.
- Run Report: When the report should run. This has the following options:
- Weekly: Run the report every week on the selected day and time.
- Monthly: Run the report every month on the selected day and time.
- Number of Days: Run the report with a set interval of days, set by the frequency. Ie if the frequency is set to 60, the report will run every 60 days at the selected time.
- Time to Run: This specifies what time the report will generate and send an email.
- Time Span: The span of time that the report should cover when it runs. The following options are available:
- Previous Weekdays: Allows selection of specific days of the week. The report will run on each of those days individually, using the set time frame if the report has the option for times.
- Previous Week: The report will run for the previous 7 days.
- Previous Month: The report will run for the previous calendar month. Ie, if the report is run at any point during May with Previous Month selected, the report will run for the full month of April.
- Previous Number of Days: The report will run for a previous set number of days, starting from the previous day.
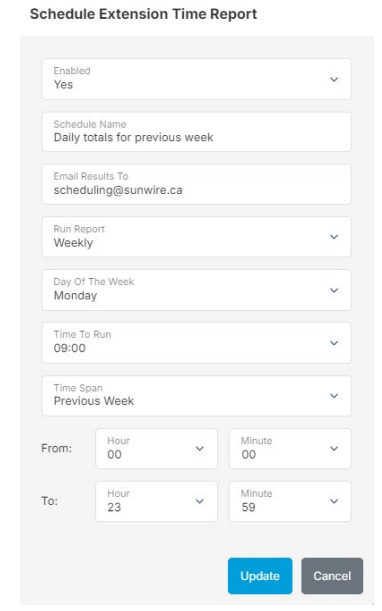
SIP Ping Monitor Report
This feature generates a graph which represents SIP account activity between selected dates and times. It will display, in milliseconds, the Packet Loss, Ping response and when a SIP account was offline. To use this tool 'Ping Monitoring' needs to be enabled on the SIP account.
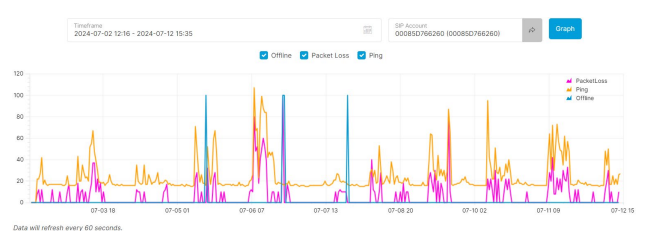
SMS Log
If your SolSwitch has SMS enabled on DIDs, you can view all of the messages that have been sent and received on them. You can search using the number, SMS ID and also any text in the message itself.

Survey and IVR Reports
Whenever a call is sent to an IVR or Survey, all of the options the caller selects are recorded. Select a time frame and an IVR or Survey to view what options were chosen during the time frame. You can also search for specific Call IDs or filter out certain extensions or queues.
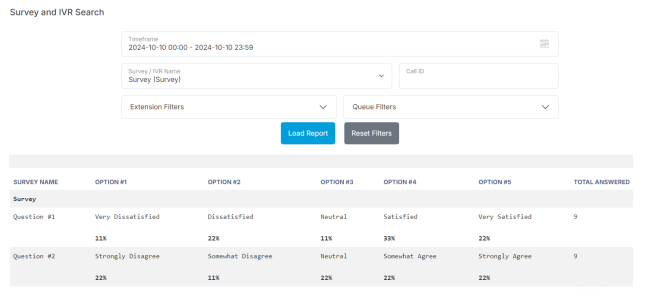
Toll Report
If calls are made to long-distance areas not covered in your calling plan they will incur a toll fee. You can search for any date range to see all of the calls made within that time, the area that was called and the cost of each call. If you have a Toll-Free number it will show you how much you are charged whenever it is dialled.
You can also view SMS, Multichannel Messaging, Speech to Text and Text to Speech tolls.
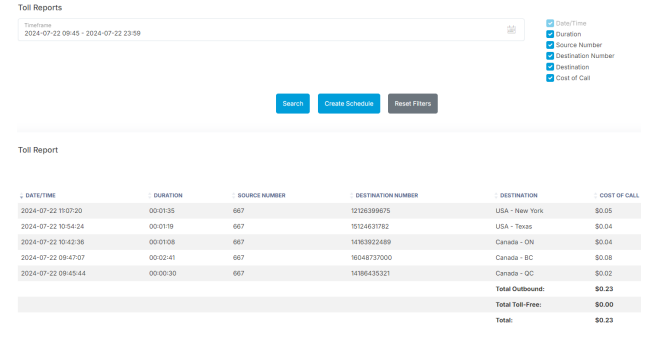
Usage Report
Select time ranges to generate a graph showing internal, outbound, inbound and combined call data.
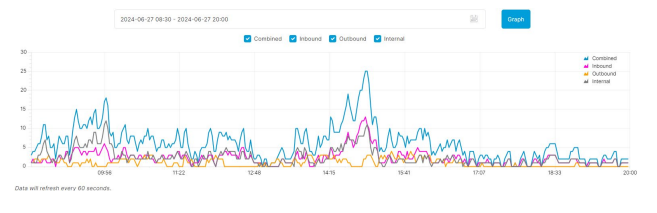
Voicemail Activity Report
This report shows a log of all voicemail mailbox activity for the current customer. Use the date range and mailbox filters to narrow results. The following actions are recorded:
- Logged In: A user successfully authenticated into a mailbox.
- Login Failed: An incorrect password was entered for a known mailbox.
- Updated Password: The mailbox password was changed.
- Listened to Message: A message was played back. Action Details shows the message ID and the date/time it was left.
- Deleted Message: A message was marked as deleted. Action Details shows the message ID and the date/time it was left.
- Forwarded Message: A message was forwarded to another mailbox. Action Details shows the message ID, the date/time it was left, and the destination extension.
- Updated Greeting: A mailbox greeting was recorded and saved. Action Details shows which greeting type was updated (greetingBusy, greetingUnavail, greetingTemp, or greetingName).
Voicemail Usage Report
The Voicemail usage report shows each voicemail, its name as well as the extension it is assigned to and the size of the mailbox.
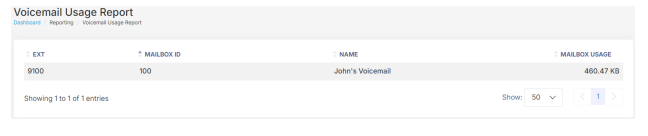
Provisioning
Provisioning is a way of remotely programming specific settings on a device. Provisioning is supported on the following device types: Aastra/Mitel, Cisco, Linksys and Polycom. Provisioning is available via HTTP or HTTPS. Please contact Sunwire for additional information regarding configuring SSL certificates.
Device Provisioning
Adding a SIP Device: Select the proper device type from the dropdown menu then click the 'Add Device' button. Depending on the device selected only some of the options below will be applicable.
Adding/Editing Device Details:
- Device Info
- Device Type: Only used for identification purposes, does not affect provisioning.
- Firmware Version: Select an available firmware version from the list.
- Device Name: Also for identification purposes.
- MAC Address/Identifier: The MAC address or identifier of the device you are adding to provisioning.
- Provisioning
- Enable Authentication: Whether HTTP authentication should be used or not.
- Authentication Username: HTTP authentication username to use.
- Authentication Password: HTTP authentication password to use.
- Provisioning Encryption Key: Leave blank to disable encryption. The encryption key (string) specified here must be used when provisioning the Cisco phones. When provisioning the Cisco phones to use encryption, you must log in to the Cisco phone's profile rule must be specified as such:
- SIP Options
- Primary: The primary SIP server that this device should register with.
- Secondary: The secondary SIP server that this device should register with. Please note that some devices (such as Polycom) will register to both SIP servers simultaneously while others (such as Aastra/Mitel) will only failover if the primary is unavailable.
- Network Options
- Enable VLAN: Enables VLANs on the phone.
- VLAN Type: Sets the VLAN type as Static, CDP or LLDP.
- VLAN ID: On Cisco phones, if the VLAN type is set to Static this is the VLAN ID used by the phone. On Panasonic Phones, this sets the VLAN ID used by the PC.
- Voice VLAN ID: This is only for Panasonic phones and sets the VLAN ID used by the phone.
- Keep Alive (seconds): Specify the interval in seconds to send keep alive packets.
- Enable Option66: Allows Option 66 to override the SIP server.
- Routing Type: For devices with a WAN and LAN port set this option to NAT to allow the device to handle NAT for the LAN device. Set to Bridged to allow the router on the WAN to handle NAT for the LAN device.
- Provisioning Protocol: Provides options for HTTP or HTTPS provisioning.
- Directory Options
- Feature Profile: Select the feature profile for this device. See the Feature Profiles section for more details.
- Directory Profile: Select the directory profile for this device. See the Directory Profiles section for more details.
- Directory Softkeys: When set to yes, the directory profile will populate the softkeys on the phone that are not filled by the feature profile. This option is only available if Expansion Modules are not being used.
- Expansion Module: Set the number of expansion modules attached to the phone. The expansion modules will display contacts from the Directory Profile.
- Allow Local Contacts: Choose whether or not to allow users to manually create contacts on their phone. If set to no, the server will remove any manually created contacts after a reboot of the phone.
- Populate Local Directory: The server will fill the softkeys on the phone from the directory profile by default. When this option is enabled the directory profile will also be pushed to the phone's local directory (which will erase any locally created contacts).
- Time Options
- NTP Server (optional): Specify an NTP server to sync time with.
- GMT Offset: Specify the time zone for the device.
- Time Format: Display in a 12 or 24 hour format.
- Web Admin Options
- Web Admin Passcode: Specify a password to access the phone's advanced settings. Must be at least 8 digits and under 4294967295.
- Enable Web Admin: Setting this to Yes allows the phone's web interface to be accessed after the phone has been provisioned. The recommended default is No.
- Web Admin Port (if applicable): Specify the port used to access the phone's web interface.
- Miscellaneous Options
- No Key Entry Timeout (seconds): Specify the amount of time for the phone to wait after a number has been dialled before automatically calling that number.
- Request Validation: If set to Off, the phone uses the first registration if the user part doesn't match any registration. If set to On, the phone is forced to match the user portion of signalling exactly. This helps alleviate ghost calls.
- SIP Line Options
- Label: Label to display on the phone next to line key.
- SIP Account: Specify the SIP account that should be attached to each of the device's line keys.
- Show Ext #: Whether or not to append the phone's extension number to the label.
- Call Waiting: Set to Yes to allow this line to able to receive a second call.
- DTMF Type: Sets the Dual-Tone Multi-Frequency to rfc2833 or inband.
- Modem Line: Disables Line Echo Canceller for faxes, jitter buffer length increases from 200ms to 300ms.
- Keep Alive: Set to Yes to allow keep alive packets to be sent.
- Keep Alive Interval: Specify the interval in seconds to send keep alive packets.
- Keep Alive Packet Loss Timeout: Defines the number of max lost packets for SIP OPTIONS or SIP NOTIFY Keep Alive before re-registration. Between 3-10, the default is 3.
- SIP Port: Specify the port to use for SIP traffic.
- Dial Out #: Setting a Dial Out number will ignore the SIP account and Show Ext# line settings turning this line key into a speed dial key.
- Enable T38: Allows the T38 codec to be used on the line.
- SIP Register Expiration: Specify the amount of time in seconds that the SIP can stay registered for.
- SIP Reregister Before Expiration: Specify the amount of time in seconds to reregister the SIP before the registration is set to expire.
- SIP Registration Failure Retry Wait Time: Specify the amount of time in seconds to wait before retrying a SIP registration after a failed registration.
- SIP Registration Failure Retry Wait Time Upon 403 Forbidden: Specify the amount of time in seconds to wait before retrying a SIP registration after a 403 Forbidden response is received from a SIP registration.
**The following encryption options are only supported on Cisco SPA-5XX phones.

*Ensure the encryption key is prefixed with [--key and ends with a ]
**Note: The local directory also attempts to display on the softkeys. If this option is enabled, contacts will display on the phone twice if the phone has enough open softkeys to allow it.**
Viewing Provisioning Status: Administrator(s) also have access to real-time and historical provisioning logs under Advanced Tools -> Monitor and Debug -> System Logs.
Any changes made in the device provisioning page will require a reboot of the phone to apply.
Rebooting a phone through the SolSwitch
A reboot can be made through the web portal by going to Provisioning -> SIP Accounts and then selecting all of the phones you wish to reboot. At the bottom of the page click 'Selected items' then select 'Reboot Selected'. To select all of the phones automatically click the checkbox at the very top of the list.
Provisioning a Aastra/Mitel IP Phone
Configuring the Phone
Use the following directions to configure an Aastra/Mitel phone:
1. Press the settings button.
2. Press Advanced (Password 22222, and enter).
3. Select Configuration Server.
4. Choose Download protocol HTTP.
5. Change HTTP Server to your provisioning server as defined in Advanced Tools -> System Settings.
6. Change HTTP Port to 80 and HTTP Path to prov.
7. Select Save.
8. Reboot the phone.
Manually Rebooting a Mitel Phone
Software changes to a phone may require a reboot. Using the settings button on the phone, press Settings -> Restart -> Yes.
Provisioning a Polycom IP Phone
Configuring the Phone
Use the following directions to configure a Polycom phone:
1. Press the Menu Key.
2. Select Settings.
3. Select Advanced (Password 4-5-6, and enter. For V5.6 Polycoms, enter 6-5-4).
4. Select Admin Setting.
5. Select Network Configuration.
6. Scroll down using the arrow keys and select Server Menu/Provisioning Server.
7. Change Server Type to HTTP.
8. Change Server Address to your provisioning server as defined in Advanced Tools -> System Settings followed by "/prov" at end of the server address.
9. Select Back twice.
10. Select Save & Reboot.
Manually Rebooting a Polycom Phone
Software changes to a phone may require a reboot. Using the menu button on the phone, press Menu -> Settings -> Basic -> Restart Phone. "Are you sure?" will appear, and select Yes. After a time, the IP address will appear with the phone MAC address and phone software revision.
Provisioning a Cisco SPA-122 ATA
Configuring the ATA
Use the following directions to configure a Cisco SPA-122 ATA:
- If you are using Encryption, the profile rule would have to be entered as such:
1. Connect a PC to the ATA Ethernet port.
2. Connect to the ATA's web interface using the default web address (192.168.15.1).
3. Login using the default username and password (admin/admin).
4. Open the 'Voice' tab.
5. Open the 'Provisioning' page.
6. Set the profile rule to the following: http://Client Provisioning Address/spa$MA.xml
[--key EncryptionKey ] http://Client Provisioning Address/spa$MA.xml
7. Click 'Submit Changes'.
Manually Rebooting an ATA
Software changes to an ATA will require a reboot. Unplug the power cable and plug it back in to initiate a reboot.
Provisioning a Grandstream ATA
Configuring the ATA
Use the following directions to configure a Grandstream ATA:
- Enter: Client Provisioning Address/prov
- Enter: Client Provisioning Address/prov
1. Connect a PC to a Router.
2. Connect the ATA to the same Router as the PC.
3. Connect an analog phone to the ATA, and wait for a dial tone.
4. Dial ***02 and record the IP address.
5. Open the ATA configuration page, by typing that IP address into a web address bar.
6. Log in with "admin".
7. Go to advanced settings.
8. Under Firmware Server Path.
9. Under Config Server Path.
10. Save and reboot the device.
Rebooting a Grandstream ATA via Web GUI or a Phone
If the web GUI is enabled on the ATA you can access it at its IP address and log into the unit. Proceed to the bottom of either the basic or advanced settings page and click on Reboot. With an analog phone connected, you can access the ATAs IVR menu by dialling "***". Press 99 to access the reset/reboot menu and then press 9 once the IVR prompt is played. You will then hear "rebooting".
Provisioning Other Devices
The steps listed above are for devices that support automated provisioning through the SolSwitch, but most SIP devices can be configured to work through manual provisioning.
Generally the Admin or Provisioning Guide for a SIP device can be found on the manufacturer's website, and that will provide the steps required for manually configuring the device. During manual configuration, when asked the SIP Server or Address, enter one of the SolSwitch's SIP Servers as configured in Advanced Tools -> System Settings.
For additional assistance with this process, please contact your system administrator.
Directory Profiles
Directory Profiles are pre-defined speed dial lists. Once directories are created, they must then be selected and attached to the appropriate device in the Device Provisioning section. To add a new Directory Profile, select the 'Add New Profile' button. To edit, import or delete an existing profile, click the 3 dots on the right of the profile. To quickly create similar directories, click the "from" and "to" radio buttons to copy from and paste into another directory. Any changes to contacts in a directory used for softkeys will require a reboot of the phone to apply them.
Importing Directory Profiles
When importing a directory profile a CSV file is required. Download the CSV template and fill it out with the required information. If later on you wish to move some items around, you can edit the directory and move items around by dragging the left icon.
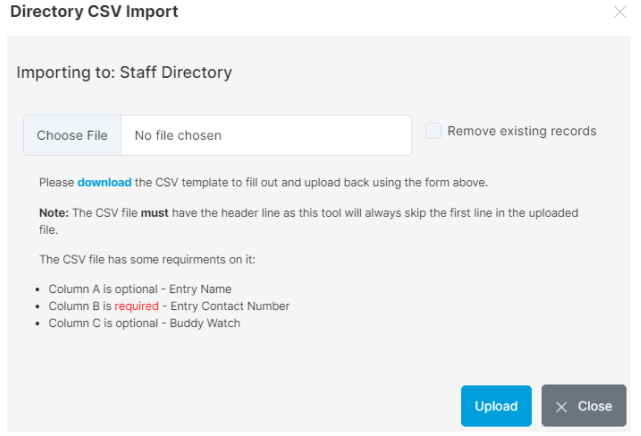
Adding/Editing a Directory Profile
- Profile Name: For information purposes, there is an option for Auto Update Profile which recognizes if the name or extension number of an entry in the directory profile is updated or deleted anywhere else in the system. The directory will then update its entries to reflect the changes.
- Add New Directory Listing: To add a new directory listing, click the 'Add New Entry' button.
- Name: Text to appear on the phone next to the button.
- Contact Number: Phone or extension number.
- Speed Dial: The number used to call the directory listing directly.
- Buddy Watch: Whether or not the SolSwitch should monitor the status of this extension. Only specified on internal extension numbers.
- Sorting Directory Listings: To sort listings in a directory, use the icon to the left of the speed dial number to drag and drop the listings in the correct order.
Feature Profiles
Feature profiles are a way to configure specific settings on an individual or on multiple devices. Once feature profiles are created, they must then be selected and attached to the appropriate device in the Device Provisioning section. To add a new feature profile, select the proper device brand and click the 'Add Profile' button. Any changes made to a feature profile will require a reboot of the phone to apply them.
Aastra/Mitel Feature Profile: You are able to copy one profile to another, within the list view, as well as import and export feature profiles. The following options are available for the Aastra/Mitel feature profiles.
- Profile Name: For informational purposes only.
- Default Mode: Specify whether the handset or headset should be used by default.
- Number of line keys: The number of line keys that should be available on the phone. If 4 is selected, the redial and callers list buttons will be replaced with lines 3 and 4.
- Show missed calls: Choose whether or not the number of missed calls should be displayed on the screen.
- UI Ring Focus: When on a call, if a call comes in the phone screen can either continue to show the current call or show the information for the incoming call.
- Enable Call Waiting Beep: When enabled, the handset will beep when receiving a call while already on a call.
- Enable More Key: Choose whether the 'more' key should display on the screen once the softkeys are full (ex, 4 bottom soft keys) or only once there are too many to fit on the screen at once (ex, 5 bottom soft keys).
- Remove Own Extension: When set to yes, the user's own extension will be removed from the Top Soft Keys when provisioning to the phone. This is compatible with the "Own Ext" option.
- Auto ReSync Mode: This specifies if configuration files, firmware files or both will be automatically resynced on reboot, default Off.
- Phone Language: The language displayed on the phone screen. Supports English and French.
- Background Image: Select a Background image to use for idle display.
- Screensaver Image: Select a Screensaver image to use for the sleeping display.
- Image Format:
- 320x240 (6867i/6920)
- 480x272 (6869i/6930)
- 800x480 (6873i/6940)
- 24 or 32-bit color depth
- 1MB Max File Size
- .PNG or .JPG
- Top Soft Keys: Up to 44 top soft keys may be specified. The actual number available will vary based on the phone model.
- Name: Label displayed on phone LCD (if supported).
- Function: Each key can serve the following function.
- BLF (Busy Lamp Field): This option is used to provide the live status of other extensions on the system.
- BLF/Xfer: This option is the same as above, although pressing the button will call the specified Value.
- Callers List: If used, when the button is pressed, phone call logs will be displayed.
- Speed Dial: Used to initiate a call to the specified value.
- Speed Dial/Xfer: This option is the same as above, although it can also be used to transfer an active call.
- DND: Sets the phone to Do Not Disturb.
- Redial: Directs the user to the Outgoing caller's list.
- Directory: Directs the user to the directory list.
- Value: Internal or external number in relation to the specified Function.
- Bottom Soft Keys: Up to 20 bottom soft keys can be specified. The actual number available will vary based on the phone model. The functions are identical to the ones used for the top soft keys above. However, bottom soft keys can only appear during certain states. Additionally, presence can only be set on the top soft keys and not the bottom soft keys.
- States: Select the state(s) at which the soft key should appear on the phone.
- Idle: Display the key when the phone is not in use.
- Connected: Display the key when a call is in progress.
- Incoming: Display the key while an incoming call is ringing.
- Outgoing: Display the key while an outbound call is ringing.
- Busy: Display the key when the phone is in a DND state.
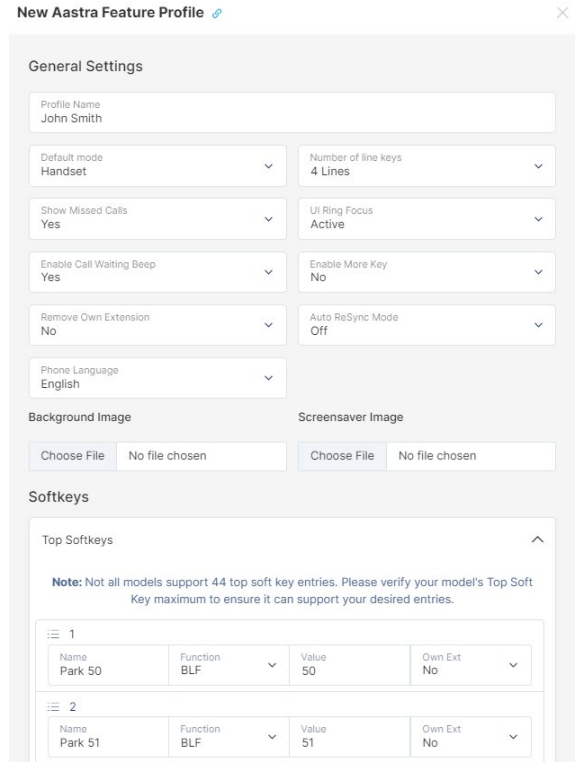
Cisco Feature Profile: The following options are available for the Cisco feature profiles.
- Profile Name: For informational purposes only.
- Branding: Used to display the company's brand name on the phone.
- Show Missed Calls: Specify whether or not the phone set should display missed calls.
- Enable DND: Allow or disallow Do-Not-Disturb functionality.
- Enable Call Waiting: Whether or not to allow incoming calls while the phone is in use.
- Enable Directory Key: Whether or not to display the Directory soft key.
- Enable Park Key: Whether or not to display the Park soft key.
- Enable Record Key: Whether or not to display the Record soft key.
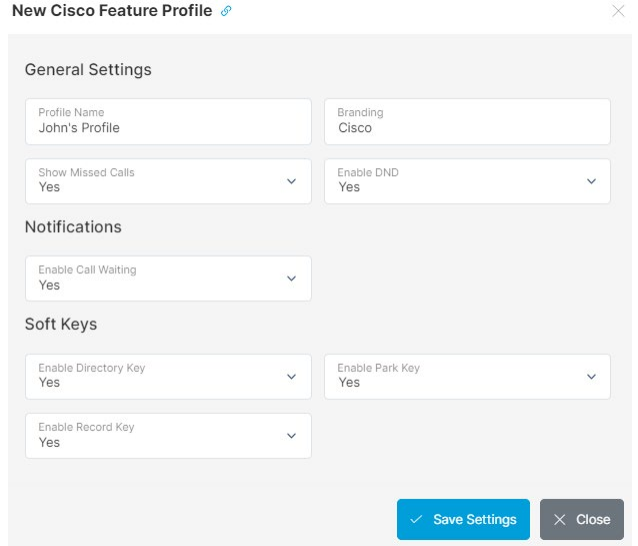
Grandstream Feature Profile: The following options are available for the Grandstream feature profiles.
- Profile Name: For informational purposes only.
- Custom Layout File: Grandstream offers a configuration tool to customize the look and feel of the phone. Upload the file here and it will be applied to all phones with this feature profile. When set, there is an Export button that can be used to download the current layout which can be used for other profiles.
- Enable Call Waiting Tone: Sets the phone system to play the call waiting tone if there is another incoming call.
- Always Ring Speaker: Determines if the speaker will play the ringtone if the speaker channel is not set as the default channel.
- Enabled Missed Call Backlight: If set to "Yes", LCD backlight will be turned on when there is a missed call on the phone.
- Enable Missed Call Indicator: If set to "Yes", the LED indicator on the upper right corner of the phone will light up when there is a missed call on the phone.
- Headset Type: Choose the preferred headset type when answering calls.
- Date Format: Choose the format that will be shown on the display.
- Enable Video Call: Enables the video call feature on the phone.
- Enable Transfer: Enables the Transfer function.
- Start Video Automatically: Permits the phone system to enable the video feature automatically when it makes an outbound call.
- Remote Video Request: Configures the preference to handle video requests from the remote party during an audio call. "Prompt": A message will be prompted if a video request is received. Users can select "Yes" to establish a video or "No" to reject the request. "Accept": Video requests will be accepted automatically, and video will be established. "Deny": Video request will be rejected automatically.
- Video Layout: Defines whether to enter full screen when an incoming video call is answered.
- Auto Preview: Configures whether to turn on video to preview the video of the caller. If set to "Yes", the user can view the video and hear the caller on the incoming page when there is an incoming call. If set to "Yes with Ringing", the caller can view the view of the caller and hear the ringtone on the incoming page but cannot hear the caller.

Linksys Feature Profile: The following options are available for the Linksys feature profiles.
- Profile Name: For informational purposes only.
- Show Missed Calls: Specify whether or not the phone set should display missed calls.
- Enable Call Waiting: Whether or not to allow incoming calls while the phone is in use.

Polycom Feature Profile: The following options are available for the Polycom feature profiles.
- Profile Name: For informational purposes only.
- Display Logo on Phone: Whether or not to display the SolSwitch logo on the phone.
- Default Mode: Specify whether the handset or headset should be used by default.
- Show Missed Calls: Specify whether or not the phone set should display missed calls.
- Enable DND: Allow or disallow Do-Not-Disturb functionality on non-VVX series phones.
- Quick Transfer: Enables the ability to blind transfer someone while on a call.
- Show Queue Stats: This Enables the display of stats on the phone's MicroBrowser.
- Call Waiting Type
- Ring: The phone will ring while on a call and receiving an incoming call.
- Beep: The phone will beep while on a call and receiving an incoming call.
- Silent: The phone will flash and display incoming call details on LCD.
- Disabled: Call waiting will be disabled.
- Direct Call Ring Tone: The ring tone to play when a call is routed directly to your extension.
- Queue/Ring Group Ring Tone: The ring tone to play when a call is received via a queue or ring group.
- Soft Keys: Up to 10 soft keys can be specified. Soft keys are used to display specific functions available depending on the state of the device.
- Name: Label displayed on phone LCD (if supported).
- Function: Each key can serve the following function.
- Applications: Used for accessing the phone's Application page. (Usually the Micro Browser).
- Buddies: Displays contacts and their current status. Contacts are managed in Directory Profiles. See Directory Profiles section.
- Callers: Directs the user to the caller's list.
- Conference: Initiate a conference call.
- Custom: When specified, the custom text box will appear where a value can be specified. When pressed, the corresponding DTMF for the value will be initiated.
- End Call: Ends the current call.
- Hold: Puts the current call on private hold.
- Hook Flash: Sends a hook flash signal to the remote end. Only supported when the remote end is an analog or T1 port.
- Issue: Allows the ability to report a call issue.
- Intercom: Pages an extension and places your call on their speaker phone.
- Login/Logout: Toggles the login/logout roaming feature.
- New Call: Initiates the dial tone to place a new call.
- Page: Defaults to extension 8000 which can be set up as a paging group.
- Park: Place the current call on park.
- Ready Toggle: Toggles the phone's Do-Not-Disturb status.
- Record: Records the current call from the beginning.
- Redial: Directs the user to the Outgoing caller's list.
- Speed Dial: Activates the phone's speed dial list.
- Transfer: Initiate a transfer.
- Custom: Internal or external number in relation to the specified Function.
- States: Select the state(s) at which the soft key should appear on the phone.
- Idle: Display the key when the phone is not in use.
- Dial tone: Display the key when there is a dial tone.
- Proceeding: Display the key when an outbound call is in progress but not yet connected.
- Alerting: Display the key when an incoming call is ringing.
- Active: Display the key while on an active call.
- Hold: Display the key when on private hold.
- Sorting Soft Keys: Soft keys can be sorted by dragging and dropping the key up or down in the list. Once you are satisfied with your sort order, select the 'Save Ordering' button.
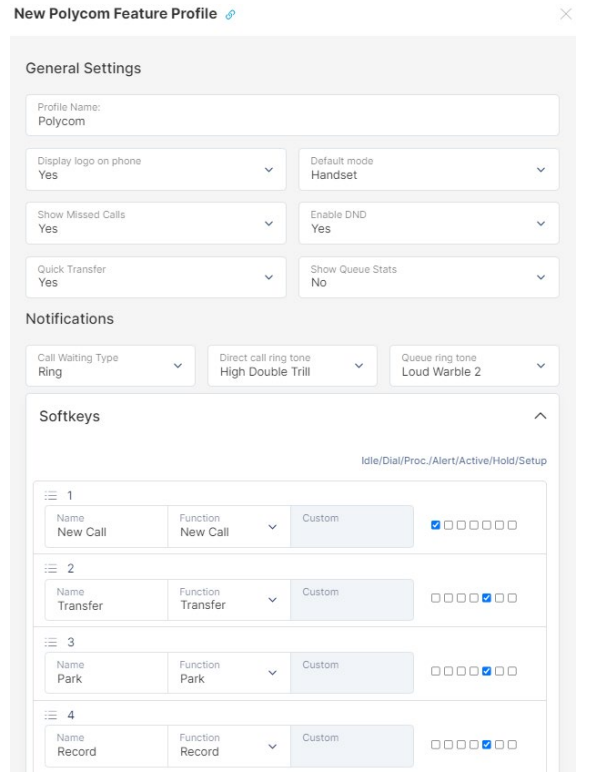
Yealink Feature Profile: The following options are available for the Yealink feature profiles.
- Profile Name: For informational purposes only.
- Show Missed Calls: Specify whether or not the phone set should display missed calls.
- Enable Call Waiting: Whether or not to allow incoming calls while the phone is in use.
- Call Waiting Tone: Whether or not to enable a tone when there is a call waiting.
- Call ring tone: To select from 8 different ring tones.
- Display logo on phone: Whether or not to display a logo on the phone.
- Default mode: To set the default mode for which to use the phone, Headset or Handset.
- Enable DND: Allow or disallow Do-Not-Disturb functionality.
- Bottom Soft Keys
- Statuses: Will display soft keys based on the phone's current status.
- Soft Keys: Displays available functions based on the phone's current status
- Functions:
- Call Failed
- Cancel/Switch Call/New Call
- Call In
- Call Switch/Answer/Forward/Silence/Reject
- Connecting
- Cancel/CallSwitch
- Transfer Connecting
- Cancel/Call Switch/Transfer
- Dialling
- Cancel/Send/IME/Delete/History/Call Switch/Directory/Line
- Selection/Pool/Group Pickup/Direct Pickup
- Ring Back
- Cancel/Call Switch /Call Completion
- Transfer Ring Back
- Cancel/Call Switch/Call Completion/Transfer
- On Talk
- Cancel/Mute/Swap/Call Switch/New Call/Answer/Reject/Hold/Private
- Hold/Transfer/Conference
- Hold
- Cancel/Call Switch/Answer/Reject/Transfer/Resume/New Call
- Held
- Cancel/Call Switch/Answer/Reject/New Call
- Transfer to
- Cancel/Directory/Call Switch/Send/Transfer/IME/Delete
- Conferenced
- Cancel/Call Switch/Answer/Reject/Mute/Hold/Split
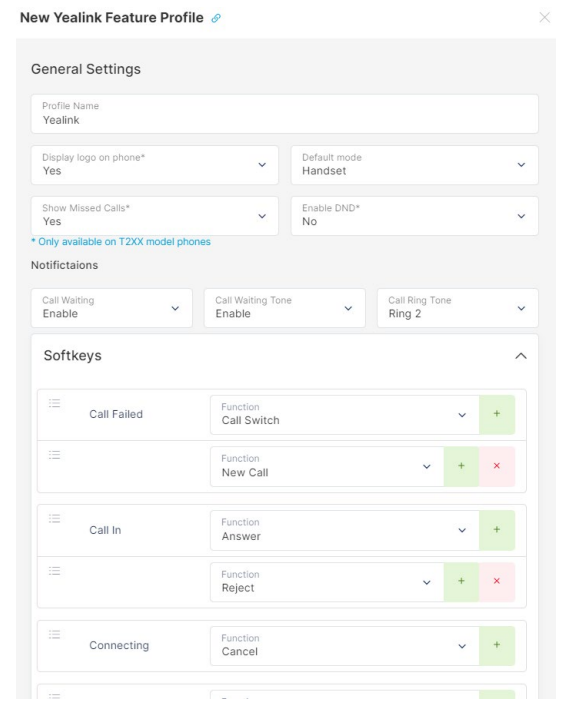
SIP Accounts
A SIP (Session Initiation Protocol) Account is used to authenticate a SIP device such as a telephone or ATA (Analog Telephone Adapter) to the SolSwitch. Any new device must first be added as a SIP account. To add a new SIP account, click the 'Add SIP Account' button.
- Active: Choose to mark the SIP as active or inactive.
- SIP Account Profiles: If configuration profiles exist for SIP Accounts, choose a profile from here to automatically fill in details.
- Description: For information purposes only.
- SIP Host Type:
- Dynamic: The most common authentication-based method used for IP phones or ATA.
- Username: Specify the username required to authenticate to the SIP Account. SIP Account Usernames cannot contain all digits if it is equal to or less than 11 characters.
- Password: Specify the password required to authenticate to the SIP Account. Strong passwords are required.
- Allowed IPs: Allow IPs to use the SIP account.
- Blocked IPs: Block IPs from using the SIP account.
- Static: Most commonly used for trunks when the SIP peer has a static IP.
- Name: Specify the name without spaces for this peer.
- Host: Static IP address or hostname of the peer.
- Port: Port number that will be used.
- Domain (optional): Specify the domain name of the SIP registrar.
- Register: When the SolSwitch must register to an outside dynamic SIP account.
- Name / BTN: Name or Billing Telephone Number for this peer.
- Registrar: Remote SIP server IP or hostname.
- Domain: Specify the domain name of the SIP Registrar.
- Username: Specify the username for the remote SIP server.
- Password: Specify the password for the remote SIP server.
- Verify Password: Ensure the password was typed the same both times.
- Transport Type: Whether this SIP account should use TCP, UDP or TLS & SRTP. The default is UDP. Encrypted communication is currently supported for Trunks, Aastra/Mitel devices, and some soft phones.
- NAT: Whether or not this SIP device will be behind NAT. If enabled, the SolSwitch will always respond to the source IP address and port of the received SIP packets.
- DTMF Mode: Choose inband or rfc2833 in order to ensure the settings match the SIP device.
- Alarm Notification: Specify an email address here to receive notifications when the peer changes from online to offline and vice-versa.
- Available Codecs: Choose which codecs should be allowed on this SIP account. The T.38 codec requires G.711 codec to be enabled as well. For video SIP devices, select one or all H.XXX codecs.
- SIP Post API Enable: Enables the SIP Post API to send a packet capture.
- Dynamic Features: Allow incoming calls to send in particular features. This is mainly used for trunks to disable feature codes such as #1 and ##.
- International Calls: Sys Admins have the option to allow or not allow international calling on each Sip account. Calling to high-cost areas is disabled by default and must be enabled to make calls to those areas. By enabling international calling you are responsible for all long-distance charges. Please see section 15. Long Distance of our terms and conditions available at https://www.sunwire.ca/company/terms-and-conditions/ for more information.
- To view our Long Distance Rates please visit: https://www.sunwire.ca/company/long-distance-rates/
- Stay In Audio Path: When disabled, the SIP path will be changed to bypass the SolSwitch. This is not recommended and should only be used in specific scenarios where the setup is intended for that.
- Pass incoming ANI+DNIS: When enabled, this feature will send ANI and DNIS information as DTMF toner when the line is answered. Enabling this option is not recommended.
- Delete Block: Place a check here in order to prevent this peer from being deleted. To delete the peer, the check mark must first be removed.
- Ping Monitoring: When enabled, the SolSwitch will ping the peer once per second until the feature is disabled. Ping results may be viewed in graph format under -> Reporting -> SIP Ping Monitor Report.
- Status: The status is displayed for each peer. The following status levels may be displayed:
- OK: Peer is okay, SIP packet response time displayed in milliseconds.
- Unreachable: The peer was online but is now unreachable.
- Offline: Peer is offline.
- Lagged: SIP response times are in excess of 10 seconds (10,000ms).
- IP: The IP address of the SIP device.
- Trunk: The trunk the SIP account is using.
- Extension: The extension the SIP account is attached to.
- Reboot Phone: Allows the remote reboot of the phone.
- Refresh MWI: Resets the Message Waiting Indicator on a phone.
Add-on Tools
Create Callback
This feature allows you to manually enter a number/caller into a queue as a call-back. As soon as an agent in a queue is available for a call, the system will automatically dial a manually entered number and connect the agent.
Outbound Faxes
This page allows you to queue a PDF attachment and send it out to the system to any fax number of your choice. To create an Outbound Fax, click the 'Create Fax' button.
Creating an Outbound Fax:
- To Phone Number: The numbers that you would like the fax to be sent to.
- From: Displays a dropdown of users created in the Fax to Email section under Phone System, which the outbound fax will be sent from.
- Confirmation Email Address: A notification will be sent to the email address specified here which will announce the results of the fax transmission.
- Maximum Number of Tries: The number of attempts the fax will try to send before stopping.
- Threshold: Adjust the black/white threshold for converting the PDF to Fax format. The default is 90% - lower the threshold if too much of the page is turning black during conversion.
- PDF to Fax: Upload the PDF(s) of the file(s) you would like to be sent. If selecting multiple files, add one file at a time and they will be sent separately.
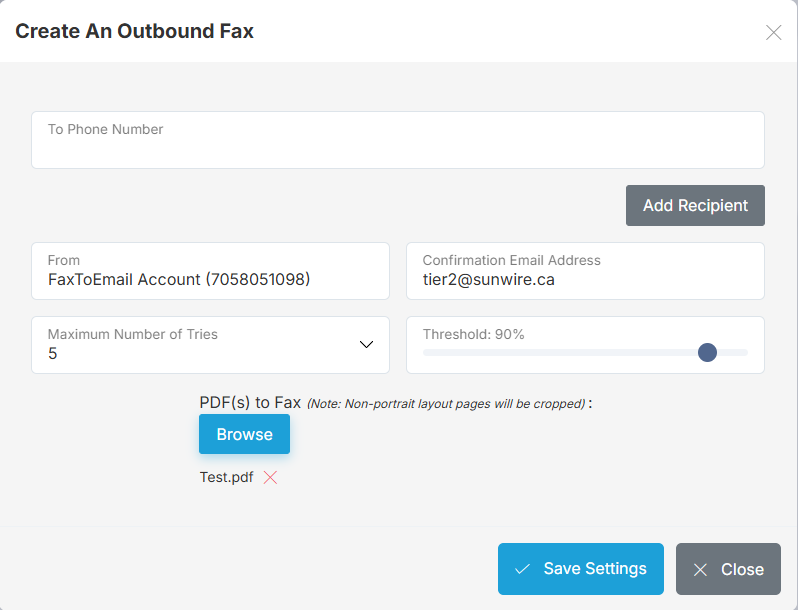
SolCast - Legacy
Note: This version of SolCast has been replaced and is no longer being maintained. For the new version of the platform please refer to SolCast.
The SolCast is used as a recurring calling tool where you schedule the valid dates, days, times and retry attempts of a particular batch. You can create as many batches as you like.
Adding a SolCast Batch: To add a new batch, click the 'Add New Batch' button. There are 5 steps to fill out for each batch; outlined on the left in the 'Batch Menu'. Below is a breakdown of each section of the batch menu and its components.

- Batch Name: Give the batch you are creating a unique name.
- Caller ID Name: The name to be displayed when calling numbers.
- Active: Whether or not the batch will run.
- Valid Period, Valid Days, and Valid Time: Select the timeframe that you would like the batch active for.
- Retry Attempts: The maximum number of times to try calling a contact number.
- Retry Delay: The amount of time to wait before attempting to retry calling a contact number. Note that this time is as of the end of the batch running, not from the last retry attempt.
- Simultaneous Calls: The number of lines to use at the same time to make multiple calls.
- DTMF 1 goes to: Where to send the caller if they press '1' during the message playback.
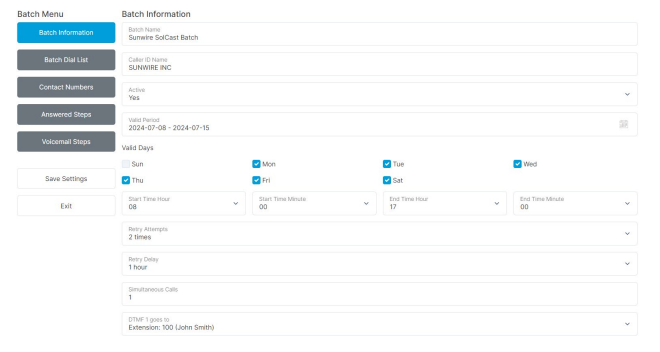
Users can also be entered manually using the 'Manual User Entry' form, whose options are listed below:
- Name: The user/contact's name.
- Phone #: The phone number to call which is associated with the above name.
- Fields 1-5: Fields 1 through 5 can be used to enter various contact information such as Email address, street address, billing type, balance due, etc.
The 'Edit Field Names' button will allow you to change the Field 1, Field 2, Field 3, Field 4, and Field 5 labels to custom labels of your choice.
Ensure to save your changes before proceeding to the next phase of the batch menu.
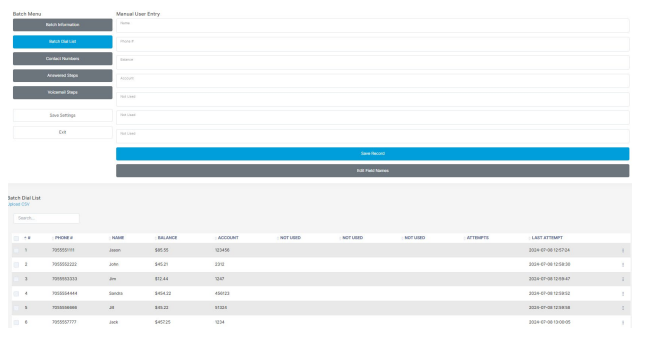
For example, if you select a specific rate centre such as Toronto, all calls going to the Toronto rate center will show the phone number entered as the CID information. Also, specific recordings can be played based on where the call is being made to. There is no limit to the rate centres that can be added so long as they are configured in your SolSwitch.
This option can be very useful for large companies with office numbers across multiple cities. This gives the person receiving the call a local number that they can call back. Ensure to save your changes before proceeding to the next menu page.
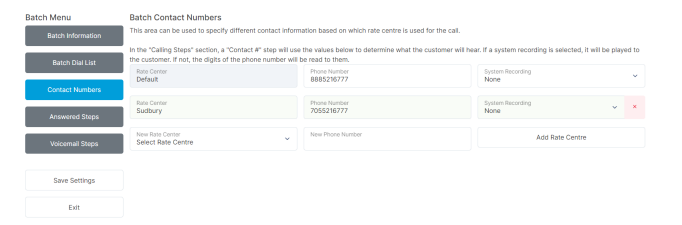
- Reading: Will play whatever system recording is selected from the reading dropdown.
- Field: Will spell out whatever field is selected from the 'Batch Dial List'. For example, if you select 'Balance' then the system will look up that particular field in the 'Batch Dial List' for each entry and read off the balance.
- Read Number: Will playback the batch's contact number based on the rate centre being called. If no rate centre is chosen, the default contact number is displayed.
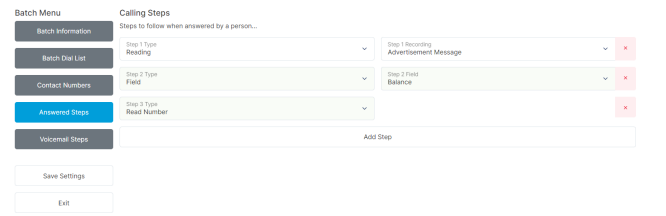
Advanced Tools
911 Management
The SolSwitch has built-in support to control 9-1-1 address information. If you subscribe to 9-1-1 services from Northern 911 or Digital Conceptions, you will be provided with API access credentials which should be entered here.
API Management
The SolSwitch comes with a set of API functions available for third-party software integration.
To access API Permissions, navigate to Advanced Tools > API Permissions.
To view information about the API functions available, click on the "View SolSwitch API function list and usage" link at the top of the API Management page.

The API Permissions section allows you to specify who can access the API and what they have access to. Permissions are based on IP address and/or API Key.

Click the "Add Access List" button to add a new entry or press the Edit icon to modify an existing entry.
For each Access List, you must specify the following:
- Access List Name: To describe the purposes of this entry.
- Access to Customer: Only for multi-tenant platforms. Specify which customer it will have permissions to.
- Allow from IP address: Enter the IP address to allow access. This is recommended but only required when no API Key is specified.
- API Key: 256-bit key used for authentication to the API. A key is required when no IP address is specified. Use the Generate Key button to generate a random key.
- API Function Permissions: Select checkboxes for each function that this access list can use. For Digit Validation Log, you must also specify which DV can be accessed.
Backup & Restore
The SolSwitch supports two methods of backing up its data. A light backup will contain everything in Phone System such as the call flow, extensions, voice prompts, voicemail greetings and messages. If you are using the system to record calls, see the Recording Backup section for more information. A light backup will result in a much smaller file size and contain everything except for the Call Detail Records. A full backup will save everything in the system.
Automatic FTP Backup: To use automatic FTP backup, you must already have access to a separate FTP server. Enter the FTP server, username, password and path to match your FTP account information. The backup frequency specifies how often (in days) the backup should be run. Backup time specifies the time of day that the backup should be run. The next backup date is the next date that the system will be backed up. This date is re-adjusted based on the selected backup frequency. If an automatic backup fails to reach the FTP server then the backup will need to be manually re-enabled. Press the 'Save Settings' button to save your settings. The 'Backup Now' button performs an immediate backup to the FTP server.
Manual Backup: Manual backups are performed by clicking the 'Backup and Download' button. You will then be prompted to download and save a backup file to your hard drive.
Restoring a Backup: In order to restore a SolSwitch, you must have a backup file of the same version. Click the 'System Restore' button, select the backup file and wait while the file is uploaded and the system is restored.
Customer Management
If you have purchased the Multi-Tenant License, this option will be available. Add, edit and remove customers in this section. The customer number, first name, last name and company fields are required. You also have the option to Export an entire customer to a file and then use that file to Import the customer to a new system. When doing so, everything except call records will be imported.
Max SIP accounts: This specifies the maximum number of SIP accounts allowed on a customer's account. Set a value of 0 for unlimited SIP Accounts.
Max Trunks: Specifies the maximum number of concurrent inbound or outbound calls on a customer's account. Internal calls between extensions are not considered trunk calls. Set a value of 0 for unlimited trunk calling.
Default Route Group: Specifies the default outbound route for calls from a customer. See the Route Groups section for more details.
Recording Email: Specifies how the recording will be delivered in the email.
Time Zone: This sets the desired time zone which will convert the times on that customer throughout the SolSwitch.
Recording Language: Determines the default language for recordings played throughout the system. This can be overridden by some system functions such as Queues and IVRs.
Billable Feature Settings: Configure options for various billable system features.
- Toll Plan - Calls: Defines how calls should be billed for this customer. See the Toll Management section for more details.
- Toll Plan - PPU Services: Defines how Pay-Per-Use services such as MCQ and Speech-to-Text are billed for this customer. See the Toll Management section for more details.
- Enable MCQ Features: The customer will be able to use the multi channel queuing features.
- Enable AI Powered Features: Customer will be able to use various AI powered features across the system, such as Speech-to-Text, Smart IVR, and more.
- Provide Call Transcript Summary: Transcribed calls will also generate a summary of the call.
- Enable SolCast: The customer will be able to create and run SolCast broadcast campaigns. Only shown when the SolCast license is enabled on the system.
- Max SolCast Trunks: The maximum number of concurrent SolCast phone calls for this customer. Set a value of 0 for unlimited.
- Toll Plan - SolCast: Defines how SolCast usage is billed for this customer. Setting it to Use Default falls back to the customer's Toll Plan - Calls. See the Toll Management section for more details.
SolSwitch MFA Settings: Configure methods of MFA here.
- Enable MFA: Enable or disable use of MFA for the customer's users.
- Phone Call Options: Provide a name and DID to have it call the user during authentication.
- SMS Options: Select an existing DID for the customer to send an SMS to the user during authentication.
SolSwitch VM Settings: Configure voicemail SMS delivery here.
- Voicemail SMS DID: Select an existing DID for the customer to send an SMS to a phone number associated with the voicemail.
SolSwitch Connect Settings: This allows you to set up SolSwitch Connect users on a specific customer.
- SSC Server: Select the SSC Server to use for this customer. This is configured in Advanced Tools -> System Settings -> SolSwitch Connect Servers.
- Group: It is recommended to have a unique group per-SolSwitch Customer. If a group is shared between customers Max Users and Presence Users will all also be shared between those customers.
- Max Users: Set the maximum number of SolSwitch Connect accounts that can be created.
- Max Presence Users: Set the maximum number of Presence accounts that can be added.
Firewall
Firewall rules can be added to ensure that certain networks can have traffic allowed or denied for SolSwitch services. Single IPs, whole subnets or entire countries can be added to an allow or deny rule. Click 'Add New Rule' to create a firewall entry. These firewall rules work alongside our built-in security tool Guardian, please see below.
Guardian
- The Guardian protects the SolSwitch from unauthorized access. In this section, you can view and remove blocked IP addresses as well as add IP addresses to the exemption list. All IP addresses that have been previously are historically logged, click on 'Blocked History' to search.
The following actions will be monitored by the Guardian.
- Using proprietary techniques, the SolSwitch Guardian ensures that only authorized devices may provision on the SolSwitch.
- The SolSwitch Guardian analyses every SIP registration attempt. Upon detection of an unauthorized attempt, Guardian will automatically alert the administration and immediately block the IP address.
- The SolSwitch Guardian monitors SIP traffic to detect floods or malicious packets and will automatically block the source IP address and alert the administrator.
- The SolSwitch Guardian will detect unsuccessfully web portal login attempts and automatically block access.
- The SolSwitch Guardian enforces strong passwords to prevent easy brute-force password discovery.
- The SolSwitch Guardian monitors call patterns and volumes and will alert the administrator if unusual activity occurs.
Monitor and Debug
This section includes a wide range of tools for monitoring the status and health of the system, as well as investigating or debugging issues.
Concurrent Calls
This will show a graph of all of the calls across every customer system-wide. Right-click the graph to zoom out or click and drag to zoom in. You can hover your mouse over any point of the graph to see the exact number of calls at that time.
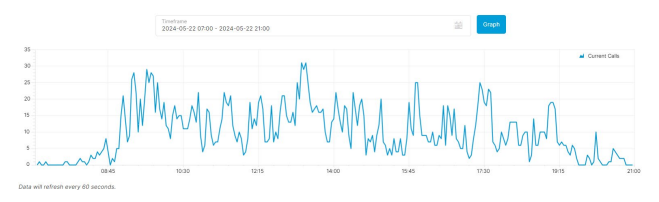
Customer Usage
This icon will be displayed if the Multi-Tenant License was purchased. Select a customer and time range in order to generate usage graphs. The graphs can display inbound, outbound and internal calls. Rightclick the graph to zoom out or click and drag to zoom in.
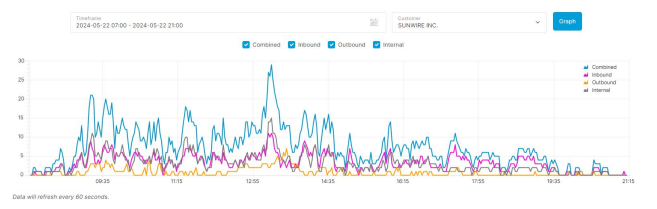
Device Statistics
This shows information about the SolSwitch, the network Interfaces, IP Table, DNS Library, Disk Information and SIP Peers.
Portal Activity
This section is used to pull web interface activity logs. Data includes date, time, username, customers, IP address, feature accessed, as well as HTTP GET and POST data.
Resource Monitoring
A graph that displays the system's CPU and memory (RAM) usage for any given period. Right-click the graph to zoom out or click and drag to zoom in.
When viewing the memory usage graph, the following report types are available:
- VSZ: Virtual Memory Size, indicates all memory that a process can access, including memory that is allocated but not currently in use by the process.
- RSS: Resident Set Size, the amount of memory actually in use by the process.
- % MEM: RSS memory represented as a percentage of the total memory available.
- Swap: Displays the free and in use portions of Swap memory on the system. Swap memory is a portion of the system HDD/SSD that can be used as 'virtual RAM' if the system runs of out physical RAM.
SIP and RTP Captures
This section gives administrator(s) access to raw packet traces. Traces are kept for a total of 24 hours.
- SIP Method: Select which method to search on.
- Filter URI (User): Specify the user part of the URI to filter on. This is usually the phone number dialled or the username of the SIP account. Optional but recommended.
- Filter Source/Dest IP: These fields are used to filter source and destination IP address.
- Search Start: Specify the time to start searching for packet traces.
- Search Timeframe: Specify the timeframe from the Search Start time. A maximum of 10-minute window can be searched at once in order to prevent performance impacts while traces are searched.
SIP Connection Times
This shows how long the SIP process took connect to the database when processing calls, this is not the latency. The first graph allows you to see the minimum, maximum and average millisecond (ms) for all SIP connection times over a set period. The second graph will enumerate slow SIP connections (any deemed to be at 200ms or greater) and display the quantity as one graph over time.
System Current Calls
Similar to 'Current Calls' under 'Reporting' This report shows all current active calls system wide for a system that has a Multi-Tenant Licence. Each active call has data concerning the source, direction, destination, duration, source channel, destination channel as well as the ability to hang up the call.
System Logs
This allows the administrator(s) to view real-time call and provisioning logs as well as all API requests and SMTP activity on the SolSwitch. This information is refreshed every 5 seconds. Click the Clear button to clear the buffer, click the Free Scroll button to prevent the screen from scrolling as activity updates and click the Pause button to stop new activity from being displayed. You can also search for historical data on a specific date instead of viewing it live.
The VoIP log gives you access to the system's log file in order to troubleshoot specific calls and find their origin, path, route group, etc. To use this tool, follow these directions:
1. Enter whatever you would like to search for in the Filter field. For example, if you want to troubleshoot a call to a specific number, enter part of or the whole number. Or if you would like to look at a call to a specific device, enter the SIP username in the search field. You can also search using the Call ID from the Call Detail Records. The results outputted will reflect any reference to your search in the VoIP log.
2. By looking at the Date/Time, find the corresponding call that you are troubleshooting.
3. See the call in its entirety by clicking on the 'Thread'. This will change your search results to show anything within that particular Thread giving you full details of the entire call in question.
The Provisioning log shows all of the MAC addresses that are requesting files from the SolSwitch and the name of the file they are looking for.
The SMTP log shows all SMTP relays including where the email came from, and which address it was sent to. This report can be useful when troubleshooting email issues.
The API log shows all of the API requests that have been sent to the SolSwitch as well as the IP address and API key.
The SMS log details inbound and outbound messages, including the date, time, source, destination and the contents of the message. .
System Status
This section displays all service status for every system as part of the SolSwitch deployment. Shows current calls in progress, total processed calls and current uptime.
Trunk Graph
Used to graph incoming and outgoing calls on a specific trunk. Select a trunk and time range to generate usage graphs. Right-click the graph to zoom out or click and drag to zoom in.
Trunk Missed Calls
Select a Time/Date, Customer, Trunk or search by DID to view all calls rejected due to customer or trunk congestion.
Trunk Monitoring
This page allows the user to set up scheduled reports to be emailed automatically, in addition to allowing trunk alerts to be sent out based on trunk capacity usage.
Scheduled Reporting, when enabled, allows a frequency of monthly or weekly, on a specific hour, which will report from that day to the previous month/week (based on the frequency). Scheduled reporting will report on all trunks.
Alerting, when enabled, allows alerts to be sent based on how much capacity is being used. In the example below, if trunk capacity is equalled to or greater than 90% it will send an alert to the alerting email. Alerting will email based on what is enabled, per customer per trunk. Different alerts will be sent based on what is enabled. Whether a call fails how many calls failed in the last hours, for which trunk and/or customer, or if calls had got over the threshold.
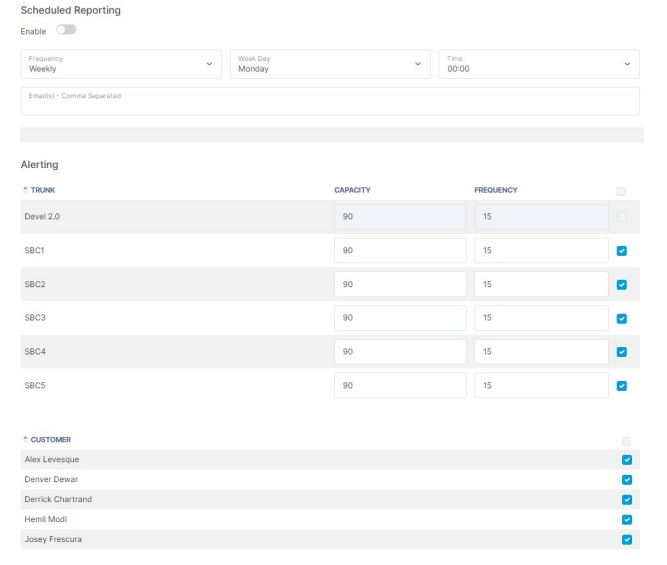
Verify CIDs
This page will indicate any fields with improperly formatted Caller ID numbers.
Voicemail Transcripts
This page allows you to search for a timeframe and view all Voicemail transcripts on a specific customer or system-wide. It will show the voicemail name, its extension, how much time was used measured in 15-second increments and the result.
Network Management
DHCP Server Configuration: Enable this option to enable the SolSwitches built-in DHCP server on a specific interface. This should be used only when there are no other DHCP servers on the same network.
Nat Settings: You must complete this section if your SolSwitch is behind NAT and you intend to use a SIP device outside of the network. Specify the external IP address that should be used for SIP and voice traffic. The Internal Network section specifies all subnets that are internal to the SolSwitch. For example, if your internal network is 192.168.0.0 to .255 then you would specify 192.168.0.0 as Internal Network IP and 255.255.255.0 as the Subnet Mask.
Network Interfaces: This section is used to specify IP information for each of the SolSwitch's network interfaces as well as DNS information. You may specify whether interfaces are static or automatic (DHCP). Secondary (alias) IP addresses on a single interface are supported.
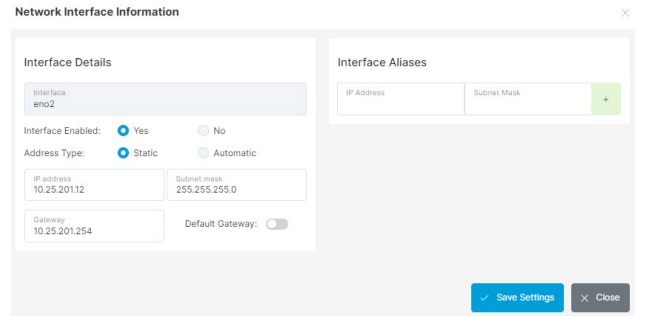
Network Tools: This provides basic network commands to assist with troubleshooting. Select one of the following commands, Ping, Traceroute or Arp then click on 'Execute'.
- Ping: This will ping the destination IP. Broadcast (-b) allows a ping to a broadcast address. Timeout (-w) specify a timeout, in seconds, before ping exits regardless of how many packets have been sent or received (default 5). Interval (-i) wait interval in seconds between sending each packet (default 1, value must be at least 0.2).
- Traceroute: This will show wall hops along the route to the IP. If Disregard hostnames (-n) is selected, there will be no resolution trying to map the IP addresses to host names when displaying them.
- Arp: Address Resolution Protocol will show all MAC addresses and their associated IP addresses on all SolSwitch interfaces.
- Static IP routes: If you have multiple subnets or gateways on your network you may need to specify static routing. Use this section to specify static routes.
Reboot / Shutdown
This option also allows you to remotely restart or shutdown the SolSwitch. The Graceful Shutdown button will wait until all calls are completed before shutting down.
Recording Backup
This section is used to archive call recordings to a separate server. To use this feature, you must have access to a separate FTP or SFTP server. Enter the server IP or hostname, username, password and path to match your FTP or SFTP account information. The Day Limit field specifies how many days to keep recordings on the SolSwitch before archiving. After a recording has been archived, it is still accessible through the SolSwitch interface as long as it has not been removed from the archiving server.
SMS Providers
Here you can add an SMS provider and that will allow it to be selected on any DID added to DID Management.
- Provider Name: Used for identification purposes, this is what will show in DID management.
- Provider Type: Select from a list of available SMS providers.
- URL: Provider endpoint URL for sending outbound SMS.
- Backup URL: Backup ULR to use if the primary fails.
- Account/Username: Account username or account number for authentication (if required).
- Key: Key or password for authentication (if required).
SNMP Configuration
The SolSwitch supports SNMP v1 and v2c on UDP port 161, allowing external monitoring platforms to poll the SolSwitch for system health and status information.
To enable SNMP access, add a community from the SNMP Configuration page. Each entry specifies a community string, the source IP address allowed to poll using that community, and a subnet mask. Only traffic from the configured source IP will be accepted; all other SNMP traffic is blocked at the firewall.
- Community Name: The community string the polling server must use to authenticate. This is case-sensitive.
- Network Address: The IP address of the server that will be polling the SolSwitch.
- Subnet Mask: The subnet mask for the network address. Use 255.255.255.255 to restrict access to a single IP.
Available Data: The SolSwitch exposes standard system information (system description, name, contact) as well as storage and interface data. In addition, the following SolSwitch-specific status values are available through the interfaces table:
- Voice / SIP Status (ifIndex 10) — Whether the SIP service is up or down, and the total number of calls processed since the last SIP service restart
- HA Sync Status (ifIndex 11) — Whether the high-availability sync is active.
- LB Sync Status (ifIndex 12) — Whether the load-balancer sync is active.
- DB Sync Status (ifIndex 13) — Whether the database sync is active.
For each status interface, ifOperStatus returns 1 (up) or 2 (down). Total calls processed is returned via ifInOctets on the Voice interface. These values are updated every minute.
Custom OIDs for SolSwitch-specific monitoring:
- SIP service status:
.1.3.6.1.2.1.2.2.1.8.10 - Total calls processed:
.1.3.6.1.2.1.2.2.1.10.10 - HA sync status:
.1.3.6.1.2.1.2.2.1.8.11 - LB sync status:
.1.3.6.1.2.1.2.2.1.8.12 - DB sync status:
.1.3.6.1.2.1.2.2.1.8.13
SolSwitch Logins
Allows configuration of logins shared between multiple systems. For additional information about configuration, please see the system administrator.
System Settings
Call Retention: Allows control over how long call records are kept before being removed from the system.
General:
- Web Address: If your system is behind a router, specify the external IP address or hostname used to access the web interface.
- Provisioning Server: Similar to the Web Address, this field defines the external IP address or hostname used to provision devices. In most cases, the Provisioning Server address is the same as the Web Address appended with /prov.
- Main Email: From address to use when sending out alerts.
- Alert Notify Email: Email address to send system alerts to.
- Timezone: Specify the correct time zone for the location of the SolSwitch.
- Default Recording Language: The default language used for system recordings. This can be overridden on individual customers or on some system features, such as Queues and IVRs.
- Default NTP Server: Where the SolSwitch should get its time.
- Allow TCP SIP Traffic: Allow incoming TCP SIP to the server. When set to no, this traffic will be dropped by the firewall.
- Cross Customer Routing: When placing a call to a DID belonging to a different customer on the same SolSwitch, determine how to route the call; Direct route - Route internally to the DID, staying local to the system (treated as one continuous call); Route Group - Route the call externally through the normal group process, and let the upstream route direct a new call back (treated as two distinct calls).
Global MFA: Configure system-wide Multifactor Authentication settings.
- Enable MFA: When enabled, all portal users on the system will be required to set up MFA before accessing the portal.
- MFA Phone Call CID: The caller ID name displayed when the system places a phone call for MFA verification.
- MFA Phone Call DID: The DID used to place outbound phone calls for MFA verification.
- MFA SMS DID: The DID used to send SMS messages for MFA verification.
- Force MFA by User Type: Require MFA for users of specific portal user types. Users of a selected type will be prompted to set up MFA on their next login if they have not already done so.
SIP Servers: If the SolSwitch can be accessed from multiple hostnames or IP addresses, you would specify them here.
SMTP Servers: The SolSwitch sends out emails for alarm notifications, voicemail to email and other features. Specify the SMTP Server to use to send email. Enter the username and password for the SMTP server if the server requires authentication.
SolSwitch Connect Servers: Here a SolSwitch Connect Server name, host address auth name, auth key and top-level group are added. You can view the maximum number of users allowed on the system. If you need more users we will add them for you.
Voicemail to Email: This section allows control over how voicemail email messages are generated. Attach Message specifies whether or not the audio file should be attached to the email. The email body can be configured using the variables provided. Below is an explanation of what each voicemail variable represents:
- ${VM_NAME} - Mailbox owners name
- ${VM_DUR} - Length of message
- ${VM_MSGNUM} - Message number
- ${VM_MAILBOX} - Mailbox the message is in
- ${VM_CIDNUM} - Caller ID number
- ${VM_CIDNAME} - Caller name
- ${VM_CALLERID} - Caller ID Info ex: "John Smith" <5551234466>
- ${VM_DATE} - Date the message was left
- ${VM_TIME} - Time the message was left
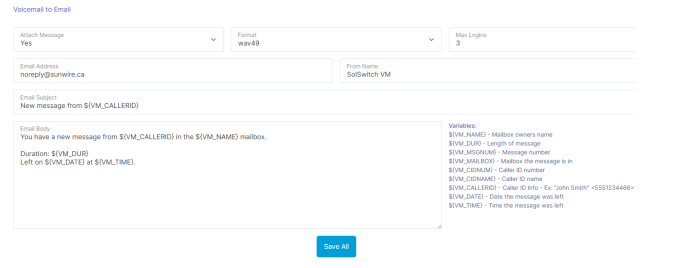
System Updates
Check for new software updates and update your system to the latest version.
When checking for updates, the system will compare your current software to the two most recent releases:
- Stable Release: The most recent version proven in production over time, with hotfixes applied for known issues.
- Bleeding Edge Release: The latest version with new features and improvements, tested in development but with limited production exposure.
In order to update without incurring a fee, your system must be covered by a Software Assurance plan. Updates also cannot be completed from this page for systems configured for High Availability or Load Balancing.
If you have questions about any of these items, please don't hesitate to contact us. Contact information can be found at: https://www.sunwire.ca/company/contact/
Toll Billing
Toll Management
- Toll Destinations: If you have already specified toll destinations, click the Export to CSV button to view or edit the data. If this is your first time using this feature, a CSV file must be created and uploaded. For this, you may use any spreadsheet application. The CSV must be formatted as follows:

The first row must be a header row. The first column specifies the Area. The second column specifies the area's calling Prefix. The third column is for informational purposes only but is still required. This column defines your cost for the area. All remaining columns must match the rate lists specified in Toll Rate Lists.
- Toll Rerun: This re-processes toll Billing for the specified time range. All tolls will be reprocessed the next time toll billing runs at 1 AM the next day, from the chosen date until the current date. The selected date range must be 2 months or less.
- Toll Sync: This will sync this SolSwitches toll billing with another SolSwitch using a Toll Billing Info API key. The SolSwitch will automatically sync itself every hour except for 1 AM when toll billing is processed. Press the Sync Now button to sync immediately.
Toll Minute Groups
This section is used to specify areas that may be included in a plan at a special rate. In other words, the Toll Minute Groups will override the previously uploaded Rates List when applicable. To create a minute group, simply choose a name and add all prefixes on individual lines.
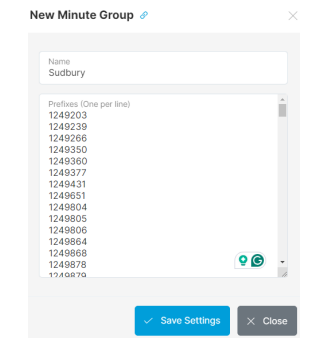
Toll Plans
Toll plans are used to create price plans that will be assigned to customers in order to determine the rates for billing their services and usage. Each billable service has its own set of toll plans, described in the sections below.
Most toll plans are set on a per-customer basis - see Customer Management for more details - however SMS Toll plans are set Per-DID, within Trunks And Routing -> DID Management.
Toll Plans - Calls
Billing for long distance and toll free calling.
Each plan requires a name and a rate list. All minute groups will be listed here under the Minute Groups section. These fields are used to specify the number of minutes allowed in a given month to that area without incurring the associated rate list costs. If 1,000,000 or more minutes are specified, the system will treat it as unlimited calling. The following options are also available on this page:
- Billing Increment: The increments, in seconds that will be used to calculate billing. The first number is the minimum billing time, and the second is the increments to be used after the minimum. For example, with 30/6, a 10-second call will be billed as 30 seconds, and a 31-second call will be billed as 36 seconds.
- Unlimited Local Calls: Local calls will be determined using the extension Caller ID and rate centers set up on the system. If the external number is not in the same rate center, it will be considered a long-distance call.
Toll Plans - Emails (SolCast)
Billing for outbound emails sent by SolCast campaigns. Rates are set as $ per email sent.
Toll Plans - MCQ
Billing for Facebook or Webchat messages sent through Multichannel Queueing. For billing SMS messages sent through MCQ, see Toll Plans - SMS.
Rates can be configured for Facebook and Webchat individually, both with options for inbound and outbound pricing. Prices are in $ per message.
Toll Plans - Recordings
Billing for storage being used by call recordings. Usage is billed based on total usage on a monthly basis. Ex, a customer storing 100 minutes of recordings a month being billed at $0.01 per minute would be billed $1 in month 1 for a total of 100 minutes, $2 in month 2 for a total of 200 minutes, etc...
Can be set to bill either per MB of storage or per minute of usage. One minute of call recordings is equal to approximately 250KB, or 0.25MB, on average.
Toll Plans - Smart IVR
Billing for calls handled by Smart IVRs on the system.
Smart IVRs combine multiple billable system features as part of their functionality, such as Speech-to-Text, however their usage is excluded from other billing and handled separately.
Rates can be configured based on the IVR Type (Standard, TaxiCaller integrated, etc...) and will be billed per-call that connects to the IVR.
Toll Plans - SMS
Billing for SMS and MMS traffic sent and received by the system.
Allows rates to be configured for SMS and MMS individually, both with options for inbound and outbound pricing. Messages are billed per segment, where one segment is 160 characters. Ex, one SMS containing 200 characters would be billed for 2 segments.
A rate can also be configured for carrier lookup costs, for SMS configurations that have an additional cost associated with that service.
Toll Plans - Speech-To-Text
Billing for various Speech-To-Text services on the system.
Rates can be configured for the following options:
- IVR - Options/Prompts
- IVR - Dial-By-Name
- Call Transcription - Priority
- Call Transcription - Dynamic
- Voicemail Transcription
All rates are billed as $ per minute of transcription time, which is calculated per channel of audio that needs to be transcribed. Ex, a 2 channel call that lasted 1 minute is a total of 2 minutes of audio being transcribed.
For Dynamic vs Priority transcription, Priority transcription generally has a higher cost as it completes the transcription immediately, whereas Dynamic will complete the processing when resources are available within 24 hours. Voicemail and IVR transcriptions are always completed using priority processing.
Toll Plans - TTS
Billing for text converted to speech on system.
Billing for text to speech is set as cost per 1,000 characters. Character counts are rounded up to the nearest 1,000 per-transcript generated. For example, a transcript generated for 1,001 characters is billed as 2,000 characters.
Toll Rate Lists
Specify the names of each rate list that you will be offering customers. For example, retail or wholesale.
Toll Reporting
Use this section to pull reports regarding call accounting, SMS tolls, Multichannel Messaging tolls, Speech to Text, and Text to Speech tolls. Reports can be downloaded in CSV, PDF or XLS format. Types of reports are as follows:
- Summary by Customer: Display selected customer(s) and total monthly charge.
- Detail by Customer: Display selected customer(s) and all individual calls for the month.
- Summary by Extension: Display a summary of selected customer(s) and extensions by month.
- Detail by Extension: A report for individual or all extensions for selected customer(s).
- Detail by Extension: A report for individual or all extensions for current customer.
Summary and Detail by extension are only available for Calls and SMS.
Trunks and Routing
This section is used to configure trunks as well as inbound and outbound routing.
DID Management
Use this section to add or remove DIDs on the SolSwitch. DIDs can be added as a single DID or a range. Rate Center, Description and Notes fields are for informational purposes only. The Customer field specifies the customer to assign the DID to. This field will only be displayed if the Multi-Tenant License was purchased.
The Active field specifies whether or not the DID is active. You also can strip caller ID name and number from a DID as soon as it arrives in the system. This is flagged per DID - keep in mind that Caller ID information will still be available in trace files.
The Call Limit field allows you to specify how many incoming calls the DID can receive at once. Set this value to 0 for unlimited.
The Apply Toll field is to be Enabled if you would like calls to this number to be processed by toll billing as a toll-free number.
The SMS provider field allows you to select from SMS providers configured in Advanced Tools -> SMS Providers to allow the DID to send and receive SMS.
Rate Centres
Rate centres are used in route groups (discussed next). This section allows for outbound routing to be area-based rather than prefix-based. Rate centre information is automatically downloaded from LocalCallingGuide.com. To add a Rate Centre, click the Add Rate Centre button. Simply enter the Name of the Rate Centre along with any NPA and NXX (Area Code and Exchange) in that area.
To update Rate Centre data, simply click the Edit button on any existing Rate Centre and click the Update Rate Centre button. This will ensure that Rate Centre prefixes are kept up to date.
Route Groups
Route Group tables are used to handle call routing. To add a new Route Group, select the Add New Group button. If this will be the default route group, click the check box. A check mark will be displayed next to your default route in the Route Groups list. An option is available for an incoming call to skip to the next trunk in the Route Group if the current one is busy. To edit an existing route group name, click the Edit icon. To manage a route group, click the Manage icon.
Adding Routes: Each entry in the Route Group table is capable of supporting unlimited routes. To add a new route, click the 'Add New Route' button. The following must be specified:
- Type: Specify whether the SolSwitch should route based on prefix or rate centre.
- Route Prefix: Specify the prefix to match on the dialled number.
- Match Length: Specify the full length of the number to match. Use 0 to match any length.
- Strip Digits: Strip this many digits from the beginning of the dialled number before routing.
- Dial Prefix: Prefix the following string to the dialled number before routing.
- Route To: Specify whether to route to a trunk or another route group table.
Adding Failover Routes: If the primary route fails a failover route will be attempted. To add a failover route, click 'Edit' on an existing Route and then click the Add New Route button. Specify the following information and click the 'Save' button:
- Strip Digits: Strip this many digits from the beginning of the dialled number before routing.
- Dial Prefix: Prefix the following string to the dialled number before routing.
- Route To: Specify whether to route to a trunk or another route group table.
Editing Routes: When editing a route, two additional options become available:
- Require Pass Code: Specifies whether or not a user must enter a passcode before a call is completed to this route. Passcodes are specified per extension (see Extensions section for more details).
- Force Trunk Caller ID: If enabled, this option allows caller ID name and number to be overwritten when a call is placed to this route.
- Managing Priorities: While editing a route with multiple entries, you will be given the option to adjust priorities. Priorities specify the order in which the routes are tried.
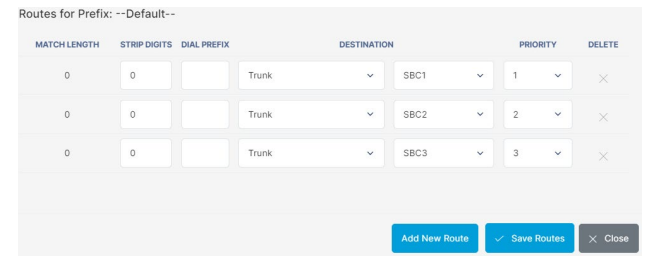
Trunk Management
Trunks are used to connect the SolSwitch to another SolSwitch, PBX or provider. The following options are available for every trunk:
- Trunk Name: Specify the name of the trunk.
- Description: Information purposes only.
- Call Limit: The trunk will be limited to this many calls. Enter 0 for unlimited.
- Record Trunk Calls: Enable this option to record all calls passing through this trunk.
- Allow Dynamic Conf: Allow trunk to use # codes to place conference calls.
- Apply toll to trunk: Enable calls passing through this trunk to be processed by toll billing.
- SIP Device: Specify the SIP account that will be used as a trunk.
- Inbound Calls
- Use Local Routing: If this option is selected, all incoming calls will be compared to the local extension table for termination. This option is usually used when connecting the SolSwitch to another PBX. If there is no match, the system will proceed to 'Use DID table'.
- Use DID Table: If this option is selected, all incoming calls will be compared to the local DID table for termination. If there is no match, the system will proceed to 'Use Route Group'.
- Use Route Group: If this option is selected, calls will be routed according to the route group specified. If there is no match, the call will be rejected as an invalid number.
- Digit Manipulation
- Add Prefix: The string specified in this field will be prefixed to any incoming DID.
- Strip Digits: The system will strip this many digits from the beginning of any incoming DID.
- Outgoing Calls
- Use E.164 Numbering: The international standard for phone number formatting. Enabling this will make sure that numbers follow the format.
- Unlimited Outbound Calls: enable the trunk to have unlimited outbound calls as long as it is under the call limit (if it is set).
- Accessibility: When using SolSwitch with Load Balancing, this option specifies which SolSwitch has access to this trunk.
Security
Portal Permissions
In this section, you control permissions for each portal user type by selecting the corresponding checkboxes.
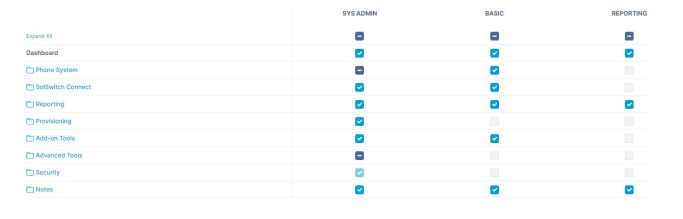
Portal User Types
Set your different types of users so that you can give them particular permissions.
Portal Users
Add, edit or remove portal users as well as designate their portal user type. To add a new portal user, select the Add Portal User button. To edit or delete an existing portal user, click the corresponding icon to the far right of the user.
- First Name: Specify the first name of the user.
- Last Name: Specify the Last name of the user.
- Email: Enter the email associated with the user.
- Authentication: The authentication method used to log in the user.
- Password: Enter the username and password that is configured on the Solswitch. The first and last name, password and email will need to be entered manually as well. If this field is left empty, an email will be sent to the email address being used containing a link to create a password.
- LDAP: A username and password will be entered and must match with the configured LDAP server. User details like first and last name and email will be given automatically. No password is configured here although RDNs can be configured if necessary.
- User Type: Determines the level of access the user is given. Types can be configured in Portal User Types. Extension Users are given extra options like User Extension and Meet Me Conferences
- Menu Type: Options include Categorized and Uncategorized. This defines whether users will see subcategories or not in the menu.
- User Extension: If set to be an Extension User, this option specifies what extension the user will be assigned to.
- Customer Access: If the user type doesn't have access customer management, this option will give the user access to none, 1 or more customers.
- CDR Settings: Allow users to delete recordings or filter the CDRs they can see.
- Meet Me Conferences: Configure meet me conferences the extension user will have access to.
- Profile Image: A user profile image can be uploaded. It will be displayed in the topbar and next to the user's name in the list of portal users.
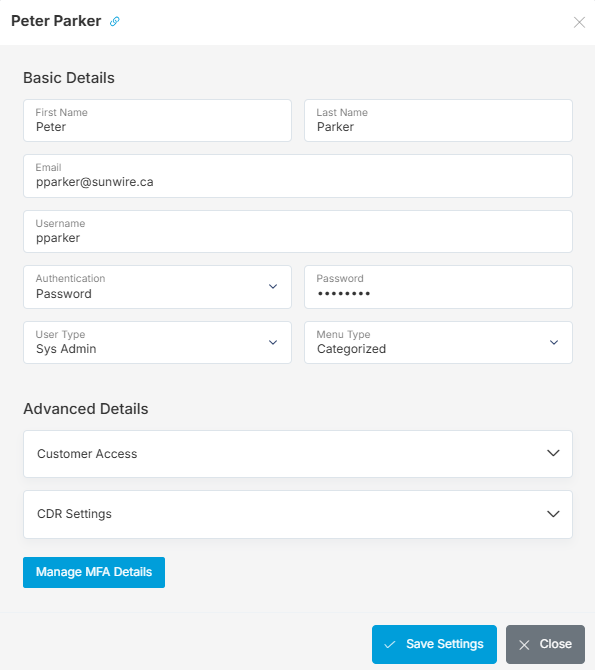
Manage Multifactor Authentication (MFA) Details
If the user has access to MFA settings, these settings can be accessed by clicking the 'Manage MFA Details' button. Select an authentication method and follow the steps to create it. Here are the supported methods:
- Email: Receive an email with the code.
- Phone Call: Receive a phone call that will tell you the code.
- SMS: Receive an SMS message that provides the code.
- Authenticator App: When logging in, refer to the authenticator app to accept the request.
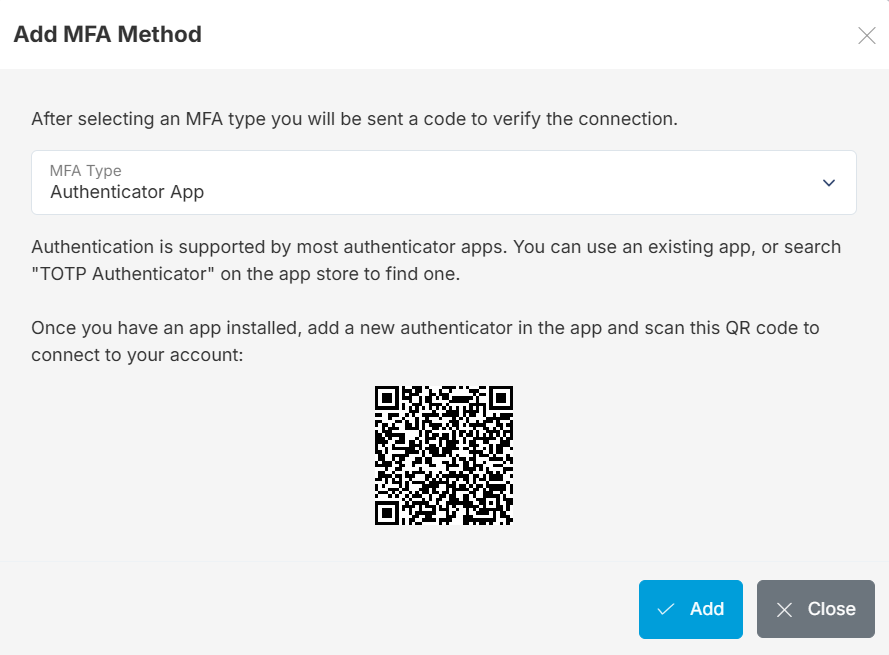
LDAP Server
LDAP server manages and stores directory information. It can be configured on the Portal User List page.
- Server: Server domain or IP address.
- Port: Specify port number.
- Use SSL: Decide to use Secure Sockets Layer security protocol or not.
- Search Base: Base directory in which to search for entires in the server.
- Authentication Type: Selecting username format to use for authenticating users on the server.
- Domain: Domain to append to usernames when using a 'DOMAIN' authentication method.
- Admin Credentials: If more advanced features are required, admin user credentials need to be provided here.
- Attribute Controls: Optional settings used to retrieve use data from the server.
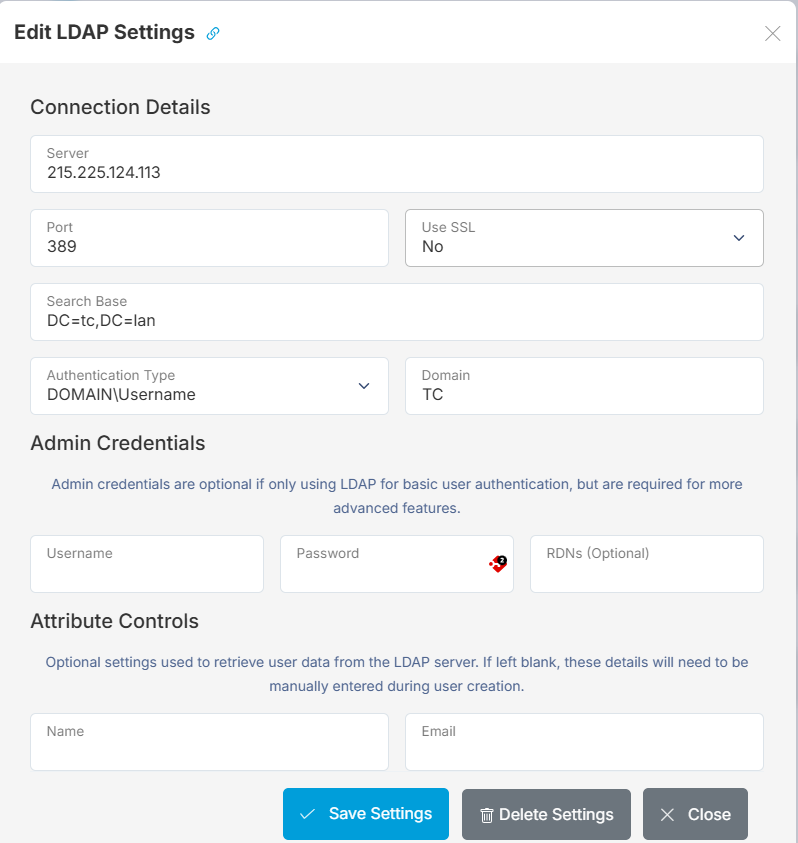
Documentation
APIs
This document outlines the API interface used for interacting with SolSwitch systems through outside applications.
APIs - SMS
This document outlines the messaging interface for application providers for the purposes of sending and receiving SMS short and long code messages.
Change Log
Lists the change history of the SolSwitch, such as new and updated features as well as bug fixes.
Custom Scripting
SolSwitch supports the integration of custom scripts, allowing a low-code implementation of custom functionality that goes beyond the default system features. This document details instructions and the available functions.
Notes
The Notes section allows you to add several text notes with anything that should be documented. Click 'Add Note' then add a name for the note and the text of the note. Please know each note is limited to 2000 characters.

Required Ports
SIP devices (trunks, phones) - Allow from/to the SolSwitch
TCP - 80
TCP - 443
UDP/TCP - 5060
TCP - 5061
UDP - 10k to 20k
SolSwitch updates/upgrades (updates.solswitch.com)
TCP - 80
TCP - 443
SSH - Allow 207.38.48.9 inbound and outbound
TCP - 22
SSC - Push IPs (listed below) from/to all clients (desktop, mobile, local and internet) and the SolSwitch
push.solswitch.com - 207.38.48.27
push.softphone.com - 34.54.173.59
push1.softphone.com - 216.93.246.121
push2.softphone.com - 216.93.246.122
push-as.softphone.com - 35.185.177.49
push-as3.softphone.com - 35.240.151.194
push-eu.softphone.com - 35.195.163.239
push-eu2.softphone.com - 34.89.45.1
push-ue.softphone.com - 34.54.173.59
TCP - 443
TCP/UDP - 2197
TCP/UDP - 5223
TCP/UDP - 5229
TCP/UDP - 5230
TCP/UDP - 5060
TCP - 5061
XMPP/Presence (prov.solswitch.com) - Reach from/to all clients and the SolSwitch
TCP - 443
TCP - 1080
TCP/UDP - 5222
TCP/UDP - 5291
TCP - 8082
TCP/UDP - 8889
TCP/UDP - 8990
MS Teams servers (ssteams01.solswitch.com, ssteams02.solswitch.com) - Inbound and Outbound
UDP/TCP - 5060
TCP - 5061
UDP - 10k to 20k
SolSwitch Load Balancing
TCP - 3306
Glossary
Agent - End user using the telephone system.
API - Application Programming Interface. Allows external systems and software to interact with the SolSwitch in various ways.
ATA - Analog Telephone Adapter required when older technology phones are used.
Call Leg- Call Leg is a discrete segment of a call connection in a VoIP network, or a single "step" of a call.
CDR - Call Detail Records. A record of each call processed by the system, including each call leg and the result of those legs.
CID - Caller Identification, also referred to as Caller ID, is the name and telephone number that display on phones receiving calls.
DID - Direct Inbound Dial. This refers to all standard 10 digit telephone numbers, including toll-free numbers. Ex, 7055551234 would be a DID.
DTMF - Dual Tone Multi-Frequency signalling used for telecommunication signalling over analog telephone lines. In most cases these are the tones generated by pressing buttons on your phone's dialpad while in a call.
FMFM - Find-Me Follow-Me. A system feature that allows incoming calls to follow a set of steps for numbers to call in order to try and connect the caller to their destination.
IP Phone - Internet Protocol phone. A phone that places calls over the internet instead of using traditional telephone lines.
IVR - Interactive Voice Response. An automated system with a pre-recorded message, allowing the caller to select a destination by pressing a digit on their phone.
MFA - Multifactor Authentication. A secondary authentication method beyond the standard username & password combination, such as a code sent by SMS or email.
MCQ - Multichannel Queuing. A modern version of the traditional phone queue, allowing incoming requests from other channels such as SMS or Webchat to be queued alongside phone calls and assigned to agents.
MWI - Message Waiting Indicator. Flashing red light on phones that indicates someone left a voice message.
NANP - North American Numbering Plan. The 10 digit telephone number format that is standard in North America: (NXX) NXX-XXXX
NAT - Network Address Translation. The translation of an Internet Protocol address (IP address) used within one network to a different IP address known within another network.
NPA - Numbering Plan Area Code. The first three digits of a 10-digit North American Numbering Plan (NANP) number, commonly called the Area Code.
NPX - Central Office Code. The first three digits following the Area Code in a 10-digit NANP number, commonly called the telephone exchange or prefix.
OCN - Operating Company Number.
PARK - Parking or Parking Lots are a shared place for putting callers on hold, allowing their call to be picked up by another phone.
PBX - Private Branch Exchange. A phone system, such as the SolSwitch, that manages inbound and outbound calls to the public telephone network, and generally supports features such as voicemail and conferencing.
PoE - Power over Ethernet. Allows IP Phones to receive power through the same line that provides them internet, instead of connecting a secondary power source.
RTP - Real-time Transport Protocol. The network protocol used in VoIP for transmitting the audio or video data of a call.
SIP - Session Initiation Protocol. The network protocol used in VoIP for initiating, managing and ending calls.
SL - Service Level. A call center reporting metric, used to determine the ratio of inbound calls that are answered in an acceptable amount of time.
SRTP - Secure Real-time Transport Protocol. An encrypted form of standard RTP that allows for more secure communications over VoIP.
SSC - SolSwitch Connect. Communication software designed to work with the SolSwitch.
Trunk - A trunk is a communication line between two switching systems.
TCP - Transmission Control Protocol. A protocol for SIP communication, generally delivers data more slowly but more reliably than UDP. Not recommended outside of specific use cases that require it.
TLS - Transport Layer Security. An encrypted protocol for SIP communication, recommended for devices that support it when security of call data is a priority.
UDP - User Datagram Protocol. The default protocol used for SIP communication in most VoIP systems, delivers data quickly to reduce or prevent delays in transmission.
VoIP - Voice over Internet Protocol. The overarching protocol that allows phone calls to be processed over the internet, making use of many other protocols such as SIP and RTP.